If you’re facing issues with your Keurig K-Latte Single Serve Coffee and Latte Maker, don’t worry! This comprehensive troubleshooting guide will help you identify and fix common problems, ensuring that your machine is back in action for the perfect cup of coffee or latte.
Common Issues with Keurig K-Latte and How to Fix Them
1. Brewer Will Not Turn On
If your Keurig K-Latte isn’t powering up, check the following:
Solution 1: Check Power Supply
- Ensure the machine is plugged into a grounded outlet.
- Verify that the circuit is not overloaded by other appliances. The brewer should operate on its own circuit.
- Press the power button to see if the green light turns on. If it doesn’t, try plugging the machine into another outlet.
Solution 2: Automatic Shut Off
- Your brewer will automatically turn off 2 hours after the last brew for energy savings. Press the power button to turn it on again.
Solution 3: Contact Customer Support
- If none of the above solutions work, contact Keurig Customer Service at 1-866-901-BREW (2739).

2. Brewer Not Brewing Properly
There are a few reasons why your Keurig may not be brewing:
Solution 1: Check Water Reservoir
- Ensure the water reservoir is seated properly in the brewer.
- If the “Add Water” light is on, refill the reservoir to the MAX fill line and check again.
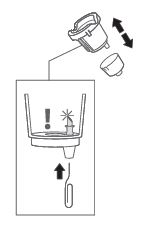
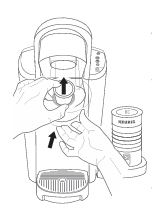
Solution 2: K-Cup® Pod Holder Issue
- Ensure that the K-Cup® pod holder is properly inserted and that the handle is pushed down completely. If the K-Cup® pod isn’t punctured, lift the handle and reinsert the pod.
Solution 3: Descale the Brewer
- Calcium buildup can prevent brewing. Descale your brewer every 3-6 months. Use Keurig’s descaling solution to remove mineral deposits that can hinder performance.
3. Brewer Only Brews a Partial Cup
If you’re only getting a small amount of coffee, here’s what to do:
Solution 1: Clean the Exit Needle
- Grounds may be blocking the exit needle. Use a straightened paper clip to gently clean the exit needle from the K-Cup® pod holder.
Solution 2: Water Reservoir Issue
- If the water reservoir was removed during brewing, reattach it and run a rinsing brew without a K-Cup® pod.
Solution 3: Descaling the Brewer
- If your brewer still brews partial cups after cleaning, repeat the descaling procedure.
4. Frother Not Working
If you’re having trouble frothing milk, try the following:
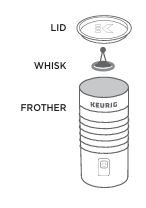
Solution 1: Wait Between Brewing and Frothing
- If the frother light does not illuminate after pressing the button, wait for 30 seconds after the brewing cycle has completed. Then press the frother button again.
Solution 2: Frother Power Issues
- If the frother still does not work, check to see if the frother is properly connected to the base. If the issue persists, contact Keurig Customer Support for assistance.
5. Grounds in Your Coffee
If you notice coffee grounds in your brewed cup, the needles might be clogged:
Solution 1: Clean Entrance and Exit Needles
- Use a straightened paper clip to clear any coffee grounds from both the entrance and exit needles in the K-Cup® pod holder.
6. Brewer Shuts Off Unexpectedly
If your Keurig shuts off unexpectedly during brewing:
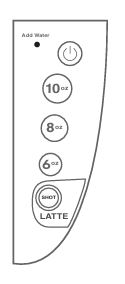
Solution 1: Power Button Check
- Ensure the power button is turned on. Press it to see if the green light turns on.
Solution 2: Brewing After Frothing
- If the frother was used before brewing, you may need to wait for 30 seconds after frothing before you can brew again.
7. Water Quality Issues
If you notice an undesirable taste in your coffee, like a chlorine or mineral taste, this could be due to poor water quality.
Solution 1: Use Filtered Water
- Use filtered or bottled water instead of tap water to improve the taste of your coffee.
- Install a Keurig® Water Filter to remove impurities from the water supply.
Solution 2: Descale Regularly
- Descaling removes mineral deposits that can affect the taste of your coffee. Perform regular descaling every 3-6 months.

Additional Tips for Maintaining Your Keurig K-Latte
1. Cleaning Your Brewer Regularly
Keep your Keurig machine running smoothly with regular cleaning:
- Water Reservoir & Lid: Clean periodically with a damp, non-abrasive cloth or on the top rack of the dishwasher.
- Frother: Clean immediately after each use with warm, soapy water. Do not submerge the frother in water, and use a soft cloth to clean the interior.
- Drip Tray: Empty and clean the drip tray regularly to prevent overflow.
2. Descaling Your Brewer
To maintain performance, descaling should be done every 3-6 months. Use Keurig® Descaling Solution to remove scale buildup and keep the internal components of the brewer functioning properly.
FAQs About Keurig K-Latte Troubleshooting
What should I do if my Keurig K-Latte is not brewing?
Check the water reservoir, ensure the K-Cup® pod is properly inserted, and descale the brewer if necessary.
Why is my frother not working?
Wait for 30 seconds after brewing before using the frother. If it still doesn’t work, contact Keurig Customer Service.
How can I improve the taste of my coffee?
Use filtered water and regularly clean and descale your Keurig machine to remove impurities.
My machine shuts off unexpectedly. What should I do?
Make sure the power button is on and check if the machine is in energy-saving mode (it will turn off after 2 hours).
Conclusion
By following this troubleshooting guide, you’ll be able to resolve common issues with your Keurig K-Latte Single Serve Coffee and Latte Maker. Regular maintenance, including cleaning and descaling, will help keep your machine in top condition. If you’re still facing issues, don’t hesitate to contact Keurig Customer Service for further assistance. Enjoy your perfect cup of coffee or latte, every time!
Here’s a short table summarizing common issues and their solutions:
| Issue | Possible Causes | Solutions |
|---|---|---|
| Brewer Not Turning On | Power supply issue, overloaded circuit | Check outlet, ensure it’s on a dedicated circuit, press power button |
| Brewer Not Brewing Properly | Incorrect pod placement, water reservoir issues | Ensure K-Cup® is inserted properly, refill water reservoir |
| Partial Cup Brewing | Clogged exit needle, water reservoir removed | Clean needles, reattach water reservoir, descale brewer |
| Frother Not Working | Power issues, interference with brewing cycle | Wait after brewing, check frother connection |
| Grounds in Coffee | Clogged entrance or exit needles | Clean both entrance and exit needles with a paper clip |
| Unexpected Brewer Shutdown | Power button off, frother interference | Ensure power button is on, wait after frothing before brewing |
| Water Taste Issues | Poor water quality | Use filtered water, install water filter, descale regularly |


0 Comments