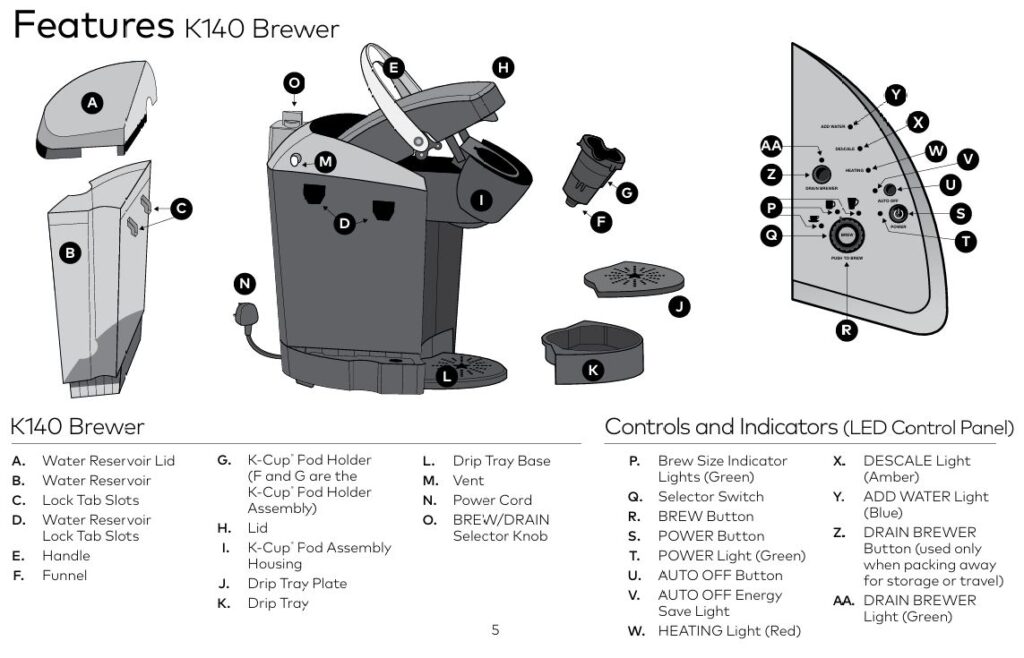
The Keurig K-140 Commercial Brewing System is a powerful, reliable machine that makes brewing coffee, tea, and hot beverages easy. Ideal for offices and commercial spaces, it provides fast brewing and consistent results. However, like any other appliance, the K-140 brewer can encounter technical issues.
Whether it’s a brewing error, flashing lights, or power problems, this guide provides comprehensive troubleshooting solutions to help you get your Keurig K-140 back to perfect working condition.

Common Problems with Keurig K-140 Commercial Coffee Maker
While the Keurig K-140 is known for its efficiency and durability, users may face common problems such as:
- Brewer not powering on
- Brewer failing to brew
- Flashing indicator lights
- Brewing partial cups
- Water dispensing issues
This troubleshooting guide will walk you through step-by-step solutions to resolve these issues and keep your brewer running smoothly. Whether you’re dealing with power issues or clogged needles, you’ll find a solution here to get your Keurig K-140 back on track.
Problem 1: Brewer Does Not Power On
Possible Causes:
- Loose power cord
- Electrical outlet problems
- Brewer malfunction
Solutions:
- Check the Power Cord and Outlet:
- Ensure the power cord is securely plugged into the electrical outlet.
- Try plugging the brewer into a different outlet to rule out any issues with the original one.
- Make sure the power switch on the outlet is turned on.
- Check the Circuit Breaker:
- If the power is still not working, check your circuit breaker. If it has tripped, reset it to restore power to the outlet.
- Reset the Brewer:
- Unplug the brewer, wait for 30 seconds, and then plug it back in.
- Check the POWER Light on the control panel. If it’s green, the brewer is powered on.
Problem 2: Brewer Does Not Brew
Possible Causes:
- Incorrect settings
- Empty or improperly seated water reservoir
- Cold or frozen brewer
- Clogged K-Cup® pod holder
Solutions:

- Ensure Proper Settings:
- Make sure the BREW/DRAIN Selector Knob is set to BREW.
- Ensure the K-Cup® Pod is correctly placed in the K-Cup® Pod Holder.
- Water Reservoir Check:
- If the ADD WATER Light is on, refill the water reservoir and ensure it’s properly seated.
- Always use bottled or filtered water for the best results.
- Priming the Brewer:
- If using the brewer for the first time, make sure it has been primed according to the setup instructions. This step is critical for first-time use.
- Check for Clogs:
- If the brewer is still not brewing, the exit needle may be clogged. Use a paper clip or similar tool to clean the needle, ensuring smooth water flow.
Problem 3: Brewer Shuts Off Automatically
Possible Causes:
- AUTO OFF energy-saving feature
- Mineral build-up in the brewer (requiring descaling)
Solutions:
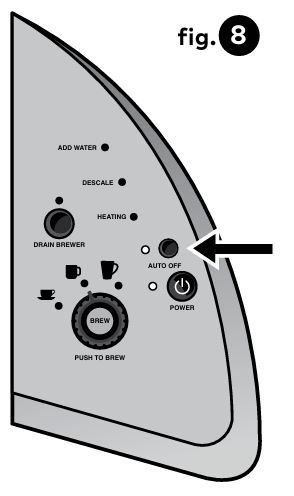
- Disable AUTO OFF:
- The AUTO OFF feature automatically turns the brewer off after 30 minutes of inactivity. To disable it, press the AUTO OFF Button, and the green light will turn off, keeping the brewer on.
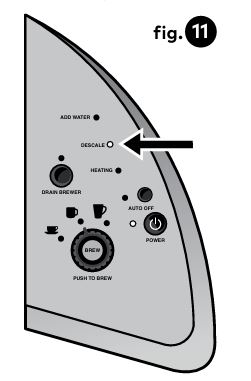
- Descaling Needed:
- If the DESCALE Light is on, it indicates mineral buildup inside the brewer. Follow the descaling instructions in the manual to restore performance.
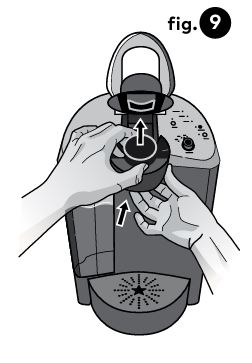
Problem 4: Water Reservoir Issues
Possible Causes:
- Water Reservoir improperly seated
- Low water levels
Solutions:
- Check Reservoir Placement:
- Ensure the Water Reservoir is correctly placed and the Lock Tabs are engaged properly. If not, reseat the reservoir.
- Refill Water Reservoir:
- If the ADD WATER Light is flashing, refill the reservoir with bottled or filtered water.
- Ensure the water level is between the MIN and MAX fill lines.
Problem 5: Brewing Partial Cup
Possible Causes:
- Clogged exit needle
- Water reservoir removed during brewing
- Need for descaling
Solutions:
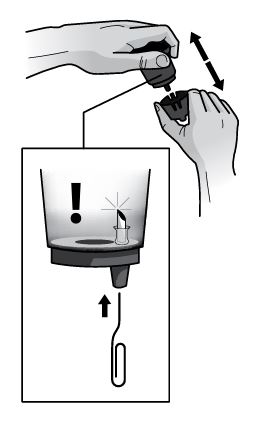
- Clean the Exit Needle:
- If the brewer is brewing only a partial cup, clean the exit needle with a paper clip or similar tool to ensure water flows freely through the pod holder.
- Ensure Proper Water Reservoir Placement:
- Double-check that the Water Reservoir is properly seated. If it is removed or improperly seated during brewing, it will prevent the full brewing process.
- Descale the Brewer:
- If the DESCALE Light is on, follow the descaling process described in the manual to remove mineral buildup that may be blocking the water flow.
Problem 6: Flashing Indicator Lights
Possible Causes:
- HEATING Light flashing: Brewer is heating water
- ADD WATER Light flashing: Water reservoir is empty
Solutions:
- HEATING Light Flashing:
- It is normal for the HEATING Light to flash while the brewer is heating the water. Once the water has heated, the light will turn off and the brewer will be ready to brew.
- ADD WATER Light Flashing:
- If the ADD WATER Light is flashing, the water reservoir is empty or improperly seated. Refill the reservoir with clean, filtered water and ensure it is correctly positioned on the brewer.
Problem 7: No Water Dispensed
Possible Causes:
- Water Reservoir is empty or improperly seated
- Clogged water lines
Solutions:
- Refill Water Reservoir:
- Ensure the Water Reservoir is full. If empty, fill it with fresh, clean water.
- Check for Clogs:
- If water is still not dispensed, the exit needle or water lines may be clogged. Follow the cleaning instructions to clear any blockages.
Preventative Maintenance Tips
Regular Cleaning:
- K-Cup® Pod Holder: Clean the K-Cup® Pod Holder and exit needle regularly to prevent clogging.
- Water Reservoir: Periodically rinse the Water Reservoir with soapy water and ensure it’s free from debris.
Descaling:
- Perform descaling every 3-6 months depending on water hardness. Mineral buildup from hard water can damage internal components and reduce the brewer’s efficiency.
- If the DESCALE Light appears, follow the descaling instructions in the manual to remove calcium deposits.
Water Quality:
- Always use filtered or bottled water to reduce mineral deposits and avoid potential clogging. Tap water may contain impurities that can affect the taste and performance of your Keurig K-140.
Frequently Asked Questions (FAQs)
My Keurig K-140 is not turning on. What should I do?
Ensure the power cord is properly plugged into a working outlet. Reset the circuit breaker and try pressing the POWER Button again.
Why is the brewer making noise but not brewing?
This could indicate a clog in the exit needle or water lines. Clean the exit needle as per the manual and make sure the water reservoir is seated correctly.
How often should I descale my Keurig K-140?
We recommend descaling every 3-6 months or more frequently if you notice decreased brewing performance.
Conclusion
By following the troubleshooting steps outlined in this guide, you can resolve many common issues with your Keurig K-140 Commercial Brewing System. Regular maintenance, such as cleaning the K-Cup® Pod Holder, descaling the brewer, and using filtered water, will help prevent these issues from occurring in the future. If problems persist despite these efforts, it’s advisable to contact a Keurig Authorized Distributor for further assistance.
Here’s a short, simplified table for key troubleshooting tips:
| Problem | Possible Causes | Solutions |
|---|---|---|
| Brewer Does Not Power On | Loose power cord, outlet issues, malfunction | Check power cord, reset circuit breaker, and confirm power light is on. |
| Brewer Does Not Brew | Incorrect settings, empty water reservoir, clog | Ensure proper settings, refill reservoir, clean the exit needle. |
| Brewer Shuts Off Automatically | AUTO OFF feature, mineral build-up | Disable AUTO OFF, perform descaling if the DESCALE Light is on. |
| Water Reservoir Issues | Improperly seated reservoir, low water level | Ensure reservoir is seated, refill with filtered water. |
| Brewing Partial Cup | Clogged needle, improper water reservoir seating | Clean the exit needle, check reservoir placement, descale if needed. |
| Flashing Indicator Lights | Heating cycle, empty water reservoir | Wait for heating to finish, refill water if ADD WATER Light is flashing. |
| No Water Dispensed | Empty reservoir, clogged water lines | Refill reservoir, clean exit needle or water lines if needed. |
By staying on top of these common problems and maintaining your Keurig K-140 properly, you can extend the life of your brewer and continue to enjoy a perfectly brewed cup of coffee, tea, or hot chocolate every time.


0 Comments