The Keurig K-4500 is a powerful and efficient coffee maker designed specifically for commercial use, offering the ability to brew coffee, lattes, cappuccinos, and more with ease. However, like any appliance, it can encounter issues from time to time. This detailed and step-by-step troubleshooting guide will help you resolve the most common problems with your Keurig K-4500 coffee maker, ensuring smooth operations and a consistently high-quality coffee experience.

Common Problems and Solutions for Keurig K-4500 Brewer
The Keurig K-4500 is built to handle the demands of a commercial coffee environment, but issues can occasionally arise. Below, we provide comprehensive solutions to the most frequently reported problems.
1. Keurig K-4500 Not Powering On
Possible Causes:
- Power Cord Issue: The power cord might not be securely plugged into the outlet.
- Power Switch: The power switch at the back of the machine may not be in the “I” (on) position.
- Tripped Circuit Breaker: The circuit breaker may have tripped, cutting power to the coffee maker.
Solution:
- Check the Outlet: Plug the coffee maker into a different outlet to rule out a faulty outlet.
- Ensure Proper Switch Position: Make sure that the power switch at the back of the machine is set to the “I” (on) position.
- Reset the Circuit Breaker: If the circuit breaker has tripped, reset it and try turning on the coffee maker again.
Pro Tip: Always use a dedicated, grounded outlet to prevent electrical issues and ensure stable performance.
2. Keurig K-4500 Not Brewing Coffee
Possible Causes:
- Incorrect Pod Placement: The K-Cup® pod might not be inserted properly into the pod holder.
- Needle Blockage: The entrance or exit needle could be clogged with coffee grounds or debris.
Solution:
- Ensure Proper Pod Placement: Double-check that the K-Cup® pod is placed correctly in the pod holder, and ensure the handle is fully lowered to close the lid.
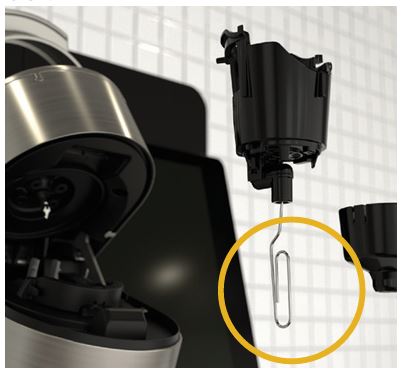
- Clean the Needles: Lift the handle, then carefully insert a straightened paper clip into the entrance and exit needle holes. Gently move the clip around to dislodge any coffee grounds. Run two rinse cycles without a pod afterward to clear the system.
Important Reminder: Always clean the needles regularly to prevent blockages that can disrupt brewing.
3. Coffee Maker Produces Only a Partial Cup
Possible Causes:
- Clogged Needles: If the needles are clogged, the water flow may be restricted, resulting in only a partial cup of coffee.
- Water Supply Issues: The internal water tank might not be filling properly due to a water supply problem.
Solution:
- Clean the Needles: Use the same process mentioned above to clean both the entrance and exit needles.
- Check Water Supply: Ensure the water supply is connected properly and is not obstructed. Make sure there are no kinks in the water line.

Helpful Tip: After cleaning, run a full rinse cycle to ensure all debris is cleared, and the coffee maker functions properly.
4. Coffee Grounds in Your Cup
Possible Causes:
- Needle Clogging: Coffee grounds may have gathered in the entrance or exit needles, resulting in grounds in your coffee.
- Damaged K-Cup® Pod: A torn or damaged K-Cup® pod can cause grounds to escape into the coffee.
Solution:
- Clean the Needles: Insert a straightened paper clip into the needle holes to clear out any trapped coffee grounds. Repeat this for each needle.
- Inspect the K-Cup® Pod: Always check the pod before brewing to ensure it is not damaged. Use only Keurig-approved K-Cup® pods.
Pro Tip: Always check for punctured or damaged pods before brewing, as this is the most common cause of grounds in your coffee.
5. Coffee Maker Is Leaking
Possible Causes:
- Water Line Leaks: A leak in the water line or connection could cause water to drip from the coffee maker.
- Damaged Seals: If seals inside the coffee maker are damaged, they may allow water to leak.
Solution:
- Check Water Line Connections: Inspect the water lines and ensure all connections are tight. If necessary, replace any damaged connections.
- Inspect the Seals: Check all seals for wear and tear. If any seals appear damaged, replace them immediately.
Reminder: If your coffee maker is plumbed into a water supply, ensure the filter is installed properly to avoid leaks.
Maintaining Your Keurig K-4500: Descaling and Regular Care
One of the most important maintenance tasks is descaling the Keurig K-4500. Over time, calcium deposits can build up inside the machine, especially if you’re using hard water. Regular descaling is crucial to ensure smooth operation and prevent clogs.
Why is Descaling Important?
Descaling removes mineral build-up from the internal components, which helps:
- Maintain optimal water flow
- Prevent heating issues
- Extend the lifespan of the machine
Descaling Steps:
- Prepare the Coffee Maker:
- Ensure the coffee maker is powered off and unplugged.
- Remove any K-Cup® pods, filters, and water from the machine.
- Open the descale solution door and pour the Keurig® Descaling Solution into the tank.
- Run the Descaling Cycle:
- Follow the on-screen instructions to start the descaling cycle.
- The coffee maker will pump the descaling solution through the system to clean it.
- Let the solution sit for 30 minutes for maximum effectiveness.
- Flush the System:
- After the soaking period, flush the system with fresh water to remove any remaining descaling solution.
- Repeat the rinse cycle until the water runs clear.
- Final Rinse:
- Once descaling is complete, reinstall any water filters and run a final rinse cycle.
Tip: Descale the coffee maker every 3-6 months, or more often if you notice slower brewing times or mineral taste in your coffee.
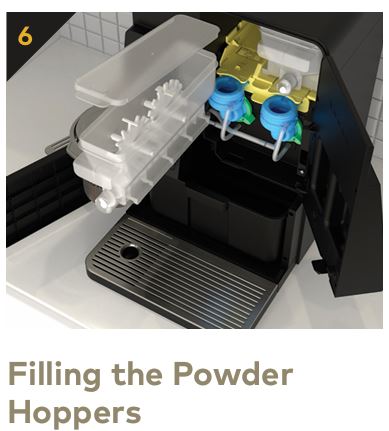
Milk Powder Not Dispensing Properly
Possible Causes:
- Empty Powder Hopper: The hopper may be empty, or the powder could be clumped inside.
- Clogged Milk Dispensing Tubes: Blockages in the milk dispensing tubes can prevent milk powder from dispensing properly.
Solution:
- Check Powder Levels: Ensure that the milk powder hopper is filled to the required level. Refill it if necessary.
- Clean the Milk Tubes: Remove the milk dispensing tubes and clean them thoroughly with hot soapy water. Use a pipe cleaner to clean the inside of the tubes.
Pro Tip: Always sanitize the milk tubes weekly to avoid clogs and ensure smooth milk dispensing.
Additional Troubleshooting Tips
How to Avoid Common Coffee Maker Issues
- Use Filtered Water: Tap water can contain impurities and minerals that cause clogs and affect the flavor of your coffee. Use filtered or bottled water for the best results.
- Clean Regularly: Regularly clean your Keurig K-4500 according to the maintenance schedule to avoid build-ups in the pod holder and other internal components.
- Use Only Keurig K-Cup® Pods: Non-Keurig pods may cause malfunction due to improper puncturing or clogging.
FAQs
How often should I clean my Keurig K-4500?
The coffee maker requires daily cleaning of the drip tray and pod holder, weekly maintenance for the brewing path, and monthly descaling to maintain optimal performance.
My coffee tastes weak. What should I do?
Weak coffee may result from clogged needles, incorrect pod placement, or using pods with lower strength. Clean the needles, check pod placement, and consider adjusting the brew strength settings.
What should I do if my coffee maker won’t brew on the first use?
Make sure the water supply is connected and turned on. The K-4500 needs to be primed before the first brew. Wait for the internal tank to fill with water, then try brewing again.
Conclusion
The Keurig K-4500 Commercial Brewing System is a reliable, high-performance coffee maker that is ideal for busy commercial settings. By following this comprehensive troubleshooting guide, you can easily resolve the most common issues, ensuring that your coffee maker operates at peak performance.
Remember, regular maintenance, including needle cleaning, descaling, and powder hopper sanitizing, will keep your Keurig K-4500 in top shape, ensuring that every cup of coffee, latte, or cappuccino is brewed perfectly.
Here’s a short table summarizing the common issues with the Keurig K-4500 and their solutions:
| Problem | Possible Cause | Solution |
|---|---|---|
| Not Powering On | Power cord not plugged, circuit breaker tripped | Check outlet, ensure the power switch is on, reset circuit. |
| Not Brewing Coffee | Incorrect pod placement, needle blockage | Ensure proper pod placement, clean the needles. |
| Partial Cup | Clogged needles, water supply issue | Clean the needles, check water connections. |
| Coffee Grounds in Cup | Clogged needles, damaged K-Cup® pod | Clean needles, inspect the pod for damage. |
| Leaking | Water line leaks, damaged seals | Check water connections, inspect and replace damaged seals. |
| Milk Powder Not Dispensing | Empty or clogged powder hopper, clogged tubes | Refill the hopper, clean the milk dispensing tubes. |
For more assistance, you can always visit the Keurig Support Page for further troubleshooting steps, videos, and expert advice.


0 Comments