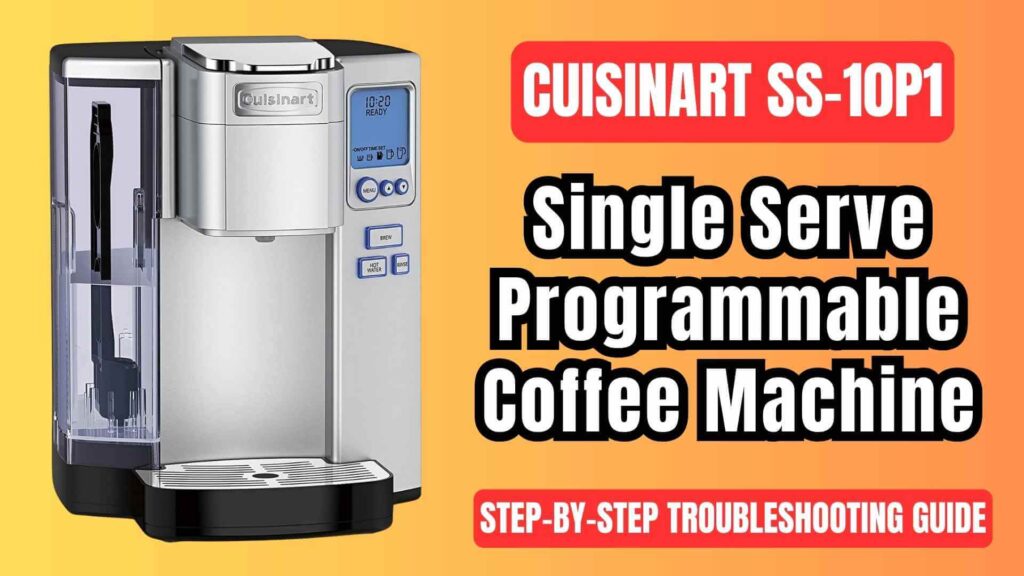
If your Cuisinart SS-10P1 (SS-10 Series) coffee brewing machine won’t brew, stops mid-cycle, makes weak coffee, flashes “ADD WATER” when the tank is full, or shows “DE-SCALE”—this comprehensive guide walks you through exactly what to check and how to fix it. I’ll use manufacturer-validated procedures throughout, including specific button sequences, settings, and safety notes.
Safety First
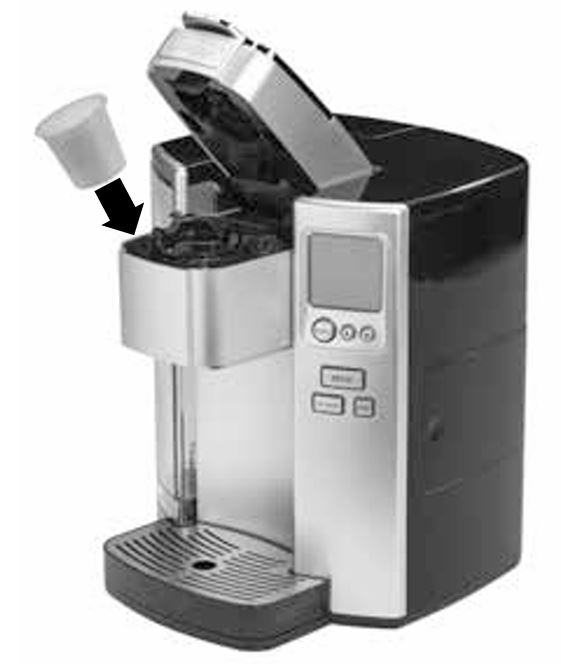
Electrical & burn safety: Hot water and sharp needles are involved. Unplug the brewer before disassembly/cleaning and never put fingers in the capsule chamber. The brew chamber contains two sharp needles (top piercing, bottom exit) and scalding water during brewing.
Key warnings to remember
- Do not open the brew head during a brew.
- Only use water in the reservoir (no milk, broths, or other liquids).
- Keep the unit away from hot burners/ovens; don’t immerse it in water.
- Use only capsules intended for this appliance; don’t force incompatible pods.
Understand the Machine (Controls & Parts)
Familiarity speeds diagnosis. The SS-10 has a removable 72-oz reservoir, front control panel with Menu, Up/Down arrows, and dedicated Brew, Rinse, and Hot Water buttons. There’s a side power switch (right side) and a storage compartment for the HomeBarista® Reusable Filter Cup. The brew head holds either the standard capsule holder or the HomeBarista® assembly.
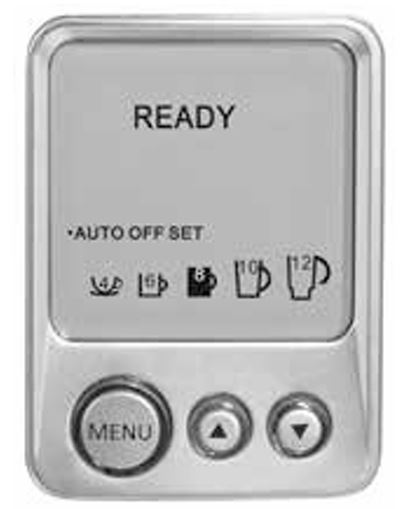
Display messages to know (we’ll fix these below):
READY • OPEN HEAD • NOT READY • ADD WATER • DE-SCALE • ON/OFF/AUTO OFF SET • HOT WATER • RINSE, plus brew sizes (4/6/8/10/12 oz).
Fast Triage Checklist
Before diving into targeted fixes, run through this quick, technician-style triage:
- Power & Controls
- Toggle the side power switch off/on; check LCD backlight.
- Confirm the outlet has power (try a different outlet) and the circuit breaker isn’t tripped.
- Reservoir & Water
- Reseat the reservoir firmly; top off to MAX and close the lid.
- If display shows ADD WATER while full, re-seat the tank again.
- Brew Head & Pod
- Open and fully close the handle until READY appears.
- Ensure no foil is peeled; do not pre-puncture capsules.
- Needles & Holder
- If brews are short/incomplete, clear coffee oils/grinds from exit needle (bottom of capsule holder) and piercing needle (top of brew chamber) using a paper clip.
- Run Rinse / Hot Water
- With no capsule inserted: Rinse cycle (≈4 oz), then Hot Water (select size) to flush residual flavors and check flow.
- De-Scale
- If you taste minerals, get partial cups, or see DE-SCALE, follow the vinegar procedure in the de-scale section below.
If the unit still shows EEO after these steps, contact Cuisinart support.
Fixes for the Most Common Problems
1) “Coffee maker does not have power”
Symptoms: Blank screen, no response.
Fixes:
- Plug into a different, independent outlet; avoid switched outlets (lamp circuits).
- Reseat the plug; verify the right-side power switch is toggled.
- Reset your home breaker/GFCI if tripped.
- Once powered, the LCD should illuminate.
2) “Coffee maker will not brew”
Symptoms: Pressing Brew does nothing.
Root causes & solutions:
- Brew head not latched → Lower the handle firmly until READY shows and the Brew/Hot Water/Rinse LEDs are lit.
- No water or reservoir not seated → If LCD shows ADD WATER/NOT READY, fill the reservoir and seat it correctly. If it still shows ADD WATER, reseat again (a misaligned tank disables brewing).
- Clogged needles → Clean the exit needle (remove capsule holder; twist off funnel; use a paper clip through the exit port) and the piercing needle (in the brew head). Reassemble and test with Rinse/Hot Water.
Pro-Tip: After any terminated brew, run a Rinse cycle before your next brew so volume/flow normalize.
3) Brews are short (partial cup) or stop mid-cycle
Likely causes: Needle clog, scale buildup, holder fouling, or reservoir seating.
Targeted fixes (in order):
- Clear the needles (exit + piercing).
- Clean the capsule holder & funnel (dishwasher top rack OK; low temp).
- Rinse cycle then a Hot Water dispense to test free flow.
- De-scale if partial cups persist. If, after two complete de-scale cycles, the brewer still pours partial cups, contact support.
4) “ADD WATER” shows but the tank is full
- Lift off the lid and reseat the reservoir squarely on its base; sensors need firm contact.
- Make sure you didn’t remove the tank during a brew. The machine locks out brewing mid-cycle if the tank is removed.
5) Weak or watery coffee
- Use a smaller brew size (e.g., 6 oz vs 8–12 oz) to increase extraction strength.
- Try extra-bold capsules.
- If using HomeBarista®, keep grounds to ≤ 2½ tbsp (≈15 g), medium grind, and do not tamp; over-filling or fine grinds can cause bypass or overflow.
6) Chlorine or mineral taste
- Install/refresh the charcoal water filter (soak 15 minutes, flush, seat in reservoir holder). Replace every 60 days/60 uses or more often in hard-water areas. Bottled/filtered water helps too.
7) Unit turns off/on by itself
- Check AUTO OFF and ON/OFF TIME SET programming: press Menu and cycle through until OFF shows for features you don’t want active. Default AUTO OFF is 30 minutes; you can disable it.
8) Display codes & messages—what they really mean
| Display / Symptom | What It Means | What To Do |
|---|---|---|
| ADD WATER | Reservoir is low, removed, or not seated | Fill tank, reseat firmly; you can’t brew while it’s detected. |
| DE-SCALE | Scale is impacting performance | Perform the vinegar de-scale cycle below; repeat if needed. |
| NOT READY | Machine hasn’t met preconditions to brew | Close handle fully; ensure water is present and display reads READY. |
| EEO | Internal error | Call Cuisinart Consumer Service (per manual). |
Deep Cleaning & De-Scaling (Vinegar Method)
Hard-water scale is the #1 cause of slow flow, partial cups, and temperature issues. The SS-10 is designed to alert you with DE-SCALE, but you should still de-scale every 3–6 months (more often for very hard water).
Exact, manufacturer-approved de-scale procedure
- Empty the reservoir.
- Disable AUTO OFF and any ON/OFF timer (so cleaning isn’t interrupted).
- Fill the reservoir with 20 oz white vinegar + 40 oz water (2:4 ratio).
- Place a large mug on the drip tray. Press & hold HOT WATER + RINSE together to start the de-scale process; discard contents each cycle.
- Repeat the hot-water dispense until the LCD shows ADD WATER.
- Rinse the reservoir thoroughly, fill with fresh water.
- Run a Hot Water cycle, discard, and repeat until ADD WATER appears again.
- If you still taste vinegar, run additional hot-water cycles.
- If DE-SCALE still shows, repeat the entire de-scale procedure once more.
Why this works: Vinegar dissolves calcium carbonate scale in the heater and internal tubes, restoring correct flow and temperature. The rinse cycles purge any residual vinegar so coffee doesn’t taste off.
Brew Strength, Temperature & Size Tuning
Set brew size (default & per-brew)
- Available sizes: 4, 6, 8, 10, 12 oz.
- Per brew: Use ▲/▼ on READY screen to choose a size before pressing Brew.
- Default size: Menu → BREW SIZE → ▲/▼ → Menu to save (factory default is 8 oz).
Strength tip: Smaller size = stronger extraction when using the same capsule. If coffee tastes weak, step down one size or use an extra-bold capsule.
Set temperature (HOT vs XHOT)
- Menu → BREW TEMP → ▲/▼ to select HOT or XHOT (default is XHOT).
- At high altitude (>5,000 ft), set HOT to reduce overshoot/aeration.
Program Auto Off & On/Off times
- AUTO OFF: Set 1–9 hours or OFF to disable (default is 30 min).
- ON/OFF TIME SET: Program wake-up heat-up and shut-down times (clock must be set; brewer must be off for ON TIME to trigger).
Using the HomeBarista® Reusable Filter Cup Correctly
The SS-10 includes a HomeBarista® reusable capsule—great for using your own grounds while keeping the brew head clean and pressure-safe.
Correct setup & fill
- Access the side storage door; remove the HomeBarista®. Disassemble: lid → filter basket → filter cup.
- Wash parts before first use (dishwasher-safe).
- Insert filter basket into cup; fill with medium-grind coffee to the top of the mesh—maximum 2½ tbsp (≈15 g).
- Do not tamp; wipe grounds off the rim; press lid down until tabs latch.
Install & brew
- Remove the standard capsule holder (lift out).
- Drop the assembled HomeBarista® into the brew chamber (don’t force it).
- Caution: Needles are sharp—don’t put fingers in the chamber.
- Select size and Brew as usual.
- After brewing, carefully remove the hot HomeBarista®, empty, and rinse. Reinstall the original capsule holder (align arrows and push until it snaps).
If the reusable cup overflows: The grind is too fine or overfilled; switch to medium grind and keep to ≤2½ tbsp.
Cleaning the Needles & Capsule Holder (Flow Restorer)
If the brewer sputters, overfills the drip tray, or brews short cups, oils/particles may be blocking the fluid path.
Exit needle (bottom—inside capsule holder)
- Lift handle; pull out the capsule holder.
- Twist off the funnel from the holder (it can be snug at first).
- Insert a paper clip up through the exit needle port to clear debris.
- Rinse, reattach funnel (align tabs/notches; twist to lock), and reinstall holder (align arrows).
Piercing needle (top—brew head)
- With handle up, use a paper clip to loosen grounds from the upper piercing needle inside the brew chamber; never touch with fingers.
Rule of thumb: Any time you see partial cups or irregular spray, clean both needles, then run Rinse and Hot Water. Repeat after any “terminated brew.”
Rinse & Hot Water Cycles (Diagnostics + Flavor Reset)
- Rinse dispenses ~4 oz of hot water to purge flavors (great between coffee/tea/cocoa).
- Hot Water gives capsule-free hot water at any brew size for cocoa, soup, or testing flow.
- To run either: ensure no capsule is inserted, close the handle to READY, select size (for Hot Water), then press Rinse or Hot Water.
Tech tip: If Brew won’t start, but Hot Water runs, the needles/capsule path are suspect; clean them, then test with Rinse.
Preventive Maintenance Schedule
| Task | Frequency | How / Notes |
|---|---|---|
| Wipe exterior | Weekly | Damp, non-abrasive cloth; never immerse. |
| Empty/clean drip tray & plate | Weekly | Both are dishwasher-safe (top rack, low temp). Keep level while removing to avoid spills. |
| Rinse cycle | Between beverages | Especially when switching flavors; purges residual tastes. |
| Needle clean (exit + piercing) | Monthly or when flow issues occur | Paper-clip method; reassemble securely. |
| Charcoal water filter | Every 60 days/60 uses | Soak 15 min, flush, install in filter holder, seat in tank. |
| De-scale | Every 3–6 months or when DE-SCALE appears | Follow the 20 oz vinegar + 40 oz water procedure. |
Mini How-Tos (for quick wins)
How to stop a brew mid-cycle (safely)
Press Brew again or toggle the side power switch OFF. Expect the next brew to be short; run a Rinse cycle first to normalize volume.
How to add water mid-day without leaks
Lift lid; pour to MAX; or remove and fill at the sink—but never during a brew. If removed mid-cycle, the brewer stops and may show ADD WATER/NOT READY.
How to set & change the clock
Menu → CLOCK (flashing) → set hours (watch the PM indicator) → set minutes → Menu to save. Required for ON/OFF scheduling.
Troubleshooting by Symptom
Nothing happens when I press Brew
- Close handle to READY; confirm Brew LED is lit.
- Reseat the reservoir; make sure ADD WATER isn’t showing.
- Try a different capsule (don’t peel foil).
- Clean needles; test with Hot Water.
It brews, but I only get a few ounces
- Exit needle clogged → Paper-clip clean (holder removed).
- Piercing needle clogged → Paper-clip clean (brew head).
- De-scale if clogs keep recurring; run Rinse before re-trying.
Coffee tastes off (chlorine/mineral or stale)
- Replace charcoal filter; use filtered water.
- Run Rinse before brewing; deep clean capsule holder/funnel.
- De-scale if taste persists (minerals).
The brewer shuts off randomly
- Check AUTO OFF setting (default 30 minutes).
- Disable ON/OFF TIME SET if you didn’t intend to schedule.
“EEO” on screen
- Contact Consumer Service as directed by the manual.
Optimization Tips (Better Coffee, Fewer Issues)
- Water quality first. You’ll taste chlorine/minerals; the charcoal filter helps, but filtered/bottled water is best.
- Right size = right strength. The SS-10’s 4–12 oz range lets you tailor extraction. If a pod tastes weak at 10–12 oz, step down to 6–8 oz.
- Don’t tamp or overfill the HomeBarista® cup; use medium grind only. (Max 2½ tbsp.)
- Rinse between beverages—especially between coffee and tea/cocoa—to avoid flavor cross-over. (Rinse dispenses ~4 oz.)
- Schedule smart. If you like a morning cup, set ON TIME—but remember the brewer must be OFF for ON TIME to trigger. Use AUTO OFF to save energy.
FAQs
My SS-10 says “ADD WATER,” but the tank is full.
Reseat the reservoir firmly; make sure it sits flat on the base and the lid is closed. If it occurred during a brew, wait for the machine to reset to READY. The sensor requires proper seating to brew.
How often should I change the charcoal filter?
Every 60 days or 60 uses (whichever comes first). In hard-water regions, change more frequently. Soak 15 minutes, flush, then seat it in the holder before installing.
What’s the safest way to clear clogs?
Use a paper clip for the exit needle (remove capsule holder & funnel) and the piercing needle (brew head). Never use fingers; both needles are sharp. Follow with Rinse/Hot Water.
Can I run vinegar straight, no dilution?
Use the manufacturer-specified mix: 20 oz white vinegar + 40 oz water, then flush with multiple Hot Water cycles until taste/odor are gone. Repeat the entire procedure if DE-SCALE remains.
My coffee tastes weak. Should I raise temperature to XHOT?
Temperature affects mouthfeel more than strength. For strength, reduce brew size or use bolder capsules. XHOT is already default; at high altitudes use HOT.
Can I brew without a capsule to clean?
Set the clock via Menu → CLOCK. After a power interruption the clock needs to be reset. (Required for ON/OFF scheduling.)
Does the drip tray come out for tall mugs?
Yes. Remove the drip tray plate to make room for travel mugs; both the tray and plate are dishwasher-safe (top rack, low temp). Keep it level to avoid spills when removing.
What grind should I use in the HomeBarista® cup?
Medium grind only. Fine grinds may cause overflow; do not tamp. Max 2½ tbsp (≈15 g).
The brewer pauses before it starts dispensing. Is that normal?
Yes—brief pre-heat/pressurization is normal. A burst of air at the end of the cycle is also normal (it clears remaining liquid from the capsule).
Step-by-Step Repair Flow (At-a-Glance)
- No Power?
• Try another outlet → Toggle side power switch → Reset home breaker.
• LCD should light if power path is good. - No Brew?
• Close handle to READY → Ensure ADD WATER isn’t showing → Press Brew.
• If still no brew → Clean needles, run Rinse/Hot Water, retry. - Partial Cup?
• Clear exit & piercing needles → Clean holder & funnel → Rinse → De-scale.
• Still partial after 2 de-scales → Contact support. - Taste Issues?
• Replace charcoal filter → Use filtered water → Rinse → De-scale.
• Review AUTO OFF and ON/OFF TIME SET in Menu; set to OFF if not desired.
What To Do After You Fix It (Dial-in Your Perfect Cup)
- Choose your size wisely: For most standard pods, 6–8 oz hits the sweet spot of strength and body.
- Keep it clean: Rinse between drinks; wipe drips so sugars/oils don’t bake on the tray area.
- Schedule for convenience: Set ON TIME for weekday mornings and use AUTO OFF to save energy. (Remember: brewer must be OFF for ON TIME to engage.)
Final Word
With a properly seated reservoir, clean needles, regular rinsing, and periodic de-scaling, the Cuisinart SS-10P1/SS-10 Series is a reliable single-serve workhorse. Everything above follows the manufacturer’s operating, cleaning, and troubleshooting guidance—so you can confidently return your brewer to perfect working order and keep it that way all year.


0 Comments