“Most ‘broken’ coffee makers aren’t broken—they’re dirty, misassembled, or waiting for a simple reset.”
If your Cuisinart Grind & Brew Single-Serve (DGB-2 series) won’t grind, won’t brew, flashes random lights, or produces weak coffee, this field guide walks you through the exact checks, cleanings, and resets that solve 90%+ of service calls. Every step below is based on the DGB-2 user manual and practical bench experience, so you can fix issues safely and with confidence.
What you’ll fix in this guide
- Unit won’t power on or shuts off
- Add Water light stays on
- Grind won’t start or stops mid-cycle
- Brew won’t start (or stops)
- All buttons flashing (or specific lights flashing)
- Weak or partial cups; slow or sputtering flow
- Pod/HomeBarista® leaks, messes, or clogs
- Descale/reset for mineral build-up
- Ongoing maintenance to prevent repeat failures
Before you start: safety & model basics
- Unplug before cleaning or opening parts and never reach into the brew chamber—there are two sharp needles (one above, one below) designed to pierce pods/capsules.
- Don’t immerse the base or power cord in water; clean exterior with a damp, non-abrasive cloth only.
- Auto-shutoff: the brewer turns itself off after ~30 minutes of inactivity—press Power to wake it.
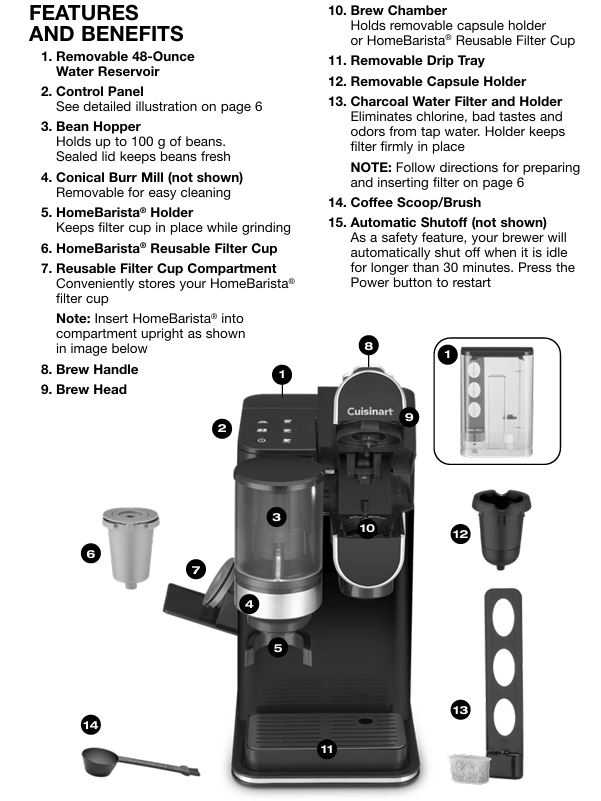
- Tank capacity: 48 oz removable reservoir.
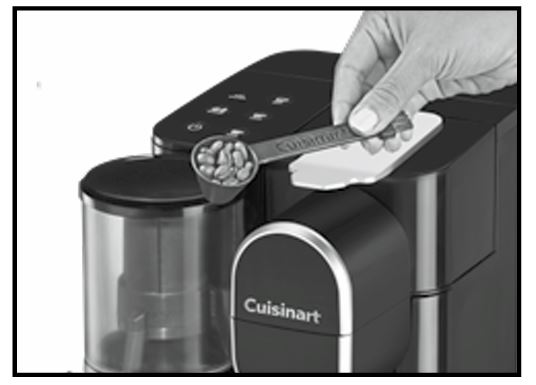
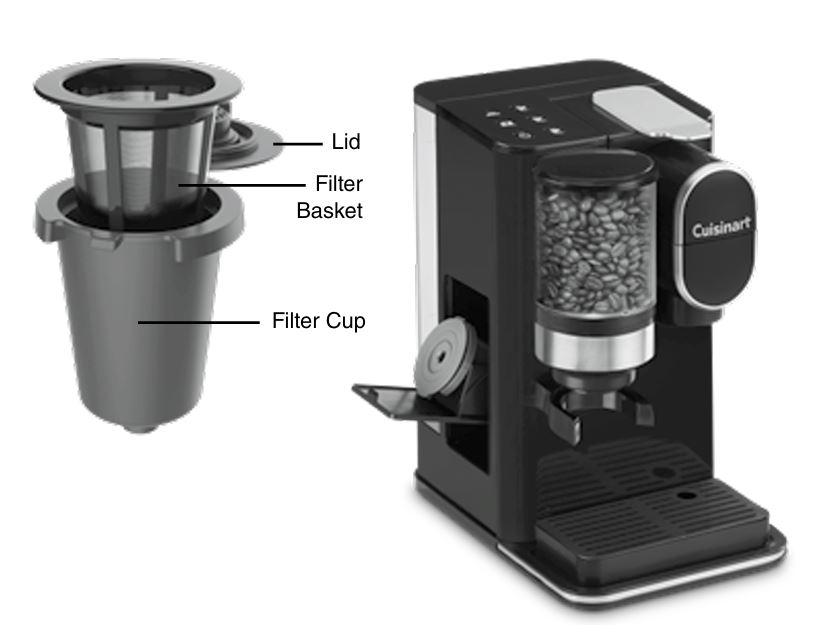
- Bean hopper: up to 100 g of beans; medium preset burr grind; HomeBarista® refillable cup max 2.5 scoops / 15 g of grounds.
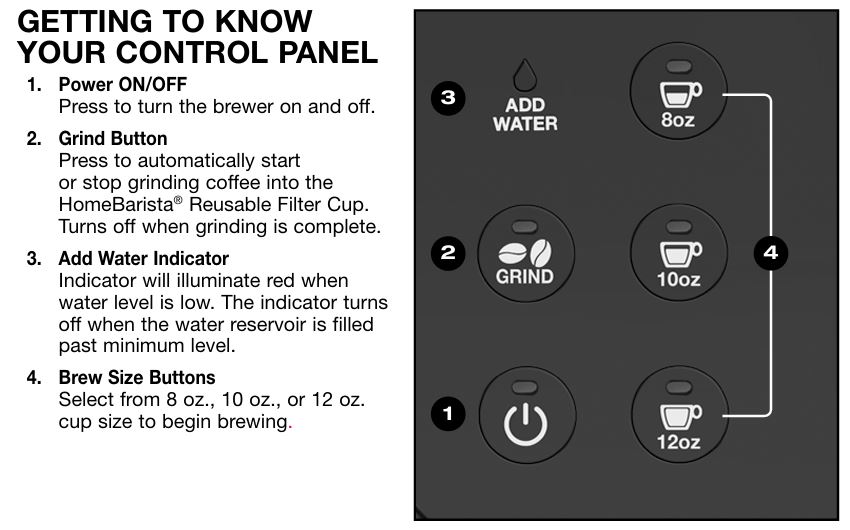
- Control panel orientation: Power, Grind, Add Water indicator, and 8/10/12-oz brew size buttons.
Quick wins (1–2 minutes)
- Power cycle properly
Turn Power off, unplug for 5 seconds, plug back in, press Power. (Recommended in grinder overload recovery; same timing helps many state hiccups.) - Open/close the brew head once
Many brew commands arm only after the head is closed and latched; it also clears some “busy” states before a new brew. (Prompted in several brew/grind interlocks.) - Reseat the water reservoir
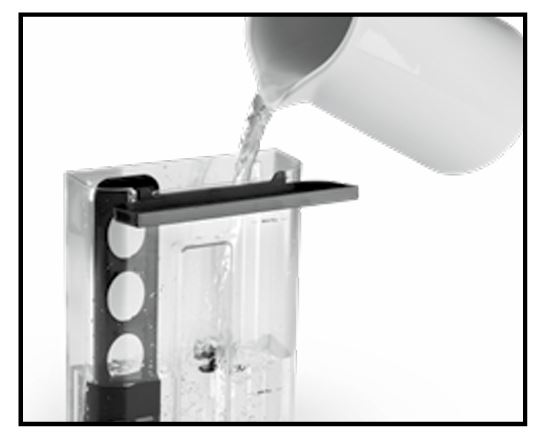
Lift out, fill above MIN, slide it firmly back into the base. A poor seat can keep the Add Water light on even when full. - Check for overfilled coffee
Don’t pack the hopper beyond 100 g or the HomeBarista® above 15 g (no tamping). Overfilling leads to jams or weak cups.

Cruisinart DGB-2 Coffee Maker & Grinder: Step by Step Troubleshooting by Symptom
1) The DGB-2 won’t power on (or shuts off unexpectedly)
Likely causes
- Auto-shutoff after idle (normal).
- Outlet/plug issues or a tripped GFCI.
- Internal protection triggered by overload (rare but recoverable).
Fix
- Press Power to wake the unit (auto-off is expected behavior).
- Try a different outlet known to work with another appliance.
- Do the 5-second unplug reset.
If lights flash right at power-on: the brewer is asking for descaling—jump to the Descale section below. (All button lights flashing in sequence = time to decalcify.)
2) Add Water indicator won’t turn off
What it means
The water level is below minimum or the reservoir isn’t seated.
Fix
- Remove, fill, and reseat the reservoir; make sure it sits flush on its base.
- If still lit, power cycle (5-second unplug) and open/close the brew head once.
- Optional: Install/replace the included charcoal filter correctly (soak 15 min, snap into holder, flush 10 sec through the bottom holes, then reinsert). An incorrectly seated filter can tilt the tank.
3) Brew won’t start (no water flow)
Common causes (in order)
- Brew head not latched → buttons won’t stay solid.
- Machine is busy grinding (brewing is locked out until grind is done/canceled).
- Needles/passage clogged with grounds.
- Low water or reservoir not seated.
- Unit is asking for descaling.
Fix in sequence
- Close the brew head firmly until all brew size buttons illuminate solid, then press a size to start. (If they’re not solid, the lid isn’t detected.)
- If the Grind cycle is active, cancel it (press Grind once), then open/close the brew head and select your cup size.
- Clear needle clogs (very common):
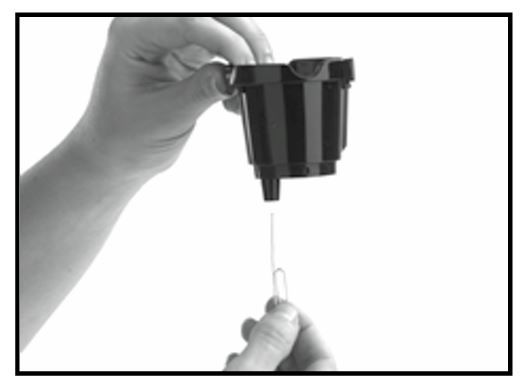
- Remove the capsule holder. Separate the funnel from the holder (twist/pull), then use a straightened paper clip to probe the exit needle at the bottom of the holder; rinse and reassemble.
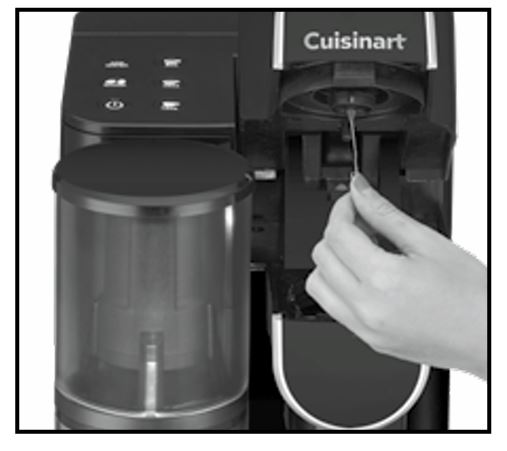
- For the piercing needle inside the brew head, open the head and carefully insert the paper clip into the top needle to dislodge packed grounds.
- Recheck water level and tank seat.
- Descale if all buttons flash on power-up or if flow remains slow—see the exact two-stage vinegar rinse below.
4) Grinding problems (no grind / jam / residue on lid)
Signs
- Grind button flashes.
- Motor stalls or stops early.
- Grounds don’t drop into the cup → weak coffee.
- Coffee residue appears on lid after grinding.
Fix
- Respect fill limits: beans ≤ 100 g; don’t overpack. (Overfill causes binding.)
- If brewing is running, you can’t start grinding—cancel the brew first, then press Grind.
- Grinder overload recovery: If the Grind indicator flashes, press Power, unplug 5 sec, then retry. If it still flashes, remove the burr grinder and clean it well.
- Clean the grind outlet & burrs:
- Unlock and remove the burr assembly; use the scoop brush to clear the chute and wipe the burr with a damp cloth (not dishwasher-safe).
- Wipe the bean hopper; ensure it’s empty before unlocking the burr.
- Grounds not making it into the cup (weak coffee): a dirty chute can restrict the flow—clean the outlet thoroughly.
- Residue on grinder lid: normal after each grind; does not affect flavor for consecutive cups.
5) All the lights are flashing
This machine uses light patterns to signal service needs or overload protection:
| Light pattern | What it means | What to do |
|---|---|---|
| All button lights flash in sequence at power-on | Descale required | Run the two-stage descaling routine (below). |
| Grind indicator flashes | Grinder overload | Power off → unplug 5 sec → retry. If still flashing, remove/clean burr and outlet. |
| All brew size buttons flash | Coffeemaker overload | Wait until lights stop, then use again. If flashing persists, contact Cuisinart service. |
Pro tip: Flashing after a power blip usually clears with the 5-second unplug reset. If it returns immediately, follow the specific condition in the table.
6) Weak coffee, partial cups, or sputtering flow
Check these first
- Brew size selection—choose a smaller size for stronger coffee or use extra-bold pods.
- HomeBarista® fill—don’t exceed 15 g; do not tamp; ensure the rim is clean so the lid seals.
- Needle and funnel—clean both (paper clip method) to restore normal flow.
- Grind chute—clear any buildup so grounds actually reach the cup.
- Descale—mineral scale narrows water paths and weakens flow; see below.
Deep-clean & reset routines
A) Initial internal rinse (one-time setup / after long storage)
If the unit is brand-new or sat unused for months, run the initial cleaning (no pod) to prime the system:
- Remove and fill the reservoir; place a mug on the tray.
- Press Power.
- Open & close the brew head (empty).
- Press 10-oz—hot water will dispense. Discard the water.
B) Descaling (the most powerful fix for slow/partial brews)
When to descale: When all buttons flash at startup, or about monthly depending on water hardness and usage.
Exact DGB-2 procedure (two stages):
- Vinegar rinse
- Fill reservoir with 13 oz white vinegar + 26 oz water.
- Place a mug/container on the drip tray.
- Open and close the brew head.
- Press and hold Power + 8-oz for 2 seconds to start the decalcification routine.
- Discard the contents; repeat until the Add Water light turns on.
- When the routine completes, Power and Grind lights illuminate; discard any remaining diluted vinegar.
- Fresh-water flush (x3)
- Repeat the sequence three times using fresh water only to clear vinegar taste. Your brewer is now ready
C) Needle & capsule holder cleaning (restores flow and prevents leaks)
- Remove the capsule holder by lifting the handle and pulling the holder straight up.
- Separate the funnel from the holder (twist/pull); both parts are top-rack dishwasher-safe (low temp).
- Clear the exit needle at the bottom of the holder with a paper clip; rinse.
- Clear the piercing needle inside the brew head (carefully!) with a paper clip.
- Reassemble and align the arrow on the capsule holder with the arrow in the brew chamber; push to snap in.
Safety callout: The two needles are sharp—never insert fingers into the brewing chamber.
D) Grinder & burr cleaning (ends jams; fixes weak cups from poor delivery)
- Unlock & remove the burr (empty hopper first).
- Brush the grind outlet/chute to remove packed grounds; wipe the burr with a damp cloth.
- Do not put the burr in a dishwasher.
- Wipe the bean hopper with a damp, non-abrasive cloth.
Step-by-step workflow: pods vs. whole beans
Brewing with pods/capsules (fast path)
- Fill & reseat reservoir; Power on.
- Place mug (remove drip tray for a travel mug if needed).
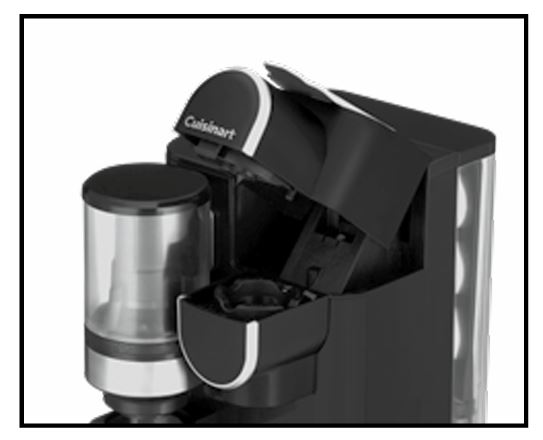
- Open head; insert single-cup pod.
- Close head; brew size lights turn solid → pick 8/10/12-oz. (You can stop mid-brew by pressing the same size again.)
- When done, lift handle and discard the hot pod; brewer is ready for the next cup.
Brewing with whole beans (grind & brew)
- Load up to 100 g beans in the hopper (seals fresh with lid).
- Insert the HomeBarista® cup under the grinder and press Grind—it will auto-stop when full.
- Fill and reseat reservoir. Remove the capsule holder from the brew chamber, place the filled HomeBarista® cup in, close the head, and select a brew size.
- After brewing, empty and rinse the HomeBarista® parts; store them in the left-side compartment.
located on the left side of the
coffeemaker by pressing OPEN
on the bottom of the door. Remove
the HomeBarista® Reusable Filter Cup.
Mini-tip: If using pre-ground coffee, limit the HomeBarista® to 15 g (2.5 scoops), don’t tamp, and wipe any grounds off the rim before closing the lid.
Diagnostic decision tree (print-friendly)
- Are all lights flashing at startup?
→ Yes: Descale now (vinegar + water routine). - Is the Add Water light on?
→ Yes: Fill and reseat reservoir; open/close head; power cycle if needed.
→ No: Continue. - Do brew buttons stay solid after you close the head?
→ No: Close more firmly; ensure capsule holder/HomeBarista® is seated; check for needle clogs; then try again.
→ Yes: Continue. - Grinding when you press brew?
→ Yes: Wait for grind to finish or press Grind once to cancel; open/close head; select brew size.
→ No: Continue. - Still no flow or weak flow?
→ Clean exit & piercing needles; clean funnel; descale; clean grind chute; test again. - Grind light flashing?
→ Power off, unplug 5 sec, clean burr & outlet; retry.
If a step resolves the issue, you’re done; otherwise proceed down the tree.
Maintenance schedule (prevents 9 out of 10 issues)
- After every brew: Empty/rinse the pod holder or HomeBarista®; wipe the rim and drip tray.
- Weekly: Clean capsule holder funnel and exit needle; wipe brew head; brush the grind chute.
- Monthly: Descale (more often with hard water).
- Every 60 days / ~60 uses: Replace the charcoal water filter after soaking and flushing per instructions.
Common mistakes that cause “no-brew” calls
- Forgetting to open/close the head after canceling a grind/brew; the machine uses that action to arm the next cycle.
- Overfilling beans or the HomeBarista®; tamping grounds; or leaving grounds on the rim—these trigger jams or leaks.
- Ignoring the all-lights-flash descale prompt for too long—scale throttles water flow until brews become partial or stop.
- Never cleaning the exit/piercing needles. One sticky pod burst can pack the needles and halt flow.
Mini reference tables
Table 1 — Symptoms & fixes at a glance
| Symptom | Likely cause(s) | Fix |
|---|---|---|
| No power | Auto-off; outlet/GFCI; overload latch | Press Power; try another outlet; 5-sec unplug reset. |
| Add Water won’t clear | Low level; reservoir mis-seated | Fill and reseat; open/close head; replace water filter properly. |
| Buttons won’t go solid | Head not latched; pod/cup not placed right | Close firmly; reseat holder/home cup; ensure rim is clean. |
| No brew while grinding | Brew is locked during grind | Cancel Grind, open/close head, then select size. |
| Grind light flashing | Grinder overload/jam | Power off → unplug 5 sec → clean burr & outlet → retry. |
| All lights flashing | Needs descaling | Run vinegar + water cycle, then three water flushes. |
| Weak coffee | Dirty chute; overfilled cup; too large brew size | Clean chute; use ≤15 g in HomeBarista®; choose smaller size/extra-bold pod. |
| Sputtering or slow | Needle clogs; scale | Clean needles & funnel; descale |
Table 2 — Cleaning/maintenance parts
| Part | How to clean | Dishwasher-safe? |
|---|---|---|
| Exterior & drip tray plate | Damp, soapy cloth; remove tray carefully to avoid spills | Tray & tray plate: Yes, top rack; avoid abrasives. |
| Capsule holder & funnel | Separate; rinse or top-rack dishwasher (low temp) | Yes (low temp). |
| Exit & piercing needles | Paper clip to clear; rinse | N/A. |
| Bean hopper | Wipe with damp non-abrasive cloth | No dishwasher. |
| Burr grinder | Brush chute; wipe burr with damp cloth | No dishwasher. |
| Water filter | Replace every ~60 days or 60 brews; soak 15 min; flush 10 sec; reseat | N/A. |
Frequently Asked Questions (DGB-2)
My brewer hisses but doesn’t dispense. Do I have to descale every month?
Hissing with little output is classic mineral build-up. The DGB-2 prompts you by flashing all lights when it’s time, but heavy users and hard water can require monthly descaling even without the prompt. Follow the 13 oz vinegar + 26 oz water routine and do three fresh-water flushes.
Can I remove the needles to clean them?
No—do not disassemble the needles. Use a paper clip to clear the exit needle (bottom of capsule holder) and the piercing needle (inside the brew head).
My grinder keeps stopping.
First, ensure the hopper is ≤ 100 g and the brew cycle isn’t active. If the Grind light flashes, do the Power-off + 5-sec unplug reset, then remove and clean the burr and grind outlet.
Is residue on the grinder lid normal?
Yes. A light dusting appears every grind and does not affect taste for consecutive cups. Wipe as needed.
What’s the safest way to clean the capsule holder assembly?
Separate the funnel from the holder; both are top-rack dishwasher-safe (low temp). Use a paper clip for the exit needle and inside piercing needle. Never put fingers into the brew chamber.
How do I get stronger coffee?
Use the HomeBarista® with fresh grind or switch to a smaller brew size and/or extra-bold pod. Keep the grind chute clean so the full dose reaches the cup; don’t exceed 15 g or tamp the coffee.
When to contact Cuisinart service
If all brew size buttons keep flashing after cool-down, or you suspect internal damage (after a drop or spill into the base), reach out to Cuisinart Consumer Service (1-800-726-0190). The DGB-2 carries a 3-year limited warranty for normal home use; Cuisinart may repair, replace with an equivalent model, or refund if they can’t fix it.
Tip: Keep your proof of purchase. For California residents, warranty service options also include returning the unit to the retailer or directly to Cuisinart.
Wrap-up
With the DGB-2, most “no-brew” situations boil down to three things: (1) descaling, (2) needle/chute cleaning, and (3) interlocks (head not closed, grind in progress). Walk the quick wins, then the symptom-based fixes. Keep to the monthly maintenance rhythm and you’ll protect the pump, maintain temperature and flow, and enjoy consistently strong coffee.
If you run into an unusual error pattern after completing the steps, note exactly which lights flash and when, then contact Cuisinart with that description—they’ll map it to service codes covered by the 3-year limited warranty.


0 Comments