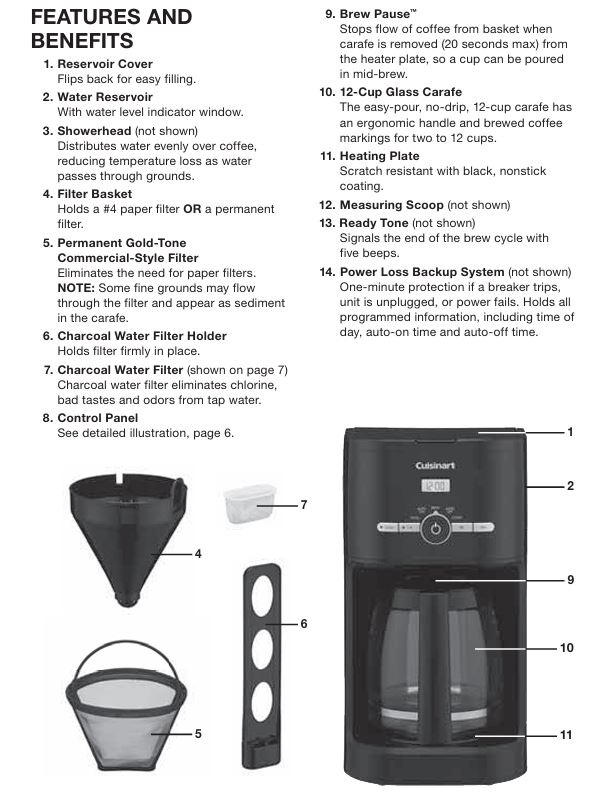
The Cuisinart DCC-1120NAS 12-cup programmable coffeemaker is designed for easy use, offering features like brew pause, auto-on, and a programmable timer, all designed to ensure you get the perfect cup of coffee. Despite its robust design, it’s possible to encounter problems after extensive use. In this guide, we’ll cover the most common issues, step-by-step solutions, and best practices for keeping your coffeemaker in top condition.
Cuisinart DCC-1120 Series Coffee Brewing Machines: Common Problems and Their Solutions
1. Coffeemaker Not Turning On
Problem:
The coffeemaker does not power on, and no display is visible.
Possible Causes and Solutions:
- Power Cord Issue:
Ensure the power cord is securely plugged into a working electrical outlet. If the coffeemaker is still not turning on, try plugging a different appliance into the same outlet to check if it’s functioning correctly. - Circuit Breaker Tripped:
If the coffeemaker is connected but still not turning on, the circuit breaker could have tripped. Reset the circuit breaker, and then test the coffeemaker again. - Faulty Power Button:
If the power button appears to be stuck or malfunctioning, it might need to be repaired or replaced. If you’re under warranty, contact Cuisinart customer service for further assistance.
2. Leaking Water
Problem:
Water is leaking from the bottom of the coffeemaker during or after brewing.
Possible Causes and Solutions:
- Improper Assembly:
Check if the water reservoir is correctly aligned. If the reservoir isn’t positioned properly, water may leak. Also, check the carafe and ensure it’s not cracked or chipped. - Clogged or Damaged Reservoir:
Inspect the water reservoir and its parts for cracks or damage. If there is any visible damage, the reservoir may need to be replaced. - Too Many Coffee Grounds:
Overloading the filter basket with coffee grounds can block the water flow, causing overflow and leakage. Make sure you’re following the correct coffee-to-water ratio for brewing.
3. No Coffee Brewing
Problem:
The coffeemaker is powered on, but no coffee is brewed.
Possible Causes and Solutions:
- Empty Water Reservoir:
Check if the water reservoir is filled properly. The coffeemaker needs water to brew, and if the reservoir is empty, it cannot function. - Brew Cycle Interrupted:
If you’ve removed the carafe for longer than 20 seconds during brewing, the Brew Pause™ feature might be activated, which halts the coffee flow temporarily. Make sure to place the carafe back onto the warming plate promptly. - Clogged Filter Basket:
A clogged filter basket can prevent water from filtering through the grounds. Clean the filter basket thoroughly to ensure it’s free of coffee grounds and debris. Also, make sure you’re using the right type of filter (either paper or gold-tone filter, not both at the same time).
4. Overflowing Coffee
Problem:
Coffee is overflowing from the filter basket, creating a mess.
Possible Causes and Solutions:
- Too Fine a Grind:
If the coffee grounds are too fine, they may clog the filter and prevent proper water flow, causing overflow. For optimal brewing, use a medium-fine grind. - Exceeding the Coffee Capacity:
The coffeemaker can hold up to 15 tablespoons of ground coffee. Exceeding this amount, especially if the coffee is finely ground, can result in overflow. Stick to the recommended coffee-to-water ratio. - Incorrect Use of Filters:
Using two paper filters at once or pairing a paper filter with the gold-tone filter can restrict the water flow, leading to overflow. Avoid this combination.
5. Coffee Taste Issues (Burnt/Sour)
Problem:
The coffee tastes burnt or sour despite using fresh coffee grounds.
Possible Causes and Solutions:
- Old or Stale Coffee Grounds:
If you’re using old coffee grounds, they can affect the flavor of your coffee. Always use fresh coffee grounds, and if you’re grinding your own beans, only grind what you need for each brew. - Incorrect Grind Size:
A very fine grind may over-extract the coffee, causing bitterness, while a very coarse grind can result in under-extraction, leading to a weak or sour taste. For best results, use a medium-fine grind. - Water Quality:
If the water you’re using is hard or has an off taste, it can affect the quality of your coffee. Consider using filtered water to improve the taste of your brew. - Brew Temperature Too High:
If the brew temperature is too high, it can burn the coffee, giving it a burnt taste. Ensure you’re using the recommended grind size and avoid brewing at excessively high temperatures.
6. Water Not Draining from the Filter Basket
Problem:
The water does not drain from the filter basket during the brewing process.
Possible Causes and Solutions:
- Clogged Filter:
Check if the filter basket is clogged with coffee grounds. Use a medium grind and ensure that the filter is not overstuffed. Clean the filter basket regularly to avoid blockages. - Improper Filter Placement:
Make sure the filter is seated correctly in the basket. An improperly positioned filter can prevent water from draining through it.
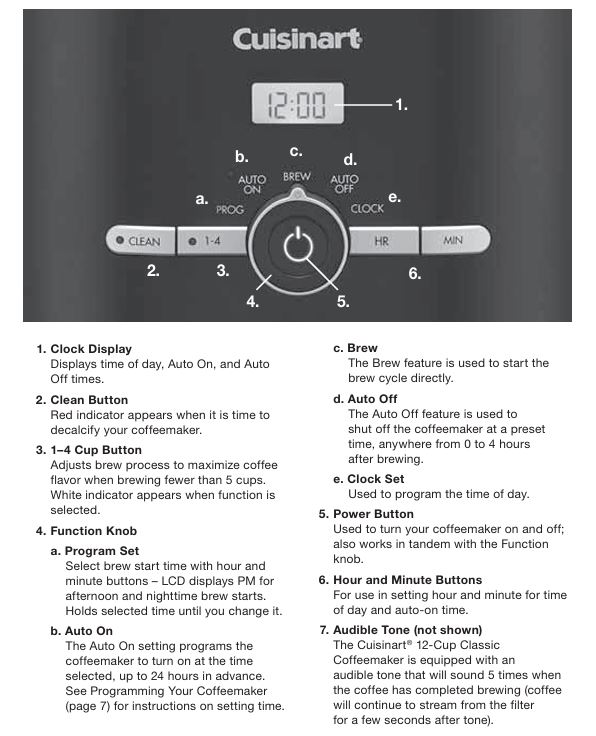
7. Display Issues
Problem:
The display is not showing the time or is malfunctioning.
Possible Causes and Solutions:
- Power Reset:
If the coffeemaker was unplugged or there was a power failure, the settings might have been reset. Unplug the coffeemaker for a few minutes, and then plug it back in to reset it. Reprogram the clock and auto-on time accordingly. - Dirty Control Panel:
If the control panel is sticky or dirty, it may not function properly. Clean the control panel gently with a damp cloth, ensuring there’s no residue left on the buttons or display.
Advanced Troubleshooting
If the basic troubleshooting steps do not resolve the issue, you may need to consider advanced solutions.
Descaling the Coffeemaker
Calcium buildup, also known as scale, can accumulate inside your coffeemaker over time, especially in areas with hard water. This buildup can affect the performance of the machine and the taste of your coffee. If the CLEAN indicator light is on, it’s time to descale the machine.
Steps to Descale:
- Fill the Reservoir:
Mix 1/3 white vinegar and 2/3 water in the water reservoir. - Start the Clean Mode:
Press and hold the CLEAN button until the indicator flashes, signaling that the machine is in cleaning mode. - Run the Cleaning Cycle:
The coffeemaker will run a cleaning cycle. When the cycle completes, the coffeemaker will beep five times. - Rinse the Machine:
After the cleaning cycle, run a cycle with clean water to remove any vinegar residue. - Reinstall the Water Filter:
After cleaning, replace the water filter in the reservoir to maintain water quality.
Contacting Customer Support
If you’ve gone through all the troubleshooting steps and the problem persists, the coffeemaker might need professional repair. The Cuisinart DCC-1120NAS comes with a 3-year limited warranty, which covers defects in material and workmanship. If the machine is still under warranty, contact Cuisinart customer service for assistance.
Preventative Maintenance
To prevent issues from arising in the future, follow these tips to maintain your Cuisinart DCC-1120NAS Coffeemaker:
- Regular Cleaning:
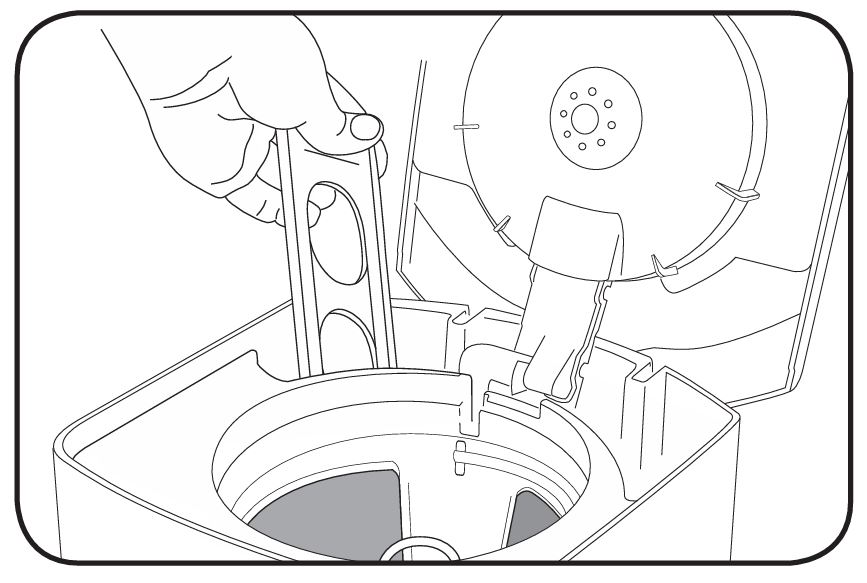
Clean the machine after each use, especially the filter basket and carafe. This prevents coffee oils from building up and affecting the flavor of your coffee. - Change the Water Filter:
Replace the charcoal water filter every 60 days or after 60 uses to maintain optimal water quality. - Descaling:
Descale the machine every 1-3 months, depending on the hardness of your water, to prevent calcium buildup. - Use Fresh Coffee Grounds:
Always use fresh coffee beans or grounds for the best flavor. Avoid using stale coffee grounds that have been sitting around for too long.
FAQs
Why is my coffee maker not brewing?
Ensure that the water reservoir is filled properly, and check that the filter basket is not clogged. Also, make sure the coffeemaker is properly assembled.
How do I reset my Cuisinart DCC-1120NAS coffeemaker?
Unplug the coffeemaker for a few minutes, then plug it back in. Reprogram the settings such as the time and auto-on feature.
Can I use the Cuisinart DCC-1120NAS without a water filter?
While it’s possible to use the coffeemaker without a filter, it’s recommended to use one to improve water quality and prevent buildup inside the machine.
What can I do if my coffee tastes bitter?
Check your grind size, as a fine grind can result in bitter coffee. Additionally, ensure you’re using fresh coffee grounds, and avoid over-brewing.
Conclusion
The Cuisinart DCC-1120NAS 12-cup programmable coffee maker is a versatile and efficient coffee brewing machine that should provide you with years of delicious coffee. By following the troubleshooting steps and preventative maintenance outlined in this guide, you can solve common issues and keep your coffeemaker in excellent working condition. If the problems persist, don’t hesitate to contact Cuisinart customer service for further assistance.


0 Comments