Your Keurig coffee maker relies on a small but powerful internal pump to draw water from the reservoir and push it through the heating chamber and pod. When that pump fails, your machine may hum, sputter, or simply refuse to pump any water at all. For daily coffee drinkers, this can be frustrating and inconvenient — and knowing how to replace the water pump can save time and money compared to replacing the entire machine. This guide walks you through why the water pump matters, how to diagnose pump issues, and why a proper replacement matters for coffee quality and machine longevity.
You can replace the water pump in your Keurig coffee maker yourself if the pump has failed. You’ll need basic tools (screwdrivers, possibly soldering gear depending on the model), a compatible replacement pump, and patience. Unplug the unit, open the base, remove mounting screws, disconnect tubes and electrical connectors, and install the new pump — then reassemble in reverse order.
Understanding the Keurig 2.0 Water Pump
Before diving into replacement, let’s clarify what the water pump does and why replacement is sometimes necessary.
What Is the Water Pump?
The water pump is a small motor‑driven device that:
- Draws water from the reservoir.
- Sends it through internal tubing.
- Helps deliver water under pressure into the brewing path.
Without a functioning pump, your Keurig won’t deliver water to the pod — leaving you with no coffee.
How the Pump Works Inside Your Keurig
Keurig brewers use an impeller pump or similar mechanism. It sits inside the machine body, connected to:
- Water inlet tube(s)
- Output pathways
- Electrical control board
- Mounting hardware
Some models may also have additional sensors, seals, or one‑way valves to aid water flow.
Signs Your Keurig Water Pump Needs Replacement
You don’t always need to open your machine to diagnose problems. Look for these common symptoms first:
No Water Output
- Machine powers on and lights up
- You hear clicking or humming
- But no water dispenses into cup
This typically means the pump isn’t pushing water through the lines.
Pump Hums, But Doesn’t Engage
If the motor sounds like it’s trying but failing to move water, that’s a key sign of pump malfunction or blockage.
Sputtering or Weak Flow
Partial water flow, sputtered streams, or irregular output often mean the pump is failing or there’s air in the system.
“Add Water” Light Despite Full Reservoir
This error suggests the machine can’t detect proper water flow — often caused by pump or float issues.
Tools & Materials You’ll Need
Before you begin your pump replacement:
- Phillips screwdrivers (various sizes)
- Small flat screwdriver or spudger
- Replacement water pump (compatible with your model)
- Needle‑nose pliers
- Soldering tools (for some models like K70)
- Clean workspace with good lighting
Note: For models requiring wire reconnection, soldering skills are helpful.
Step‑by‑Step: How to Replace a Keurig Water Pump
Step 1: Safety First
- Unplug the machine from the outlet.
- Remove the water reservoir and empty any remaining water.
- Work on a stable, dry surface.
Step 2: Open the Bottom or Back Panel
Models vary, but generally:
- Flip the unit on its side or upside down for access.
- Remove screws securing the base/back panel.
- Carefully detach panels without forcing clips.
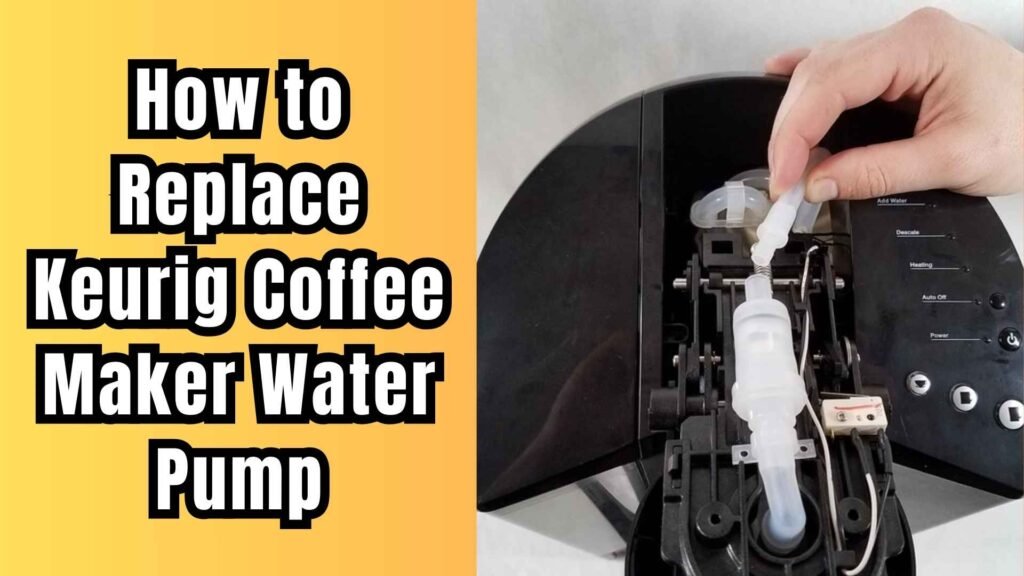
Step 3: Locate the Water Pump
Inside the machine, you’ll see tubing connected to a small motor‑like component — that’s your pump.
Step 4: Disconnect Tubes & Wiring
- Gently detach the water input and output tubes from the pump.
- Disconnect electrical connectors (2‑pin, 4‑pin as applicable) from the control board.
Step 5: Remove the Old Pump
- Unscrew the pump’s mounting brackets.
- Slide it out carefully.
If your model requires cutting zip ties or wires (e.g., Keurig K70), prepare to reconnect later using solder or connectors.
Step 6: Install the New Water Pump
- Position the replacement pump in the same place.
- Reconnect tubes and secure with clips or hose clamps.
- Plug electrical connectors back into the control board.
- Ensure wires aren’t pinched or stressed.
Step 7: Re‑assemble and Test
- Replace panels and screws.
- Re‑install reservoir.
- Plug in and run a water‑only test cycle (no pod).
- Check for water flows, leaks, or strange noises.
Troubleshooting Before Replacement
Not all water issues require pump replacement. Try these first:
Clear Air Locks
Sometimes trapped air prevents the pump from priming:
- Unplug the machine.
- Remove the reservoir.
- Tilt the machine forward and tap to dislodge air.
- Refill and run a water cycle.
This fixes around 70% of “no flow” scenarios.
Descale Your Machine
Mineral buildup can choke pumps and valves. A regular descaling routine helps improve flow and reduce the need for premature pump replacement.
Clean Exit Needles & Tubing
Clogs in the needles or one‑way valves may mimic pump failure — so clear these with a paperclip or maintenance tool before internal repair.
Model‑Specific Considerations
Different Keurig models (K‑Classic, K‑Duo, K70, Vue) may have slight variations:
- K‑Duo: Easier back panel access for pump extraction.
- K70/K‑Series: May require cutting zip ties and soldering to replace wiring.
- K‑Mini: Smaller internal layout, pay attention to space constraints.
Always consult your model’s service manual or visual teardown guide if available.
Replacement Pump Cost & Where to Find One
- OEM Keurig pumps are rare; aftermarket pumps on parts sites or specialty sellers are common.
- Ensure pressure head and size match your model’s requirements.
- Genuine parts tend to last longer and maintain proper brew pressure.
Frequently Asked Questions (FAQs)
Does Keurig make hot cocoa pods?
Yes — Keurig offers hot cocoa pods (K‑Cups) compatible with most Keurig brewers. They provide easy cocoa brewing alongside coffee.
Does Keurig make sugar‑free hot chocolate?
Yes — a few brands offer sugar‑free hot chocolate pods that work in Keurig machines, ideal for low‑sugar diets.
Can I just clean the pump instead of replacing it?
Cleaning internal lines may help if the issue is debris or air locks. But if the pump motor is failing, cleaning won’t fix it.
How often should I descale my Keurig?
Every 3–6 months, depending on water hardness and frequency of use. Regular descaling reduces mineral buildup and improves pump life.
Is it safe to replace the pump myself?
Yes, if you’re careful and follow instructions. Always unplug the unit, work with proper tools, and handle electrical parts safely.
Why does my Keurig hum but not brew?
A humming sound with no water often indicates the pump is trying but failing — possibly due to air locks, clogs, or a failing water pump.
Will replacing the pump fix slow water flow?
It can — but also check for scale buildup and blocked needles before replacement.
Can I use distilled water in my Keurig?
Yes — distilled water helps reduce mineral deposits and prolongs pump and boiler life.
What’s the difference between a pump and priming issue?
Priming is the initial drawing of water. Air locks often cause temporary priming issues, while pump failure is a mechanical problem.
Replacing the water pump in a Keurig coffee maker is a manageable task for DIY enthusiasts and helps extend machine life. Start with troubleshooting (air lock purge, descaling, needle cleaning) before moving to replacement.
When a pump does fail, carefully follow the step‑by‑step instructions: remove panels, disconnect tubes and wiring, swap the old pump for a compatible replacement, and test before final assembly. With patience and the right tools, you can restore your Keurig to full brewing performance — and enjoy fresh coffee again.


0 Comments