If you’re a proud owner of the Hamilton Beach 42500 convenient craft 16 Oz. rapid cold brew and hot coffee maker, you understand the importance of enjoying the perfect cup of coffee, whether hot or cold. However, like any appliance, issues can arise. This comprehensive troubleshooting guide is here to help you address common problems and ensure your coffee maker continues to serve you with consistently great coffee. We’ll guide you through detailed solutions to each issue, ensuring that you can quickly fix any malfunction that might occur.
Whether you’re dealing with malfunctioning components, brewing issues, or just want to ensure your machine runs smoothly, this guide provides clear, step-by-step troubleshooting solutions, maintenance tips, and practical advice based on the official user manual.
Hamilton Beach 42500 Coffee Brewer: Common Problems & Solutions

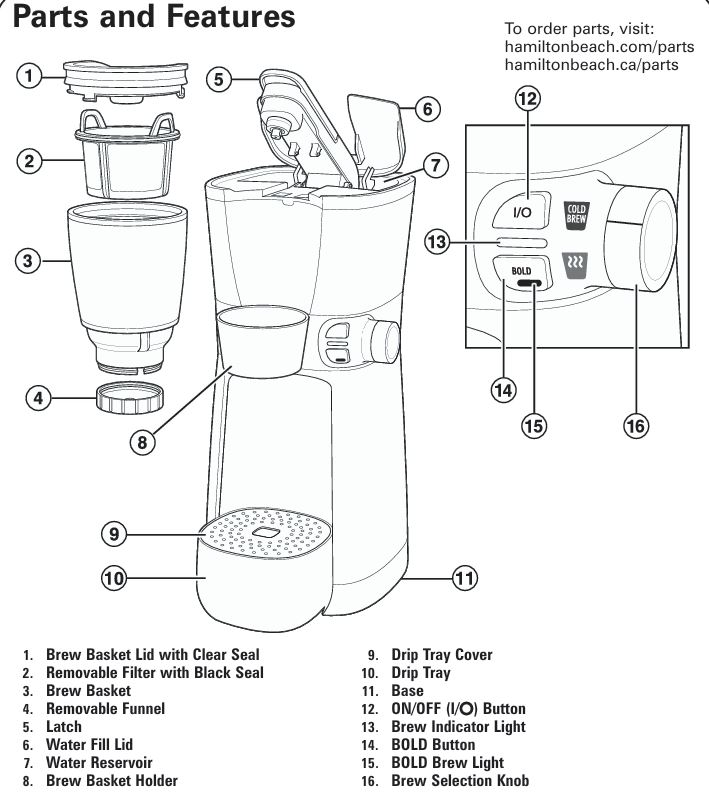
1. Latch Issues: Why Won’t It Close Properly?
Problem: The latch of the brew basket won’t close all the way, preventing the coffee maker from starting.
Possible Causes:
- Brew Basket Lid Misalignment: The brew basket lid may not be placed properly, preventing the latch from closing securely.
- Improper Installation of Brew Basket: If the brew basket isn’t aligned correctly with the holder, the latch won’t engage properly.
Detailed Solutions:
- Ensure Proper Lid Placement: The Brew Basket Lid needs to be securely twisted into the locked position. When you place the lid, check for a solid, tight fit. If the lid is slightly askew, the latch won’t lock, and brewing will not begin.
- Check the Brew Basket Alignment: Ensure that the Brew Basket is installed properly in its holder. The bottom of the Brew Basket should align perfectly with the Brew Basket Holder. If the brew basket is off-center, the latch will not close properly, and this could stop the brewing cycle from starting.
2. Brew Indicator Light On, But Coffee Isn’t Coming Out
Problem: The brew indicator light is on, but no coffee is coming out of the coffee maker.
Possible Causes:
- Blooming Process (Pre-infusion): In Cold Brew or BOLD modes, the brewing process pauses intermittently to allow the coffee grounds to bloom (pre-infusion), which enhances flavor extraction.
Detailed Solutions:
- Wait for the Blooming Process to Complete: The Brew Indicator Light staying on while no coffee flows is typically part of the blooming process. This happens in Cold Brew or BOLD Brew modes. Don’t worry; it’s normal for the coffee maker to stop and start during brewing to allow for optimal extraction.
- Confirm Brewing is Complete: Once the Brew Indicator Light turns off, the brewing cycle is complete, and you can safely remove your coffee. If you are using Cold Brew or BOLD settings, the cycle will be paused multiple times to enhance the coffee’s flavor profile, so wait until the light turns off.
3. Brew Indicator Light Flashing, But Brew Cycle Doesn’t Start
Problem: The brew indicator light flashes, but the brew cycle does not start.
Possible Causes:
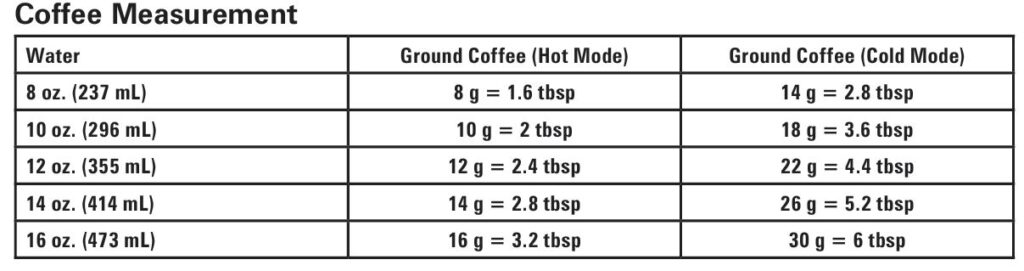
- Out of Water: The machine requires a minimum of 8 oz. (237 mL) of water to function properly.
- Malfunctioning Water Reservoir: Sometimes, water may not be flowing properly into the brewing system, which causes the cycle to fail to start.
Detailed Solutions:
- Add Enough Water: Ensure that the water reservoir has at least 8 oz. (237 mL) of water before beginning the brewing cycle. Maximum capacity is 16 oz. (473 mL), so avoid overfilling.
- Check for Airlocks in the Water Reservoir: Sometimes air bubbles can block the water from entering the brewing system. If the water reservoir is properly filled and the light still flashes, tap gently on the side of the coffee maker to release any trapped air and try starting the brew cycle again.
4. Grounds in the Coffee Cup
Problem: Grounds end up in your coffee cup after brewing.
Possible Causes:
- Gray Seal Not Installed on Removable Filter: The gray seal on the removable filter might not be seated correctly, which allows grounds to seep into the brewed coffee.
- Clogged Removable Funnel: The removable funnel may be clogged with coffee grounds, which could prevent coffee from properly filtering.
Detailed Solutions:
- Check the Gray Seal: Always ensure that the gray seal is installed correctly on the removable filter before brewing. If it’s not installed properly, coffee grounds can pass through into the brewed cup.
- Clean the Removable Funnel: Remove the removable funnel from the brew basket and clean it thoroughly with warm, soapy water or run it through the dishwasher. Reinstall it properly to ensure it’s not clogged.
- Clean the Brew Basket: Always clean the brew basket and removable filter after each use. Avoid scooping grounds with the removable filter. Instead, use a coffee scoop or spoon to add grounds into the filter.
5. Leaking from the Brew Basket
Problem: Coffee leaks out of the brew basket during brewing.
Possible Causes:
- Improper Lid Seal: The clear seal on the brew basket lid may not be in place, leading to leaks during brewing.
- Excessive Coffee: Too much coffee in the brew basket could lead to overflow or leakage during brewing.
- Coffee Grounds Around the Sealing Surface: If there are any coffee grounds around the sealing surface, this could lead to leakage.
Detailed Solutions:
- Ensure the Clear Seal is Installed Properly: Always check that the clear seal is securely installed on the brew basket lid before brewing. This seal prevents coffee from leaking during brewing.
- Avoid Overfilling the Brew Basket: Add no more than 30g of ground coffee to the brew basket. Overfilling can lead to coffee overflowing from the basket, causing a mess.
- Clean the Brew Basket Sealing Area: If coffee grounds are around the sealing surface, this can cause leakage. Wipe the sealing area carefully with a damp cloth before each brew cycle to ensure it is free of grounds.
6. Coffee Quality Issues
6.1 Weak Coffee
Problem: Your coffee comes out too weak.
Detailed Solutions:
- Increase Coffee Grounds: To make stronger coffee, increase the amount of coffee grounds. You can add up to 30g of coffee (about 6 tablespoons) in the brew basket for a stronger cup.
- Use the BOLD Setting: For an even stronger coffee, press the BOLD button before starting the brew cycle. This will adjust the brew cycle for a more intense extraction process.
6.2 Strong Coffee
Problem: Your coffee is too strong.
Detailed Solutions:
- Reduce Coffee Grounds: If your coffee is too strong, reduce the amount of coffee in the brew basket. You can try using a smaller amount of grounds and adjust the amount of water used as well.
- Use More Water: If the coffee is too concentrated, you can also add more water (up to 16 oz.), which will dilute the coffee and make it less intense.
6.3 Sediment in Coffee
Problem: Sediment is visible in your coffee cup.
Detailed Solutions:
- Use a Coarser Coffee Grind: If you’re using a fine grind of coffee, it will likely produce more sediment in the coffee cup. Switch to a coarser grind of coffee to reduce the amount of sediment and make the coffee clearer.
Step-by-Step Troubleshooting Guide
Step 1: Check the Power Source
Before troubleshooting any other issues, ensure that the coffee maker is plugged into a functioning power outlet. Examine the power cord for any visible damage. If the cord is damaged, replace it immediately to avoid electrical hazards.
Step 2: Verify Water Levels
Make sure that there is enough water in the water reservoir. For brewing to begin, the coffee maker requires at least 8 oz. (237 mL) of water. Overfilling can cause spills or overflows, so avoid exceeding the 16 oz. (473 mL) maximum capacity.
Step 3: Ensure Proper Installation of Parts
Ensure that the brew basket lid, removable filter, and brew basket are installed correctly. If any part is missing, improperly installed, or misaligned, it could prevent the machine from brewing properly.
Step 4: Reset the Coffee Maker
If the coffee maker is unresponsive or malfunctioning, turn it off and unplug it. Wait for about 2 minutes before plugging it back in and trying the brew cycle again.
Step 5: Regular Cleaning
The Hamilton Beach 42500 coffee maker must be cleaned regularly. After every use, rinse the brew basket, removable filter, and funnel to prevent coffee grounds from building up. Once a month, run a cleaning cycle with white vinegar and water to remove mineral deposits from the internal components.
Advanced Troubleshooting: High-Altitude Calibration
In areas with high altitudes, excessive steam during brewing can occur. To address this, follow the steps below to activate High-Altitude Calibration Mode:
- Press and hold the ON/OFF button and the BOLD button simultaneously 5 times in quick succession.
- The Brew Indicator Light and the BOLD Brew Light will flash 5 times to confirm activation.
- The coffee maker is now ready for brewing at high altitudes.
To Reset the Coffee Maker:
- Unplug the unit and leave it unplugged for 2 minutes before restarting.
FAQ
Why does my coffee maker stop brewing halfway?
This is due to the blooming process that occurs during Cold Brew or BOLD Brew modes. The brewing process pauses intermittently to allow the coffee grounds to bloom, which enhances flavor extraction. Wait for the Brew Indicator Light to turn off before removing your cup.
How do I prevent coffee grounds from getting into my coffee?
Ensure that the gray seal on the removable filter is properly installed and check that the removable funnel is clean. Always use a coffee scoop to measure coffee grounds and never scoop directly from the coffee bin.
My coffee isn’t hot enough. What can I do?
Ensure that you are using the Hot Brew mode for hot coffee. Also, using colder water for brewing Cold Brew coffee will help provide a sharper contrast between brewing temperatures.
How can I make my coffee less bitter?
If your coffee is too bitter, try using less coffee grounds or cooler water. A coarser coffee grind may also help reduce bitterness.
Maintenance Tips
Regular Maintenance for Long-lasting Performance
To ensure your Hamilton Beach 42500 coffee maker remains in top condition, follow these essential maintenance tips:
- Clean the Brew Basket and Removable Filter after each use.
- Run a monthly cleaning cycle with white vinegar to prevent mineral buildup and ensure smooth operation.
- Check the seals regularly to prevent leaks and ensure a proper brewing process.
- Use proper coffee measurements to avoid overflow or under-extraction.
By following these tips and addressing any issues promptly, you can enjoy a long-lasting, high-quality brewing experience with your Hamilton Beach 42500 convenient craft coffee brewing machine.


0 Comments