The Keurig B-30 Mini Brewer is a highly convenient appliance designed for single-cup brewing with K-Cup® pods, delivering a quick, satisfying cup of coffee, tea, or hot cocoa. However, like all appliances, it may encounter problems that affect its performance. This professional troubleshooting guide offers a complete walkthrough to diagnose and fix common issues with your Keurig B-30. By following these troubleshooting steps, you can quickly identify and solve any problems, ensuring your coffee brewer performs optimally.
This guide is based on the official Keurig B-30 User Manual and will help you resolve issues such as power failures, brewing issues, or maintenance needs. Let’s dive into the most common Keurig B-30 problems and solutions.

Common Issues with Keurig B-30 Single Cup Mini Brewing System
Many users experience the following issues with their Keurig B-30 Single-Cup Brewer. These problems can often be fixed with some basic troubleshooting. Here is a list of common issues:
| Issue | Description |
|---|---|
| Brewer not turning on | No power light, unresponsive buttons |
| Will not brew | Flashing indicators, no liquid dispensed |
| Brews a partial cup | Incomplete brewing cycle |
| Auto shut-off | Brewer powers down during or after brewing |
| Water not heating | Heater light stuck or process slow |
Each of these issues will be addressed in detail in the sections below.
Keurig B-30: Step-by-Step Troubleshooting Guide
Power Issues: Brewer Not Turning On
Symptoms:
- No power light is illuminated.
- Buttons are unresponsive.
- The machine remains cold.
Solutions:
- Check the Power Source:
- Plug the brewer into a dedicated, grounded outlet. Power strips or overloaded outlets may not provide sufficient power.
- Ensure that the outlet works by plugging in another appliance.
- Ensure a Firm Plug Connection:
- Unplug the Keurig and reinsert the plug securely.
- Try a different electrical outlet to ensure the issue isn’t with the original one.
- Reset the Circuit Breaker:
- If your circuit has overloaded, you might need to reset the breaker. Check the breaker panel and reset any tripped breakers.
- Temperature Conditions:
- If your brewer was in a cold or frozen environment, allow it to warm up to room temperature for at least 2 hours before turning it on. This is crucial for appliances affected by temperature fluctuations.
Pro Tip: Always keep your brewer in a dry, room-temperature location, away from extreme cold or heat.
Brewing Problems: Not Dispensing or Not Starting
Symptoms:
- Brewing does not start after pressing the button.
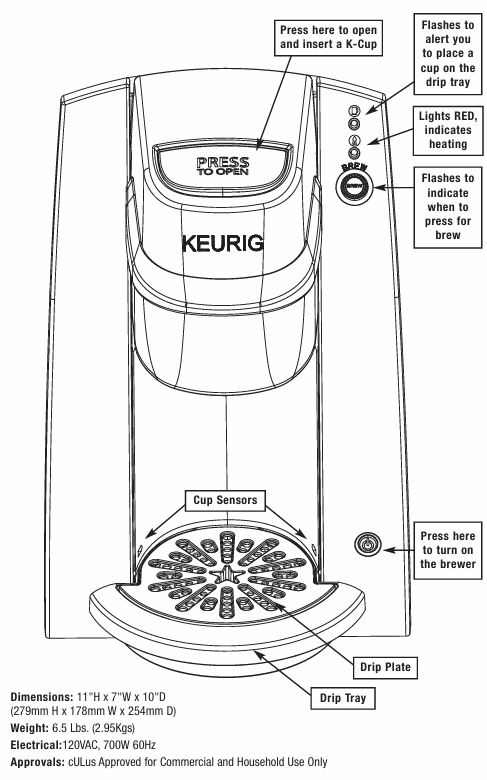
- “Place Mug” light flashes continuously.
- The machine is idle even after pressing “Brew.”
Solutions:
- Check for Water in the Hot Water Tank:
- Ensure the Hot Water Tank is filled to the FILL LEVEL with filtered or bottled water. Never use unfiltered tap water to avoid mineral buildup.
- Check Mug Placement:
- Only use ceramic or plastic mugs (avoid clear glass mugs) to allow the cup sensor to function properly. If the sensor does not detect the mug, the “Place Mug” light will flash.
- Power Cycle the Brewer:
- Turn off the brewer, unplug it from the power source, wait for 5 minutes, and then plug it back in. This simple step can often resolve minor electronic issues.
Partial Cup Brewing
Symptoms:
- The brewer starts the brew cycle but stops early.
- Less than 10 oz of coffee is dispensed.
Causes & Fixes:

- Clogged Exit Needle:
- Coffee grounds can clog the exit needle, preventing water from properly flowing through the K-Cup®.
- Fix: Detach the K-Cup® holder and clean the needle using a paper clip.
- Dirty K-Cup® Holder:
- Coffee grounds or debris may be obstructing the brewing process.
- Fix: Remove the K-Cup® holder, rinse it under water, or place it on the top rack of the dishwasher.
- Scale Build-Up:
- Over time, mineral deposits from water can clog internal pipes and the heating element.
- Fix: Descale the machine using vinegar (see the section on descaling below).
Auto Shut-Off Unexpectedly
Symptoms:
- The machine turns off during or immediately after brewing.
Causes & Solutions:
- Ensure Proper Mug Placement:
- The brewer has automatic sensors to detect if there is a cup placed on the drip tray. If no cup is detected, the machine may automatically shut off to prevent spills.
- Fix: Ensure a non-transparent cup is placed on the tray.
- Reset the Machine:
- Power off the machine, unplug it for 5 minutes, and then plug it back in to reset its internal functions.
Cleaning & Maintenance Tips
Regular maintenance and cleaning are crucial for keeping your Keurig B-30 functioning smoothly.
Weekly Cleaning:
- Drip Tray & Plate:
- Slide the tray out and wash it with a damp cloth. Do not immerse it in water.
- External Surfaces:
- Wipe the exterior of the brewer with a lint-free cloth to remove dust and coffee stains.
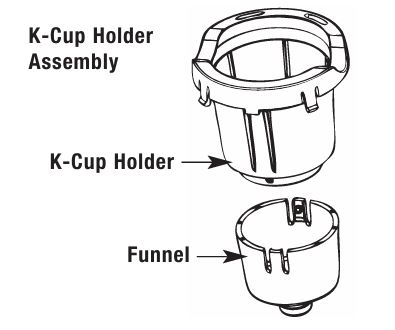
- K-Cup® Holder Assembly:
- Detach the K-Cup® holder and rinse it under water or place it in the dishwasher’s top rack.
- Funnel:
- Detach the funnel and rinse or clean it gently.
Reminder: Never immerse the entire brewer in water.
How to Descale Keurig B-30 Brewer
Descaling your brewer is an essential step to maintain optimal performance. Calcium and mineral deposits can build up inside your brewer over time, affecting the machine’s ability to heat and brew efficiently.
Descaling Steps:
- Materials Needed:
- 8 oz of white vinegar (undiluted).
- 10 oz ceramic cup (do not use paper cups).
- First Brew:
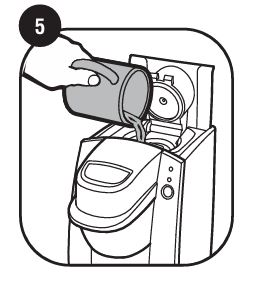
- Fill the water tank with white vinegar up to the FILL LEVEL.
- Place the ceramic cup on the drip tray and brew without a K-Cup®.
- Pause & Soak:
- After brewing, pour the hot vinegar back into the tank.
- Turn off the machine and let it sit for 30 minutes.
- Rinse & Clean:
- Brew with fresh water to rinse out the vinegar, repeating until the machine is clean.
“Descaling every 3–6 months will significantly extend the life of your brewer.” — Keurig Manual
Quick Troubleshooting Table
Here is a quick reference table for common problems:
| Problem | Solution |
|---|---|
| Brewer not turning on | Plug into a grounded outlet, check power supply |
| Brewer won’t brew | Ensure water is filled, use a ceramic mug |
| Brewer brews a partial cup | Clean the exit needle, descale unit |
| No power at all | Wait for 2 hours if frozen, check power |
| Brewer auto shuts off | Ensure a cup is placed properly on the tray |
Frequently Asked Questions
Why won’t my Keurig B-30 brew even though it’s powered on?
- Ensure the water tank is filled.
- Avoid using clear glass mugs, as the sensor won’t detect them.
- Make sure the K-Cup® is correctly positioned.
How do I clean the exit needle?
Detach the K-Cup® holder and use a paper clip to clear any coffee grounds blocking the needle.
How often should I descale my Keurig B-30?
Descale every 3 to 6 months, or more often if you notice white scale buildup or slow brewing.
My Keurig only brews a few ounces—what’s wrong?
Likely caused by a clog or mineral build-up. Clean the exit needle and descale your brewer.
Can I use tap water in my B-30 Brewer?
It is highly recommended to use filtered or bottled water to avoid mineral buildup.
Final Thoughts & Recommendations
The Keurig B-30 is a durable and reliable brewer when properly maintained. Regular cleaning, periodic descaling, and simple troubleshooting will keep your brewer in top shape for many years. Always follow the manufacturer’s guidelines for maintenance and troubleshooting.
Pro Maintenance Tips:
- Weekly: Clean the drip tray, exterior, and K-Cup® holder.
- Monthly: Inspect the exit needle for blockages.
- Quarterly: Perform a vinegar descaling procedure.
- Always: Use filtered or bottled water to minimize mineral build-up.
If your brewer continues to have issues, don’t hesitate to reach out to Keurig Customer Service at 1-866-901-BREW (2739) for further assistance.


0 Comments