Keurig’s K-150 commercial coffee maker is a top choice for those who need quick, consistent, and quality brewing. However, like any appliance, it can occasionally experience issues. Whether your brewer is not turning on, not brewing, or giving you error messages, this comprehensive troubleshooting guide will help you identify and resolve the problems quickly.

Keurig K150 Common Problems & Their Solutions
a. Brewer Not Powering On
If your Keurig K-150 isn’t turning on, this can be frustrating, especially when you need that morning coffee rush. Here are the steps you can take to troubleshoot this issue.
Step 1: Ensure Proper Power Connection
Before you panic, check the following:
- Check the Outlet: Make sure the brewer is plugged into a properly grounded outlet. If it’s plugged in securely but still not working, try a different outlet to rule out any issues with the power source.
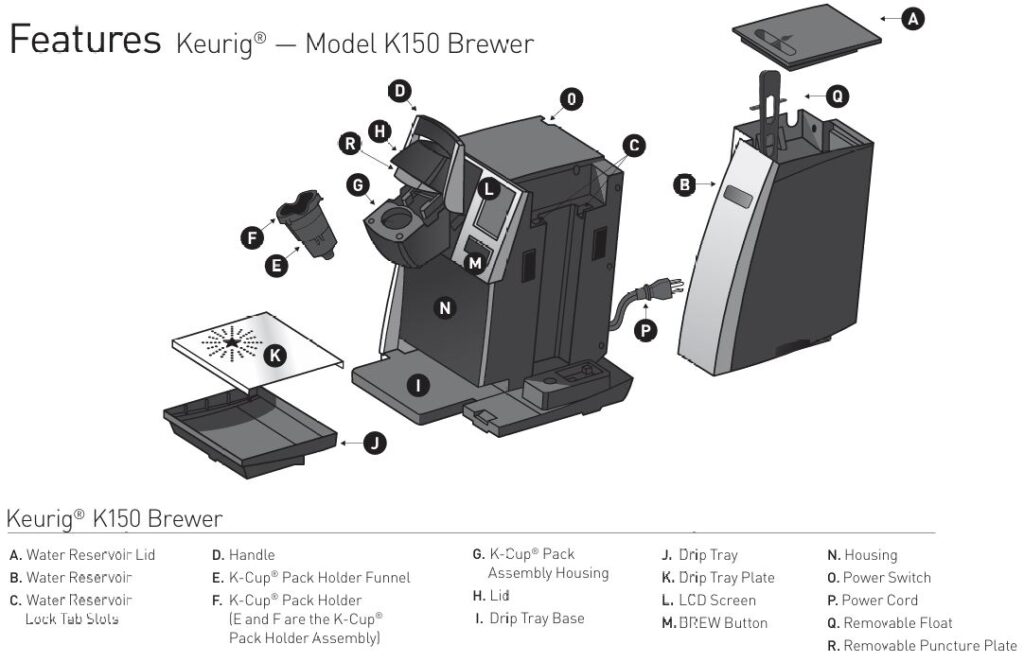
- Check the Power Switch: The Keurig K-150 features a power switch located on the back. Ensure it is in the “ON” position.
- Reset Circuit Breaker: If you have other appliances connected to the same circuit, it’s possible the breaker tripped. Reset the circuit breaker if needed.
Step 2: Inspect the Power Cord
- Look for Damage: Inspect the power cord for any visible signs of wear or damage. A frayed or broken cord can be the reason your brewer isn’t getting power. If you notice damage, you must replace the power cord to avoid any safety issues.
Step 3: Check the Fuse
Some models include a fuse for additional safety. If the brewer is still not powering on after confirming the outlet, power switch, and power cord are all functional, you may need to consult the Keurig service manual for fuse replacement.
b. Brewer Not Brewing
If your Keurig K-150 is turning on but not brewing, follow these steps to resolve the issue.
Step 1: Check the K-Cup® Pack
- Proper Insertion: Ensure the K-Cup® pack is correctly inserted into the K-Cup® holder. Sometimes, improper placement can prevent brewing. The K-Cup® holder should fit snugly in the assembly.
- Clogged Exit Needle: A common cause for brewing failure is a clogged exit needle. If your brewer is not dispensing coffee, it’s worth cleaning the exit needle. Use a paperclip to gently clear any coffee grounds or debris from the needle. Follow the cleaning instructions in the manual for best results.
Step 2: Refill the Water Reservoir
- Check Water Levels: The K-150 will not brew if the water reservoir is too low. Always ensure the water reservoir is filled to the maximum line before attempting to brew.
- Water Flow Interrupted: If the message “Water Flow Interrupted” appears on the display, lift and remove the water reservoir, refill it, and place it back securely. Follow the on-screen instructions to reset the system.
Step 3: Descale the Brewer
Mineral build-up can affect your brewer’s performance over time. To keep your Keurig K-150 in good working order, it’s important to descale the machine regularly.
- Descaling Process: Follow the steps in your manual to descale the brewer. Typically, this involves running a cycle with white vinegar or a descaling solution through the machine. This will clear any mineral deposits from the internal components, ensuring smooth water flow.
c. Chlorine or Mineral Taste in Coffee
A common complaint among Keurig users is the taste of chlorine or minerals in their coffee. Here’s how to resolve that issue:
Step 1: Use Filtered or Bottled Water
Keurig recommends using filtered or bottled water for brewing. Tap water, especially in areas with hard water, can leave behind minerals that affect the flavor of your coffee. Bottled water is a great alternative that will improve the taste and prevent mineral build-up.
Step 2: Clean the K-Cup® Pack Holder
The taste of stale or old coffee grounds can also affect the freshness of your brew. Regularly clean the K-Cup® pack holder, funnel, and puncture needles to remove any residual coffee oils or grinds that may be affecting the flavor.
Step 3: Install a Water Filter
Keurig offers a Water Filter Starter Kit that can be installed in the K-150. This will help filter out chlorine, minerals, and other impurities, improving the taste of your coffee.
d. Brewer Display Issues
Sometimes, your brewer’s LCD display may act up. Whether it’s not displaying the time or showing strange error messages, here’s how to handle it.
Step 1: Reset the Clock
- Set the Time: If the clock is not showing or it’s incorrect, you may need to reset it. Access the “Clock” settings from the menu and manually adjust the time to the correct hour and minutes.
Step 2: Perform a Hard Reset
- Power Cycle: Unplug the Keurig K-150 for about 30 seconds. This can help reset the internal system and clear any minor glitches or frozen settings on the display.
Step 3: Check for Error Codes
If your brewer displays any error codes, refer to the Keurig K-150 troubleshooting section in the manual. Common issues like water flow interruptions or heating problems will be displayed as error messages, along with recommended fixes.
e. Brewer Shuts Off or Turns On Automatically
Automatic on/off behavior can sometimes be controlled by settings within the menu. Here’s how to ensure your brewer is following your schedule.
Step 1: Check Auto-Off Settings
- Disable Auto-Off: The Keurig K-150 features an automatic shut-off function that can turn off the machine after a period of inactivity. If the brewer is shutting off unexpectedly, disable the “Auto Off” feature through the menu.
Step 2: Review On/Off Time Settings
- Set On/Off Time: If your brewer is turning on or off at the wrong times, make sure the “On/Off Time” is correctly set in the menu. This feature allows you to program specific times for your brewer to turn on or off, which is useful for offices or commercial settings.
FAQs
How often should I descale my Keurig K-150?
It’s recommended to descale your brewer every 3 to 6 months, depending on your water quality. If you live in an area with hard water, you may need to do this more frequently.
Why is my coffee not brewing the correct amount?
This could be caused by a clogged exit needle, low water levels, or an incorrect brew size setting. Ensure the exit needle is clean, the water reservoir is filled, and the brew size is correctly set.
How do I clean the water reservoir?
Use a damp, non-abrasive cloth to wipe down the water reservoir. Do not submerge it in water or use harsh cleaning chemicals, as this could damage the parts or leave unwanted residues.
Conclusion
Your Keurig K-150 commercial coffee maker is an efficient and reliable machine that can deliver high-quality brews day in and day out. However, if you encounter issues, these troubleshooting steps will help you quickly diagnose and resolve the problem. Regular maintenance, such as descaling and cleaning, will ensure your brewer continues to perform at its best.
Here’s a concise table summarizing the troubleshooting steps for common issues with the Keurig K-150:
| Issue | Solution |
|---|---|
| Brewer Not Powering On | – Check the outlet and power switch. – Inspect the power cord for damage. – Reset the circuit breaker. |
| Brewer Not Brewing | – Ensure proper K-Cup® insertion. – Clean the exit needle. – Refill water reservoir. – Perform descaling. |
| Chlorine or Mineral Taste | – Use filtered or bottled water. – Clean the K-Cup® holder and puncture needles. – Install a water filter. |
| Display Issues | – Reset the clock. – Perform a hard reset (unplug for 30 seconds). – Check for error codes and follow troubleshooting steps. |
| Brewer Shuts Off/On Automatically | – Disable the Auto-Off feature. – Set the correct On/Off time in the menu. |
If you’re still having trouble after following this guide, don’t hesitate to contact Keurig customer support for further assistance. Keep your brewer well-maintained, and it will continue to provide delicious coffee, tea, and hot cocoa for your office or business needs!


0 Comments