The Cuisinart DCC-3000NAS Coffee On Demand 12-Cup Programmable Coffee Maker is a convenient appliance that offers fresh coffee at the touch of a button. However, like any appliance, it may occasionally run into issues. Whether it’s not brewing, dispensing coffee, or displaying problems, this troubleshooting guide will help you resolve these common issues and restore your coffee maker to optimal performance.

Common Problems with the Cuisinart DCC-3000NAS Coffee Maker
Before diving into troubleshooting, it’s important to familiarize yourself with the types of issues that users frequently experience with this model:
- Coffee maker not brewing
- Coffee not dispensing correctly
- Display issues or no power
- Weak coffee or poor taste
- Cleaning and maintenance notifications
In this guide, we will cover these problems and provide detailed, step-by-step solutions. Let’s explore the potential causes and their fixes in greater detail.

Problem 1: Coffee Maker Not Brewing
Possible Causes:
- Power Supply Issues: The coffee maker may not be receiving power, which can occur if it is unplugged or if there is an electrical issue.
- Water Reservoir Misalignment: If the water reservoir is not placed correctly or not filled, the coffee maker may fail to brew.
- Filter Basket Blockage: Overfilled or clogged filter baskets are a common cause for brewing failure, as they impede water flow.
How to Fix:
1. Ensure Proper Power Connection:
- Make sure the Cuisinart Coffee Maker is plugged into a working electrical outlet. Test the outlet by plugging in another device to check if it’s functioning.
- If your coffee maker loses power after a power surge or outage, check the Power Loss Back-up System. This feature saves your settings for one minute, but you may need to reset the time and programmed brew settings.
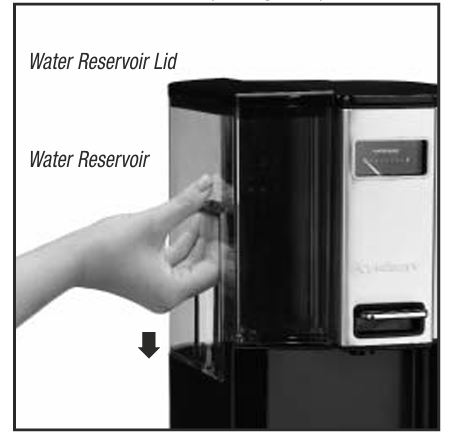
2. Check the Water Reservoir:
- The water reservoir must be properly aligned in its compartment to allow the brewing process to begin. Remove and reinsert the reservoir to ensure it’s seated correctly.
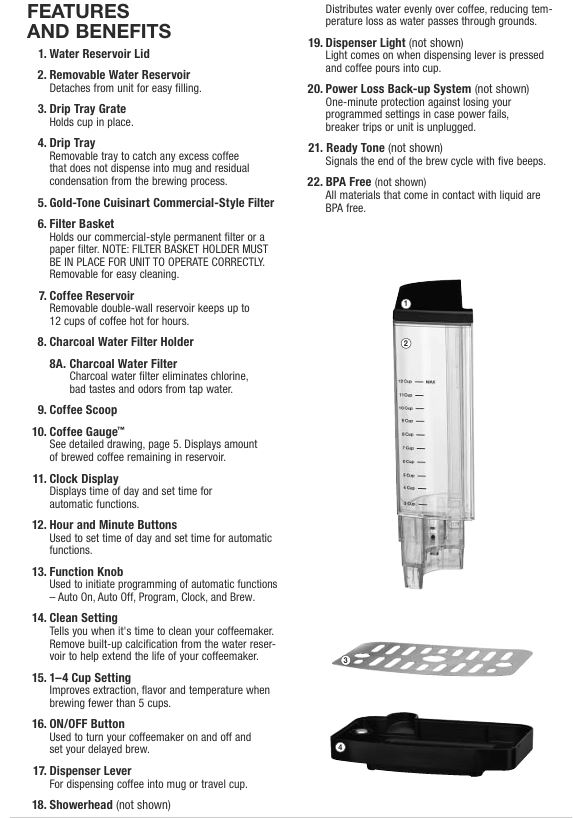
- Ensure you fill the reservoir to the appropriate level (up to the 12-cup mark) before starting the brewing cycle. For smaller servings, use the 1–4 cup setting to adjust the brewing process.
3. Inspect and Clean the Filter Basket:
- A clogged filter basket can obstruct water flow. Remove the filter basket and inspect it for any blockages or coffee grounds that may have accumulated.
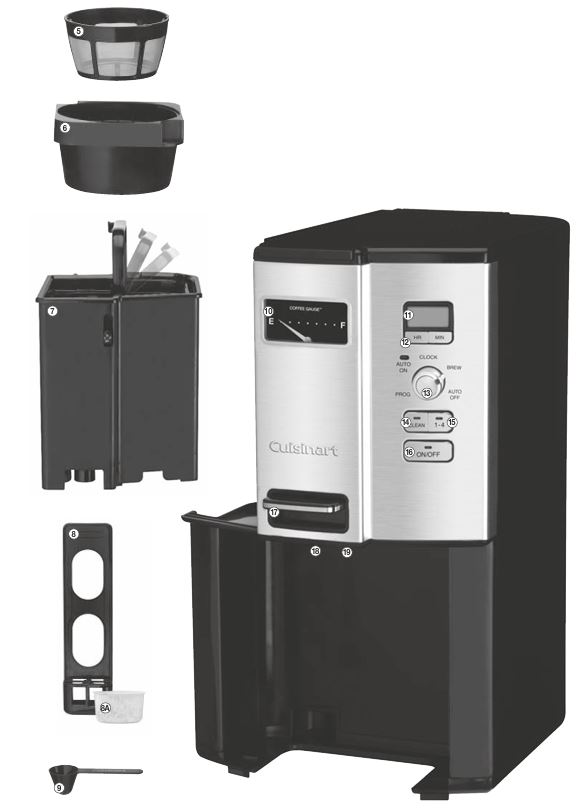
- Ensure you’re using the correct type of filter. The coffee maker works with either paper filters or the gold-tone permanent filter. Always use only one filter at a time. If you’re using the gold-tone filter, make sure it’s clean and free of built-up coffee grounds.
4. Clear Blockages:
- If the coffee grounds are too finely ground or if too much coffee is used, this can lead to blockages. Only use the recommended amount of ground coffee per cup (one tablespoon per 5 fl. oz. of water).
- Avoid using multiple paper filters or combining paper filters with the permanent filter, as this can restrict water flow.
Problem 2: Coffee Not Dispensing Properly
Possible Causes:
- Dispenser Lever Jammed: The dispenser lever may be stuck or malfunctioning, preventing coffee from being dispensed properly.
- Clogged Dispenser Spout: Coffee grounds or residue might be clogging the dispenser spout.
- Coffee Reservoir Overflow: If coffee or water is not properly draining into the coffee reservoir, it can spill into the drip tray or block the dispensing mechanism.
How to Fix:
1. Check the Dispenser Lever:
- Press down on the dispenser lever firmly to ensure it activates properly. If the dispenser light doesn’t turn on, it may indicate an issue with the lever mechanism.
- Check if any coffee grounds have lodged near the lever or the dispenser light, which could prevent coffee from being dispensed.
2. Clean the Dispenser Spout:
- Over time, coffee grounds can accumulate in the dispenser spout, clogging the flow. Clean the spout with a damp cloth to remove any coffee residue. For more thorough cleaning, use a soft brush to scrub the inside of the spout.
- After cleaning, test the dispenser lever again to see if coffee dispenses correctly.
3. Inspect the Coffee Reservoir and Filter:
- Ensure that the coffee reservoir is properly aligned. If the coffee isn’t dispensing correctly, make sure the filter basket is also in place, as the unit requires it to function properly.
- If any residual coffee grounds have spilled over, wipe the inside of the coffee reservoir clean to prevent further blockages.
Problem 3: No Power or Display Issues
Possible Causes:
- Electrical Faults: The coffee maker may not be receiving power due to a faulty plug, cord, or power source.
- Internal Component Failure: A blown fuse or malfunctioning internal component may cause display issues or power loss.
- Power Loss or Surge: A power surge, outage, or tripped breaker can disrupt the coffee maker’s settings.
How to Fix:
1. Reset the Coffee Maker:
- If the coffee maker isn’t responding to power or the display isn’t showing anything, try resetting the coffee maker by turning it off and then back on. You may need to reset the time and other settings as the coffee maker may have lost them due to power loss.
2. Check the Power Cord and Plug:
- Examine the power cord for any visible damage or fraying. If the power cord is damaged, it could prevent the coffee maker from receiving power.
- Try plugging the coffee maker into a different outlet. If another device works in the same outlet, the issue may lie with the coffee maker’s plug or internal wiring.
3. Inspect the Circuit Breaker:
- Ensure that no other appliances are causing an overload in the circuit. If the coffee maker is plugged into a circuit with other devices, try using a different outlet to avoid overloading the circuit.
4. Check the Back-Up Power System:
- The Power Loss Back-up System helps preserve your settings for one minute after a power surge. If the coffee maker isn’t powering on after an outage, ensure that the system hasn’t been affected. You may need to reprogram the coffee maker’s settings.
Problem 4: Weak Coffee or Poor Taste
Possible Causes:
- Incorrect Grind Size: The grind size of the coffee beans may be too fine or too coarse, affecting the extraction process.
- Incorrect Coffee-to-Water Ratio: Using too little coffee or too much water can result in weak coffee.
- Poor-Quality or Stale Coffee Beans: Coffee that is not fresh or has been stored improperly will produce inferior-tasting coffee.
- Water Quality: Tap water with a high chlorine content or unpleasant odor can affect the taste of your coffee.
How to Fix:
1. Adjust the Coffee Grind:
- For the best brewing results, use a medium grind. If the grind is too fine, it can cause over-extraction, leading to bitterness and clogging. Conversely, a coarse grind will result in under-extraction, making your coffee weak and watery.
2. Measure Coffee Grounds Accurately:
- Use one scoop (1 tablespoon) of ground coffee per 5 fl. oz. of water. This will ensure that the coffee is neither too strong nor too weak. If you prefer a bolder brew, you can adjust the amount of coffee to your liking, but avoid exceeding 14 scoops to prevent overflow.
3. Use Fresh, High-Quality Beans:
- The quality of your coffee beans has a direct impact on the taste of your coffee. For the best flavor, use fresh beans and grind them just before brewing. Buy beans in small quantities and grind only what you need for each brew. This ensures that your coffee will be as fresh as possible.
4. Use Filtered Water:
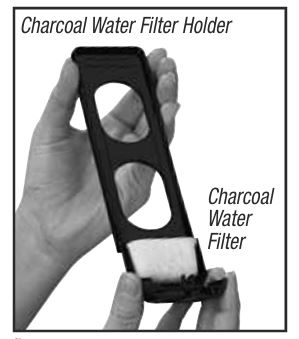
- If your tap water has a strong taste or odor, use filtered or bottled water to brew your coffee. Additionally, make sure to use the charcoal water filter included with the coffee maker to remove chlorine and impurities that could alter the flavor of your coffee.
Problem 5: Cleaning and Maintenance Alerts
Possible Causes:
- Calcium Buildup: Over time, mineral deposits from hard water can accumulate inside the coffee maker, affecting performance and taste.
- Expired Charcoal Filter: The charcoal filter in the water reservoir may need to be replaced to ensure optimal water quality.
How to Fix:
Decalcification (Descaling):
- Descaling helps remove mineral buildup, which can affect the coffee maker’s performance. To decalcify your Cuisinart Coffee Maker, fill the water reservoir with a mixture of two-thirds water and one-third white vinegar.
- Press the Clean button to start the cleaning cycle. The machine will run the solution through the system, removing calcium deposits. After the cycle is complete, run one cycle of clean water to flush out any vinegar residue.
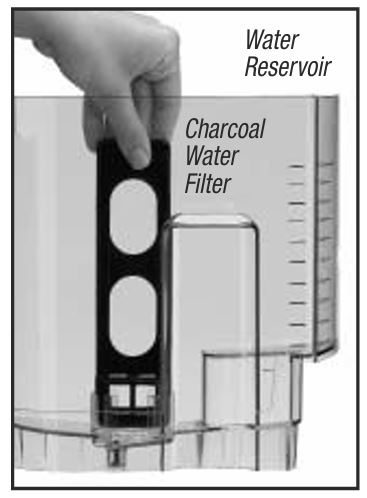
Replace the Charcoal Water Filter:
- The charcoal water filter eliminates chlorine, odors, and other impurities from the water. To replace it, remove the old filter and insert a new one into the filter compartment. Rinse the new filter under cold water and reinstall it in the water reservoir.
- Cuisinart recommends replacing the charcoal filter every 60 days or after every 60 uses, especially if you have hard water.
Regular Cleaning:
- Clean the filter basket, coffee reservoir, and drip tray after each use. Use warm soapy water to wash removable parts and avoid harsh chemicals that could damage the appliance. Make sure to dry all parts thoroughly before reassembling the coffee maker.
Frequently Asked Questions (FAQs)
How do I reset the time on my Cuisinart Coffee Maker?
To reset the time, turn the Function Knob to Clock. Hold down the Hour or Minute button until the clock begins flashing. Adjust the time using the buttons.
What is the 1–4 cup setting, and when should I use it?
The 1–4 cup setting improves the coffee extraction when brewing fewer than 5 cups. If you’re brewing a smaller amount, press this button to ensure optimal brewing performance.
How can I avoid the “Clean” light from flashing?
The Clean light flashes when calcium buildup is detected. To prevent this, regularly descale the coffee maker using a vinegar-water solution and change the charcoal filter as recommended.
Conclusion
With regular maintenance and proper troubleshooting, your Cuisinart DCC-3000NAS Coffee On Demand Coffee Maker can continue to brew delicious coffee every day. Always ensure that you’re following the correct water-to-coffee ratio, using fresh coffee beans, and keeping your appliance clean. If problems persist, refer to the troubleshooting tips above or contact Cuisinart customer support for further assistance. By maintaining your coffee maker, you’ll ensure that each cup of coffee is brewed to perfection.


0 Comments