If your Hamilton Beach 46895 12-Cup Programmable Coffee Maker with cone filter is acting up—brewing slowly, overflowing, tasting off, or refusing to start—this guide walks you through step-by-step troubleshooting like a professional technician.
This article is based directly on the official user manual for the 46895 series plus practical diagnostic logic, so you’re getting model-specific, accurate procedures, not generic coffee-maker advice.
Safety First – Before You Start Troubleshooting
Working on any electrical appliance requires a bit of caution. Before you take anything apart or start cleaning, keep these points in mind:
- Always unplug the coffee maker before cleaning, inspecting, or moving it.
- Never immerse the base, cord, or plug in water.
- There are no user-serviceable parts inside the bottom cover. Don’t remove it; internal repairs should be done by authorized service personnel.
- The keep-warm plate stays hot even after brewing ends. Treat it as a hot surface.
- Handle the glass carafe carefully: never place a hot carafe on a cold or wet surface and never use a cracked carafe.
Rule of thumb: If you need a screwdriver, soldering iron, or to open the base, stop. That’s where home troubleshooting ends and authorized service begins.
Understanding Your Hamilton Beach 46895 Brewer
Before you can fix a problem, it helps to know how this coffee maker is designed to work.
Key Components
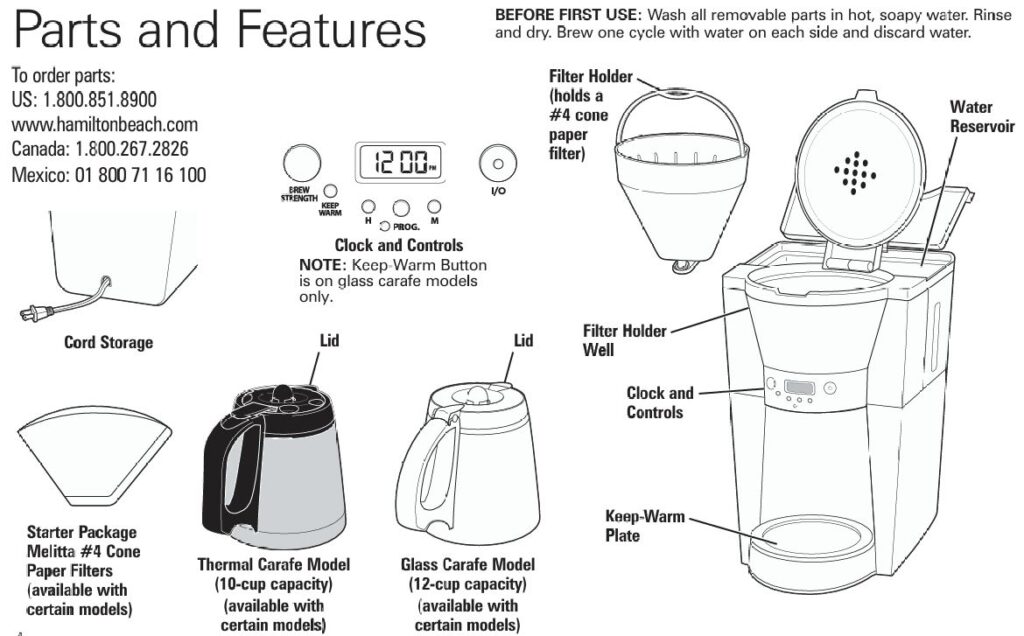
According to the parts diagram in the manual, the main components are:
- Water reservoir – where you pour fresh water.
- Filter holder & #4 cone paper filter – holds the coffee grounds; only size #4 cone filters are recommended.
- Filter holder well & lid – the filter holder drops into this well and is covered by the top lid.
- Glass or thermal carafe – collects brewed coffee; the thermal version is 10-cup, glass is 12-cup.
- Keep-warm plate – on glass-carafe models only; keeps coffee hot for up to 2 hours before auto-shutoff.
- Control panel & clock – with:
- ON/OFF button
- Brew Strength button (Regular / stronger options)
- Program (PROG) and time-setting buttons (H and M)
When everything’s working correctly, water is pulled from the reservoir, heated, and dripped through the cone filter into the carafe. Any problem usually appears at one of these stages.

Quick Diagnostic Table – Problems & Fast Fixes
Use this table as your first stop. Then, jump to the detailed sections for step-by-step instructions.
| Problem | Likely Causes | Quick Actions |
|---|---|---|
| Brew basket overflows or coffee leaks around filter | Too much coffee; decaf or finely ground coffee; filter mis-seated; poor-quality filter; mineral buildup slowing flow | Reduce grounds; switch to medium grind; refit or replace filter; descale with vinegar |
| Coffee brews very slowly | Internal scale; clogged filter; decaf/very fine grind | Run vinegar clean; use fresh #4 filter; use medium grind |
| Coffee tastes bad (weak, bitter, or “off”) | Wrong coffee-to-water ratio; stale coffee; poor water; dirty machine; grind size issues | Use 1 level tablespoon per cup, medium grind; use fresh beans and filtered water; deep-clean with vinegar |
| Coffee maker will not brew / won’t power on | Empty water reservoir; unplugged; power outage or surge; clock mis-set | Fill reservoir; check outlet; unplug/replug after surge; reset clock/program |
| Auto Brew doesn’t start | Program not set or not confirmed; AM/PM mistake; power interruption | Reprogram Auto Brew; verify AM/PM; re-set after outage |
| Coffee not hot enough or cools quickly | Carafe not on plate; 2-hour auto-shutoff; thermal carafe not pre-warmed | Ensure carafe is seated; serve soon after brewing; pre-warm thermal carafe with hot water |
| Pause-and-Serve overflow when removing carafe mid-brew | Carafe left out too long or not reseated properly | Replace carafe within 20 seconds and center it fully under basket |
| Grounds in coffee or collapsed filter | Filter not opened/folded; filter not rinsed against basket; poor filter quality; grind too fine | Use #4 cone filter, folded, fully open; lightly rinse basket before inserting filter; choose medium grind |
Problem 1: Coffee Maker Will Not Brew / Won’t Turn On
When you press the ON/OFF button and nothing happens, work through this sequence.
Step 1 – Check the Basics
- Verify the water reservoir is filled.
The machine will not brew if there’s no water in the reservoir. - Confirm the unit is plugged in.
Plug firmly into a polarized outlet (one slot wider than the other). Don’t use a damaged cord or plug. - Test the outlet.
Try a lamp or phone charger in the same outlet. If those don’t work, the outlet, not the coffee maker, is the problem.

Step 2 – Look for Power Interruptions
- Power outage: If you recently had a blackout or tripped breaker, the internal clock and settings may have reset. The manual notes the clock must be reset after a power outage.
- Power surge: A surge can lock up the electronics.
- Unplug the unit for 1–2 minutes.
- Plug it back in and reset the time.
Step 3 – Check the Control Panel
- Make sure you actually pressed ON/OFF (I/◼) and not just the PROG or Brew Strength buttons.
- If you’re using Auto Brew, see the dedicated section below—incorrect programming is a common cause of “won’t brew” complaints.
Step 4 – Look for Safety Issues
If the unit still doesn’t power up after confirming outlet and settings, do not attempt to open the base. As the manual states, there are no user-serviceable parts inside; internal failures require authorized service.
Problem 2: Brew Basket Overflows or Coffee Leaks Around the Filter
This is one of the most common complaints: coffee and grounds end up in the carafe, on the counter, or around the filter holder.
The manual’s troubleshooting table calls out several causes for this problem.
Step 1 – Stop and Cool
- Press ON/OFF to turn the machine off.
- Unplug it.
- Allow the brew basket and coffee to cool before removing the filter holder to avoid burns.
Step 2 – Check Coffee Amount & Grind
- Use only one level tablespoon of grounds per cup of coffee.
- For decaf or flavored coffee, use slightly less—these blends foam more and can clog the filter, causing overflow.
- Make sure your grinder is set to medium. Too fine (espresso-like) grounds restrict water flow.
If you’ve been piling the filter high with grounds “for stronger coffee,” that’s almost certainly your culprit. Instead, use the Brew Strength button to make the coffee stronger without overloading the filter.
Step 3 – Inspect the Paper Cone Filter
For this model, Hamilton Beach specifies #4 cone paper filters only.
Check that:
- The filter is fully opened and seated all the way down into the cone holder.
- The seams are folded flat along the bottom and side so it conforms to the cone shape.
- No part of the filter is folded over the rim or crushed; otherwise, water can bypass it and carry grounds into the carafe.
- You’re not stacking two filters together.
- Your filters are decent quality; very thin or damaged filters can burst.
The manual suggests rinsing the filter basket before inserting the paper filter so the damp walls help hold the filter in place.
Step 4 – Confirm Filter Holder & Carafe Position
- The filter holder only fits one way into the well: the small plastic handle should fold toward you when correctly seated.
- Make sure the carafe is centered fully on the keep-warm plate or under the brew spout.
- If you use the Pause and Serve feature, always return the carafe within 20 seconds to avoid overflow from the basket.
Step 5 – Clean Out Scale and Residue
If your basket still tends to overflow even with correct filter and coffee amounts, the unit probably needs descaling. Mineral buildup narrows water passages, making water drip more slowly into an already full basket.
Use the vinegar cleaning cycle described later in this guide.
Problem 3: Coffee Brews Very Slowly
Slow brewing is almost always a maintenance issue.
Step 1 – Run a Vinegar Descale
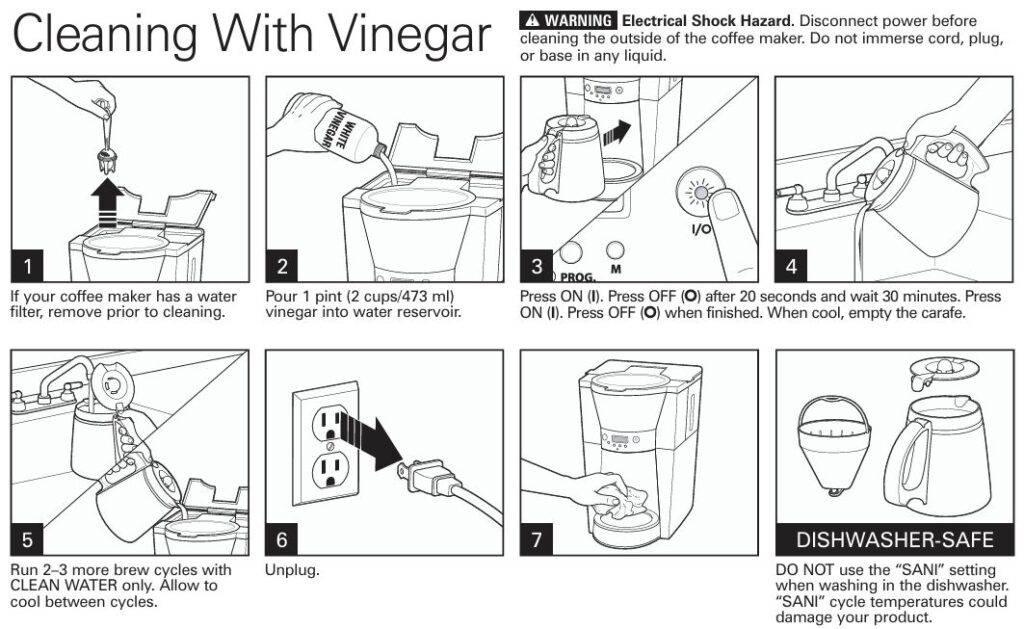
The manual provides a clear descaling procedure:
- Remove any optional water filter from the reservoir.
- Pour 2 cups (about 473 mL) of plain white vinegar into the water reservoir.
- Place the empty carafe on the plate and ensure the empty filter holder is in place.
- Turn the coffee maker ON and let it run for about 20 seconds, then turn it OFF.
- Leave the vinegar sitting in the system for 30 minutes (this soak dissolves scale).
- Turn the unit back ON and allow the cycle to complete.
- When cool, empty the carafe.
- Run 2–3 more full brew cycles with clean water only, letting the unit cool between cycles to remove any remaining vinegar.
This process clears mineral deposits that can dramatically slow water flow.
Step 2 – Check Filters and Grounds
- A clogged paper filter (from very fine grounds or decaf foam) also slows brewing.
- Switch to medium-ground coffee and avoid exceeding the recommended amount.
If, after a full vinegar clean, brew speed is still extremely slow, internal channels may be blocked or components failing; at that point, service is recommended.
Problem 4: Coffee Tastes Weak, Strong, or Just “Off”
Taste problems are rarely electrical—they’re about ratios, freshness, and cleanliness.
Step 1 – Dial in the Coffee-to-Water Ratio
The manual suggests:
- Approx. 1 tablespoon (15 mL) of grounds per cup of water.
- For decaf or flavored coffee, around ¾ tablespoon per cup to avoid overflow while still giving good flavor.
If your coffee is weak:
- Increase the dose slightly, or
- Use the Brew Strength button to select a stronger brew option.
If your coffee is too strong or bitter:
- Reduce the grounds slightly, or select “Regular” brew strength.
Step 2 – Use the Right Grind and Coffee Type
- Use a fine-to-medium grind—the manual notes this gives the best results.
- Coarse grinds can taste weak; overly fine grinds cause bitterness and sometimes overflow.
- Choose better beans: arabica beans, or arabica-heavy blends, generally taste smoother and more complex.
Step 3 – Coffee & Water Freshness
- Ground coffee goes stale quickly. Buy smaller amounts and check expiry dates.
- Use filtered or bottled water if your tap water has strong taste or odor.
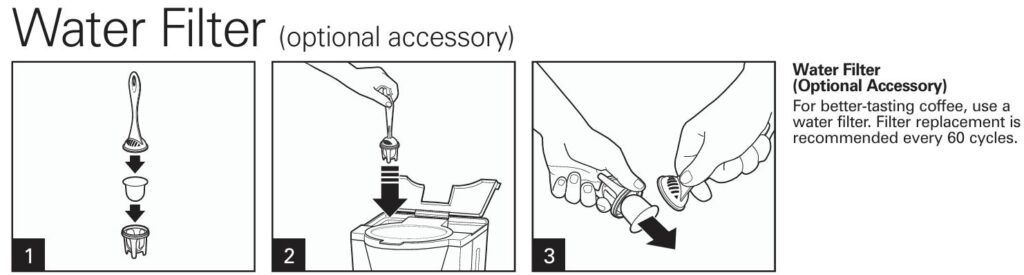
If your machine has the optional water filter accessory, replace the filter about every 60 brew cycles for best taste.
Step 4 – Clean the Machine
Old oils and residue in the brew path or carafe can make fresh coffee taste stale.
- Descale with vinegar as described earlier.
- Wash removable parts (filter holder, carafe, lid) in warm soapy water or on a dishwasher’s regular cycle (avoid “SANI” / high-temp sanitizing settings, which the manual warns can damage parts).
Problem 5: Coffee Not Hot Enough or Cools Too Quickly
“Not hot enough” can mean two different things depending on which version of the machine you have.
Glass Carafe Models
Glass-carafe units have a keep-warm plate and a 2-hour auto-shutoff:
- After brewing finishes, the hot plate keeps coffee warm for up to 2 hours.
- After 2 hours, the unit turns itself off for safety.
If your coffee seems cool:
- Make sure the carafe is fully seated on the hot plate.
- Verify that the machine is still within the 2-hour window—if not, simply reheat coffee separately or brew a fresh pot.
- Avoid leaving the carafe half-full for many hours; brewed coffee tastes best within 30–60 minutes.
Thermal Carafe Models
Thermal carafe versions shut off immediately after brewing—there’s no hot plate.
To maximize temperature:
- Pre-warm the thermal carafe with hot tap water before brewing, then dump the water just before the brew starts.
- Make sure the lid is fully locked on the carafe to keep heat in.
- Don’t leave the carafe uncovered or on a cold surface.
Problem 6: Auto Brew / Clock Programming Problems
The programmable feature is great—until the coffee doesn’t start on time. Usually the issue is a programming mistake rather than a hardware fault.
Step 1 – Set the Correct Time of Day
- Plug in the coffee maker.
- Press the H (hour) button repeatedly until the display shows the correct hour.
- Press the M (minute) button until the correct minute appears.
Make sure you’re aware of AM/PM indication if your display uses a 12-hour format.
Step 2 – Program Auto Brew Time
- Press and hold the PROG button until the display begins to flash.
- While continuing to hold PROG, use the H and M buttons to set the time you want brewing to start.
- Release the PROG button.
- Press PROG once again briefly (don’t hold it this time) to activate Auto Brew. The indicator on the display should confirm that Auto Brew is set.
If you lose power or unplug the machine, you must reset the time and Auto Brew, or the scheduled cycle will never start.
Technician tip: Always do a “dry run” right after programming—set Auto Brew just a few minutes ahead, watch the machine start by itself, then re-program to tomorrow morning.
Problem 7: Issues Using Pause and Serve
The 46895 lets you pull the carafe out mid-brew to pour a quick cup. There’s a spring-loaded valve under the basket that stops coffee flow when the carafe is removed.
If you experience overflow or dripping during Pause and Serve:
- Always replace the carafe within 20 seconds, as the manual specifies; otherwise hot coffee backing up in the basket can overflow.
- Make sure the carafe slides straight back in, all the way under the filter holder, to fully open the valve.
- Check that the carafe lid is on—without it, the spout alignment can be off.
If you still see leaks with correct use, mineral buildup may be preventing the valve from sealing well; give the machine a thorough cleaning and inspect the area around the drip valve for debris.
Problem 8: Grounds in the Coffee or Collapsed Filter
If your brewed coffee has floating grounds or the paper filter seems to have folded in on itself, review your setup:
Step 1 – Filter Placement
According to the manual’s troubleshooting notes:
- Grounds caught between the paper filter and the basket can break the seal and let them escape.
- If the filter isn’t opened fully or isn’t in the proper position, it can collapse.
- Rinsing the filter basket briefly before inserting the paper filter helps the edges stick to the damp sides, stabilizing it.
Step 2 – Grind and Coffee Volume
- Too much coffee or too fine a grind can cause water to rise and overflow the filter, washing grounds into the carafe.
- Stick to the recommended 1 tablespoon per cup and a medium grind, reducing slightly for decaf.
Step 3 – Filter Quality
- Very cheap or damaged paper filters can tear under the hot water flow. If you see tears or pinholes, switch brands.
Problem 9: Iced Coffee Mode Issues (Thermal Carafe Models Only)
For the iced-coffee brewing method, the manual specifies:
- Fill the water reservoir to a maximum of 5 cups.
- Fill the thermal carafe with ice up to just below the inner rim.
- Brew double-strength coffee using about 10 scoops for a full pot.
If you see overflow or weak iced coffee:
Overflow in Iced Coffee Mode
- Check that you didn’t exceed 5 cups of water.
- Use slightly less coffee for decaf or flavored blends, which foam more and can lead to overflow.
- Make sure the carafe is aligned and twisted to the locked position as shown in the manual diagrams.
Iced Coffee Too Weak
- Verify you’re using double the normal grounds (roughly 10 level scoops for a full iced batch).
- Ensure the ice amount is correct; overfilling with ice will dilute more than the recipe intends.
Deep Cleaning & Regular Maintenance Schedule
Proper maintenance not only solves many issues but also prevents them.
Vinegar Descale (Every 1–3 Months)
Use the Cleaning With Vinegar procedure detailed earlier. The manual recommends running 2–3 clean-water cycles afterward and unplugging once you’re done.
Routine Cleaning (Daily / After Each Brew)
- Empty and rinse the filter holder, paper filter, and carafe.
- Wash in hot, soapy water or place dishwasher-safe parts in the dishwasher (avoid high-temperature sanitizing cycles labelled “SANI”).
- Wipe the exterior and hot plate with a damp cloth only when the unit is unplugged and cool.
Optional Water Filter Replacement
If your model uses the optional water filter assembly, the manual suggests replacing the filter around every 60 brew cycles for best results.
Best-Practice Tips for Long-Term Reliability
These habits help your Hamilton Beach 46895 last longer and brew better:
- Use only the supplied carafe (or the correct replacement). Using another container to fill the reservoir can lead to overfilling and overflow.
- Keep the unit on a flat, stable counter, away from edges, to avoid accidental tipping.
- Never operate with a cracked carafe or damaged cord.
- Avoid abrasive cleaners or steel wool on the glass carafe; they can scratch and weaken it.
- Store the machine with the lid open after cleaning so moisture can evaporate and odors don’t build up.
- If you’re away for a while, unplug the machine and empty any remaining water from the reservoir.
“A clean, properly loaded coffee maker is a reliable coffee maker.”
Frequently Asked Questions (FAQ)
What paper filter size does the Hamilton Beach 46895 use?
This model is designed for #4 cone-style disposable paper filters placed into the removable filter holder. Using other shapes or sizes can cause poor extraction or overflow.
How much coffee should I use for 12 cups?
For standard strength, use one level tablespoon of medium-ground coffee per cup of water. For a full 12-cup glass carafe, that’s about 12 level tablespoons. For decaf or flavored coffee, use a bit less (about ¾ tablespoon per cup) to prevent overflow.
Why does my coffee maker shut off by itself?
Glass-carafe models include a 2-hour automatic shutoff. After two hours of keeping the coffee warm, the machine turns itself off for safety. Thermal carafe versions shut off immediately after brewing.
Can I wash the carafe and filter holder in the dishwasher?
Yes. The removable parts such as the carafe and filter holder are dishwasher-safe, but the manual warns not to use “SANI” or extra-hot sanitizing cycles because very high temperatures could damage the product.
How often should I descale the coffee maker?
For most households, descaling with white vinegar every 1–3 months is adequate. If you have very hard water or notice slow brewing or off-tasting coffee, clean more frequently using the vinegar procedure described earlier.
My Auto Brew light is on, but coffee didn’t brew this morning. Why?
Common reasons:
- The time of day is wrong (for example PM instead of AM).
- The Auto Brew time wasn’t confirmed by pressing PROG again after setting the hour and minute.
- A power outage or surge reset the clock overnight. In any of these cases, reprogram the clock and Auto Brew.
Can I use my thermal carafe on a stove or in the microwave?
No. The manual states that the carafes are designed only for use with this coffee maker and must never be used on a range top or in a microwave oven. Doing so can damage the carafe and create a safety hazard.
What should I do if the basket overflows with decaf coffee only?
Decaf (and some flavored coffees) tends to foam more and can clog the paper filter. The manual specifically notes that excessive amounts of decaf or very finely ground coffee can cause overflow. Reduce the amount slightly, ensure you’re using medium grind, and consider a sturdier filter brand.
Is there a reset button?
There’s no dedicated hardware reset button. To reset the electronics after a surge or glitch:
- Turn the machine OFF.
- Unplug for about a minute.
- Plug back in, then reset the clock and any Auto Brew programming.
If it still behaves unpredictably after this and a full cleaning, professional evaluation is recommended.
When should I stop troubleshooting and call for service?
Stop DIY troubleshooting and contact Hamilton Beach customer service or an authorized repair center when:
- The unit does not power on even with a known good outlet.
- You see sparks, burning smell, or melted plastic.
- The carafe’s glass is cracked or the handle feels loose.
- You’ve followed the descaling and cleaning steps but brewing is still abnormally slow or inconsistent.
The manual makes it clear that internal repairs must be done by qualified personnel, and attempting to open the base may void your warranty.
Final Thoughts
The Hamilton Beach 46895 is a solid programmable cone-filter coffee maker, but like any appliance, it relies on correct loading, clean internals, and proper programming. Most issues—overflowing baskets, bad taste, slow brewing, or Auto Brew failures—can be fixed at home by:
- Using the right #4 cone filters and coffee amounts.
- Sticking with a medium grind, especially for decaf or flavored coffee.
- Descaling regularly with vinegar.
- Checking the clock and Auto Brew settings after any power disturbance.
Work through the steps in this guide, and in most cases you’ll have your 46895 brewing smooth, hot coffee again without a trip to the repair shop.


0 Comments