If your Ninja CFP-300 DualBrew Pro 12-Cup Coffee Maker is not working as expected, you’re in the right place. Many users experience common issues that can be easily resolved. In this comprehensive guide, we will walk you through detailed troubleshooting steps, provide practical solutions, and give tips on maintaining the coffee maker for optimal performance. Whether it’s a brewing issue, leakage problem, or control panel error, we’ve got you covered.

Common Issues with the Ninja CFP-300 DualBrew Pro Brewer
The Ninja CFP-300 DualBrew Pro is an excellent coffee machine that offers multiple brewing styles. However, like all complex devices, it may experience occasional glitches. Common problems include:
- Coffee not brewing or brewing too slowly.
- Overflowing brew baskets due to incorrect filter or ground size.
- Water leakage or improper water flow.
- Control panel malfunction, displaying error messages.
This guide will address these issues and offer easy-to-follow solutions.
Ninja CFP-300 DualBrew Pro Coffee Brewing Machine: A Step-by-Step Troubleshooting
1. Coffee Not Brewing
Problem: Your Ninja DualBrew Pro is powered on, but no coffee is being brewed.
Solution:
- Check the Water Reservoir: The reservoir needs to be filled to the “Full” line to function. If it’s underfilled, the brewing cycle won’t start.
- Drip Stop: Make sure the Drip Stop lever is open. If it’s closed, the coffee will be blocked from flowing into your carafe.
- Brew Style Settings: Ensure the right brew style (Classic, Rich, Over Ice) has been selected. The brew style impacts the water flow and strength of the coffee.
- Power Reset: Turn the coffee maker off, unplug it, and wait for 1 minute. Plug it back in, power it on, and try brewing again.
2. Slow Brew Cycle
Problem: The brew cycle seems to be taking longer than usual.
Solution:
- Larger Brew Sizes: Larger brew volumes like a full carafe will naturally take more time. Check the Approximate Brew Volumes Chart.
- Fine Coffee Grounds: Fine coffee grounds can slow down brewing. Try switching to a medium grind to avoid clogging the filter basket.
- Mineral Buildup: Hard water can cause mineral deposits that slow down brewing. Running a cleaning cycle will help remove this buildup.
3. Overflowing Brew Basket
Problem: Coffee is spilling over the brew basket during brewing.
Solution:
- Check the Filter: Ensure you’re using the correct size filter. A poorly seated filter can cause an overflow.
- Grind Size: Avoid using a fine grind, as it can cause water to back up. Use medium grind coffee for best results.
- Overfilling the Basket: Make sure not to exceed the recommended amount of coffee grounds. Refer to the Coffee Measurement Chart for proper measurements.
4. Coffee Splattering
Problem: Coffee splashes out of the carafe while brewing.
Solution:
- Proper Placement: Ensure that your carafe or cup is properly aligned under the brew basket. If it’s positioned too far from the basket, splattering can occur.
- Use the Cup Tray: Lower the Single-Serve Cup Platform to reduce the distance between the brew basket and your cup, which minimizes splashing.
Water and Leakage Issues
Brewer Leaking Water
Problem: Water is leaking from your coffee maker.
Solution:
- Check the Water Reservoir: Ensure the reservoir is securely placed on the base. If it’s loose, it could lead to leaks.
- Inspect the Brew Basket: Water might leak from above the brew basket if it’s overfilled. Also, ensure the drip stop is closed before removing the carafe.
Water Left in the Reservoir
Problem: Some water remains in the reservoir after brewing.
Solution:
- Normal Behavior: It’s perfectly normal for small amounts of water to remain in the reservoir. This is done to ensure the pump doesn’t run dry and the system continues to function smoothly.
- Excess Water: If too much water remains, check for blockages or any malfunctions in the water line. Cleaning might be necessary.
Control Panel and Display Troubleshooting
“CLn” Message Appears on the Display
Problem: The display shows the “CLn” message, indicating the need for a cleaning cycle.
Solution:
- Run the Cleaning Cycle: The “CLn” message appears when descaling is required. Follow the cleaning instructions in the Cleaning and Maintenance section to run a clean cycle using white vinegar or a descaling solution.
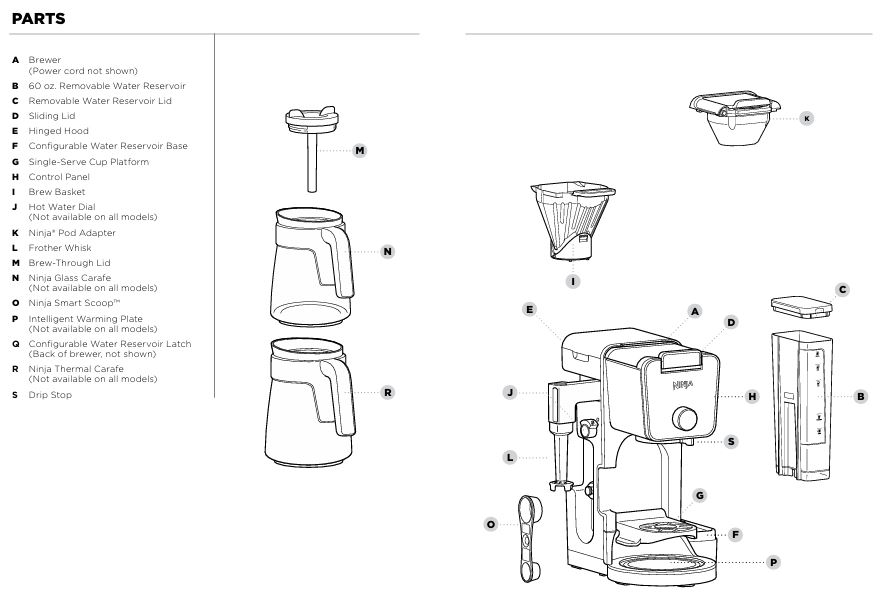
Brewer Not Detecting Ninja® Pod Adapter
Problem: The Ninja Pod Adapter is not being recognized by the machine when brewing with pods.
Solution:
- Proper Installation: Ensure the Ninja Pod Adapter is securely placed over the brew basket. Pull the handle towards you until it clicks into the “LOCK” position.
- Check Pod Compatibility: Verify that you are using compatible pods. If the pod doesn’t fit, do not force it into the machine.
No Size or Brew Style Displayed
Problem: The display on the control panel doesn’t show brew size or style options.
Solution:
- Close the Sliding Lid: The machine won’t function properly unless the sliding lid is fully closed. Make sure it clicks into place.
- Check the Pod Adapter: If using the Ninja Pod Adapter, ensure the handle is in the correct locked position.
Cleaning and Maintenance Tips
Running the Intelligent Clean Cycle
Problem: The “Intelligent Clean Cycle” indicator is lighting up, suggesting the machine needs cleaning.
Solution:
- Start the Cleaning Cycle: Press the CLEAN button and follow the instructions in the manual to run a full cleaning cycle. This typically takes around 75 minutes to complete. You can use white vinegar or a descaling solution.
Table: Cleaning Cycle Steps
| Step | Action |
|---|---|
| 1 | Fill the water reservoir with white vinegar and water solution |
| 2 | Press CLEAN button and start the brew cycle |
| 3 | Wait for cycle to finish (approximately 75 minutes) |
| 4 | Run a water-only cycle to flush out any remaining vinegar |
| 5 | Clean all removable parts after the cycle |
Cleaning the Pod Adapter
Problem: The pod adapter is clogged, causing brewing problems.
Solution:
- Hand Wash: After each use, remove the Ninja Pod Adapter and clean it with warm, soapy water. Be careful around the sharp needles.
- Dry the Pod Adapter: Once cleaned, dry the pod adapter thoroughly before reattaching it to the machine.
Frequently Asked Questions (FAQs)
My coffee isn’t brewing. What should I check first?
Ensure the water reservoir is filled to the “Full” line, the Drip Stop is open, and the brew style is selected. Also, make sure the machine is plugged in and turned on.
How can I make my coffee stronger?
Use the “Rich” brew setting, and increase the amount of coffee grounds according to the Coffee Measurement Chart.
How do I clean my coffee maker?
A: Run the cleaning cycle with a white vinegar and water solution to remove mineral buildup. Refer to the Cleaning Cycle Steps for detailed instructions.
Why is my coffee too weak or too strong?
If the coffee is too weak, try using the “Rich” brew setting and add more coffee grounds. If it’s too strong, reduce the amount of coffee grounds or use the “Classic” brew setting.


0 Comments