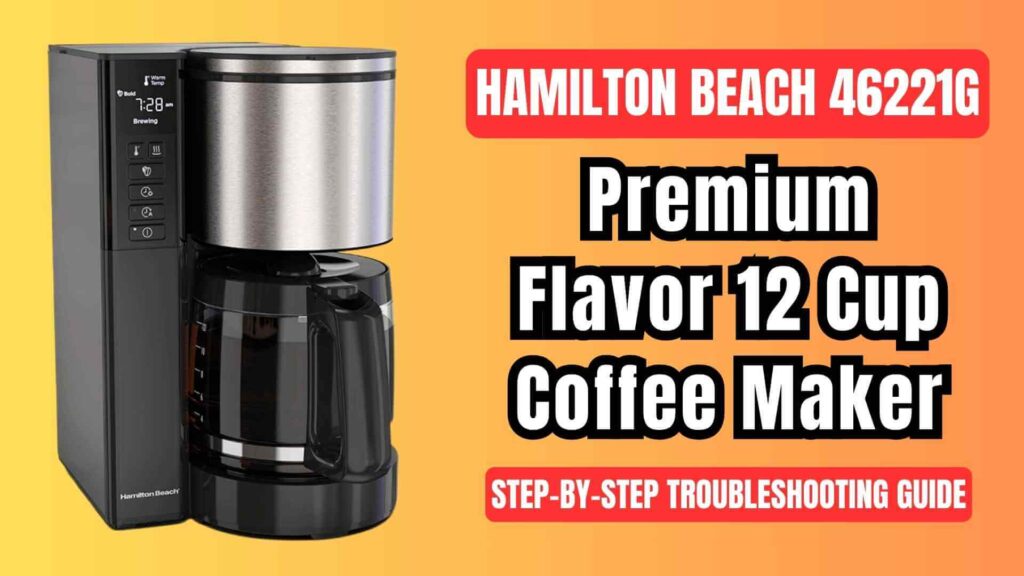
If your Hamilton Beach 46221G Premium Flavor / Premium Brew 12-cup coffee maker has suddenly stopped brewing your favorite pot of coffee, you’re not alone. As an appliance repair technician, I can tell you that most coffee maker failures are simple to diagnose and fix at home—especially when you understand how the machine is designed and what the manufacturer recommends.
This guide walks you through real-world troubleshooting, based directly on the official user manual plus practical repair experience. You’ll learn:
- What each symptom usually means
- Safe, step-by-step fixes
- How to clean and maintain the unit to prevent future problems
- When it’s time to call Hamilton Beach or replace the brewer
Safety First – Before You Touch the Coffee Maker
Electric coffee makers combine water, steam, hot glass, and electricity—a mix that demands respect.
Essential Safety Precautions
Before any troubleshooting or cleaning:
- Unplug the coffee maker from the wall outlet. Never work on it while it’s powered.
- Let it cool completely. The keep-warm plate, carafe, and internal parts stay hot even after brewing stops.
- Never immerse the base, cord, or plug in water or any liquid. Wipe the exterior only with a damp cloth.
- Use only the supplied glass carafe. It’s designed specifically for the keep-warm plate on this model—do not use it on a stovetop or in a microwave.
- If the carafe is cracked, chipped, or has a loose handle, stop using it immediately and replace it.
- Do not open the bottom enclosure. There are no user-serviceable parts inside; internal repairs must be done by authorized service personnel.
“When in doubt, unplug it.” – That’s rule number one for safe appliance troubleshooting.
Get to Know Your Hamilton Beach 46221G
Understanding the components makes it much easier to track down problems.
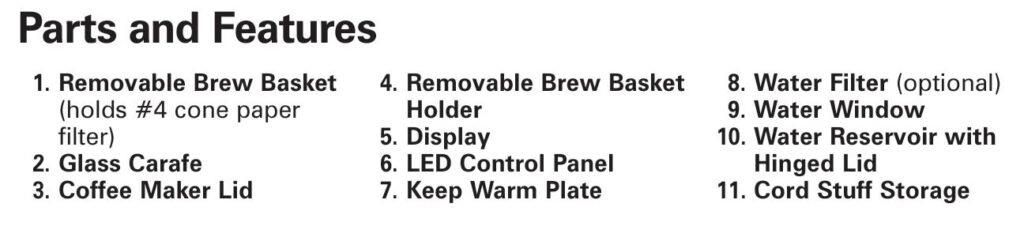

Key Parts & Features (as shown in the manual diagram)
- Removable brew basket – Holds a #4 cone-style paper filter
- Removable brew basket holder
- Glass carafe with lid
- Water reservoir with hinged lid and water window
- Optional water filter that sits in a well inside the reservoir
- Keep-warm plate under the carafe
- LED control panel & display, including:
- Power button (ON / OFF)
- Brew strength selections: Classic, Bold, Robust, 1–4 Cups
- Keep Warm Time (0–4 hours in 10-minute steps; default 2 hours)
- Keep Warm Temperature (Low / Medium / High)
- Program (Auto Brew up to 24 hours ahead)
- Clean Coffee Maker indicator
- Water Filter indicator
- Time Since Brew display that tracks how long ago a pot was started
Knowing where these parts are will help you interpret symptoms and error indicators correctly.
Quick Diagnostic Checklist
If your Hamilton Beach 46221G stops working or behaves oddly, run through this quick list before diving into specific repairs:
- Is it plugged in firmly and is the outlet working (test with another device)?
- Is the water reservoir filled to at least the minimum level?
- Is the carafe fully seated on the keep-warm plate with the lid on?
- Is a #4 cone filter installed correctly in the brew basket?
- Did you accidentally activate Auto Brew instead of starting an immediate brew?
- Are any icons lit—such as “Clean” or “Filter”—indicating maintenance is due?
If everything above looks normal, move on to the symptom-by-symptom troubleshooting below.
Hamilton Beach 46221G Coffee Brewing Machine: Common Problems & Their Solutions
1. Brew Basket Overflows or Coffee Brews Very Slowly
How This Problem Usually Looks
- Coffee spills over the brew basket and into the machine
- Grounds end up in the carafe
- Brew cycle seems to take forever
Likely Causes (From the Manufacturer + Tech Experience)
According to the manual, the following are the main culprits for overflow or slow brewing:
- Too much coffee in the filter
- Decaf or very finely ground coffee
- Brew strength set to Bold or Robust (these intentionally slow the flow for stronger flavor)
- Coffee maker needs cleaning / descaling
- Carafe removed too long during Pause ’N Serve (more than 20 seconds)
Step-by-Step Fix
- Power down and cool
- Turn the unit off and unplug it.
- Allow any hot coffee in the basket to cool before removing it to avoid burns.
- Empty and reinstall the filter correctly
- Discard the used filter and grounds.
- Insert a fresh #4 cone-style paper filter.
- Make sure the filter is fully opened and its bottom edge is folded under so it reaches the top edge of the basket, as recommended in the manual.
- Reduce the coffee amount
- Use about 1 level tablespoon (≈5 g) of medium-ground coffee per cup.
- For decaf or flavored blends, reduce to about ¾ tablespoon (≈4 g) to prevent overflow.
- Check your grind
- Use medium grind. Very fine espresso-style grinds restrict water flow and cause backup in the basket.
- Review brew strength selection
- Bold and Robust modes brew more slowly by design; that’s normal.
- If you don’t want extended brew time, use Classic or 1–4 Cups (for small batches).
- Use Pause ’N Serve correctly
- If you pull the carafe mid-brew, return it within 20 seconds. The manual warns that removing it longer than this can cause the basket to overflow.
- Clean and descale the machine
- Mineral buildup inside can slow water flow dramatically. Follow the descaling steps in the “Cleaning & Maintenance” section below.
- Test with a smaller batch
- Brew 4–6 cups with the adjusted amount of coffee and see if the flow normalizes. If it does, your issue was over-dosing coffee, fine grind, or scale buildup.
2. Coffee Grounds In the Carafe or Between the Filter and Basket
What’s Going Wrong
You brew a pot and find gritty coffee or visible grounds floating in the carafe. This usually means the paper filter has failed or shifted.
The manual lists these causes:
- Paper filter not fully opened or not seated properly
- Poor-quality or thin paper filter
How to Fix It
- Choose good-quality #4 cone filters
- Avoid ultra-thin or ill-fitting filters that can collapse under the water flow.
- Pre-shape and fold the filter
- Open the filter completely.
- Fold the bottom seam under so the filter sits flush at the top edge of the basket, just as Hamilton Beach specifies.
- Pre-rinse the filter (optional but helpful)
- Rinse the paper filter with warm water and gently press it against the sides of the basket. This helps it stick and reduces the chance of grounds sneaking around the edge.
- Avoid overfilling with coffee
- An over-packed filter can bulge and allow grounds to bypass the paper.
- Seat the brew basket fully
- Make sure the brew basket and holder are correctly installed and the lid closes flat.
After you correct the filter placement and coffee dose, the problem almost always disappears.
3. Coffee Tastes Weak, Bitter, or Just “Off”
A bad-tasting pot can come from coffee, water, or the coffee maker itself.
According to the user guide, common causes include:
- Coffee maker needs cleaning
- Coffee ground too coarse or too fine
- Incorrect coffee-to-water ratio
- Poor coffee quality or staleness
- Poor water quality
Step-by-Step Taste Improvement
- Clean and descale first
- Old oils and mineral deposits ruin flavor. Descale monthly (weekly with hard water) using the vinegar method described later.
- Dial in grind size
- Use a medium grind—too coarse yields weak coffee; too fine causes over-extraction and bitterness.
- Use the right amount of coffee
- Start with 1 tablespoon (5 g) per “cup” on the carafe scale.
- Adjust slightly up for stronger coffee or down for milder.
- For decaf or flavored coffee, reduce slightly to prevent overflow and over-extraction.
- Use fresh, good-quality beans
- The manual notes that arabica beans generally produce better flavor than robusta.
- Improve your water
- Tap water with strong odors or heavy minerals can wreck the taste. Use filtered or bottled water, or install the optional water filter in the reservoir.
- Select the right brew strength
- Classic – balanced, everyday brew
- Bold / Robust – longer contact time for a stronger, more intense cup
- 1–4 Cups – optimized flow rate for small batches
Experiment with these modes until you hit the flavor you like.
4. Coffee Maker Not Brewing / Won’t Turn On
If you press the power button and nothing happens, don’t panic.
What the Manual Suggests
- Water reservoir is empty
- Unit is unplugged
- Power outage
- Power surge (needs unplug/plug back in)
- Clock needs to be reset after an outage
Technician’s Troubleshooting Steps
- Confirm power at the outlet
- Plug in another device (like a lamp) to test the outlet.
- If using a GFCI outlet (bathroom or kitchen), press the RESET button.
- Check the cord and plug
- Make sure the plug is fully seated and the cord is not damaged.
- If you see cuts, burns, or exposed wires, stop using the coffee maker and contact Hamilton Beach for service.
- Fill the reservoir
- Ensure there is enough water in the reservoir.
- If the reservoir is completely empty, the unit may appear unresponsive.
- Reset after a power surge
- Unplug the coffee maker for 60 seconds, then plug it back in. The manual specifically suggests this after a power surge.
- Reset the time and try again
- When first plugged in, “0:00” flashes on the display. Set the time using the Time button, then press Power to start brewing.
- Try a different outlet
- If possible, plug the unit into a completely different circuit to rule out breaker issues.
- If still dead
- At this point, the machine may have an internal failure (thermal fuse, board issue, or damaged wiring).
- Because the manual clearly warns not to remove the bottom enclosure and not to attempt internal repairs yourself, contact Hamilton Beach or an authorized service center.
5. “Clean” or “Filter” Light Illuminates on the Display
Your Hamilton Beach 46221G includes maintenance reminder icons:
- Clean Coffee Maker indicator
- Water Filter indicator
The manual explains that these icons turn on when the appliance needs descaling or the filter needs replacement, and they automatically clear after a proper cleaning cycle.
How to Clear the “Clean” Light – Descaling Procedure
Perform this at least once a month, or weekly with hard water.
- Remove the optional water filter, if installed.
- Pour 2 cups (about 473 mL) of white vinegar into the water reservoir.
- Place an empty carafe on the keep-warm plate with no coffee and no paper filter.
- Press Power to start a brew cycle.
- After about 30 seconds of brewing, press Power again to stop the flow.
- Let the machine sit for 30 minutes with vinegar inside. This loosens mineral deposits.
- Press Power again to resume and complete the brew cycle.
- Discard the vinegar from the carafe.
- Run 2–3 complete brew cycles with fresh water only, allowing the coffee maker to cool between cycles.
Once done, the Clean indicator should turn off automatically after the cycle is recognized.
How to Clear the “Filter” Light – Replace the Water Filter
- Soak a new filter pod in clean water for 15 minutes.
- Place the pod into the bottom of the plastic water filter holder and snap the handle on.
- Drop the assembled water filter into the well in the water reservoir.
The Filter indicator goes off once you have reset or replaced the filter per the manufacturer’s schedule.
6. Auto Brew (Program) Isn’t Working
If you wake up to an empty carafe instead of fresh coffee, check these points.
What the System Requires
- The clock time must be set correctly.
- You must hold the Program button to enter auto-brew time setup.
- After setting hours and minutes, the auto-brew icon appears on the display, confirming it’s armed.
- Brew basket, water, and coffee must be ready the night before.
Step-by-Step Auto Brew Check
- Set the correct current time
- Press and release Time, then hold it to scroll hours.
- When hours are correct, they stop flashing and minutes start flashing.
- Hold Time again to set minutes.
- Program the brew time
- Hold Program until the display enters auto-brew time mode.
- Use Time to set the desired brew hour and minutes.
- Wait for the digits to stop flashing.
- Confirm the icon appears
- The manual notes that once the time is set, the auto-brew mode is turned on and the corresponding symbol appears on screen.
- Prepare for brewing
- Fill the reservoir with water.
- Place coffee and a filter in the brew basket.
- Make sure the carafe is in place and the lid is closed.
- If you need to cancel auto brew
- Press Program again to toggle auto-brew off.
7. Coffee Not Hot Enough or Staying Hot Too Long
The keep-warm system on the 46221G is adjustable both for temperature and time.
Adjusting Keep Warm Temperature and Time
- After brewing, press Keep Warm Temperature to choose Low, Medium, or High.
- Press and hold Keep Warm Time to choose how long to hold the coffee at temperature—from 0 to 4 hours in 10-minute increments (default is 2 hours).
If coffee is too cool, bump the temperature up or increase the time. If it tastes burnt or stewed, use a lower temperature or shorter keep-warm period.
8. Water or Steam Where It Shouldn’t Be
Leaks or excessive steam can be alarming.
Common, Non-Serious Causes
- Condensation under the lid dripping down the sides
- Overfilling the reservoir beyond the maximum level
- Carafe not properly seated, causing coffee to miss the opening
What to Check
- Confirm you’re within the 12-cup maximum marking on the water window.
- Inspect the carafe lid and position. It must be aligned so brewed coffee flows into the pot, not onto the plate or counter.
- Check the reservoir lid for proper closure; a lid left ajar can redirect steam and condensate.
If water appears to be coming from inside the machine’s base or there’s obvious cracking, stop using the coffee maker and contact Hamilton Beach or a qualified service center—this may indicate an internal hose or seal failure.
Cleaning & Maintenance – Preventing Most Problems
Many “repairs” are actually preventable with routine care.
Daily / After-Each-Use Cleaning
The manufacturer recommends:
- Turn off, unplug, and allow the unit to cool.
- Remove the carafe, brew basket, and brew basket holder.
- Hand-wash all removable parts in hot, soapy water, then rinse and dry, or wash them in the top rack of the dishwasher.
- Do not use the dishwasher’s “Sanitize” cycle; the higher temperatures can damage the plastic components.
- Wipe the exterior of the coffee maker with a damp cloth; avoid abrasive sponges or cleansers that can scratch the finish.
Monthly Descaling (More Often in Hard-Water Areas)
As explained earlier, descaling is essential for:
- Preventing slow brewing
- Avoiding overflow
- Maintaining water temperature and good flavor
Follow the vinegar procedure in the “Clean” light section once a month, or weekly if you notice heavy scale deposits or if you live in a hard-water region.
Caring for the Glass Carafe
The manual includes specific carafe safety tips:
- Never put a hot carafe on a cold or wet surface.
- Don’t place an empty carafe on the hot plate.
- Avoid steel wool or abrasive cleaners.
- Don’t bump or scratch the glass—chips and scratches increase breakage risk.
- Use only wooden, plastic, or rubber utensils when stirring inside the carafe.
Treat the carafe like you would any other fragile glass item; a little care goes a long way.
Getting the Best “Premium Flavor” From Your Coffee Maker
This model is designed to give you flexible control over flavor. Here’s how to get the most from it.
Coffee & Water – The Foundation of Great Flavor
The manual offers several quality tips:
- Choose arabica beans or blends for smoother, higher-quality flavor.
- Grind just before brewing when possible.
- Use a fine/medium grind for optimal extraction (not espresso-fine).
- Use filtered or bottled water or the optional reservoir filter.
Brew Strength Modes Explained
- Classic – Standard brew, balanced body and strength.
- Bold – Longer brew time, slightly stronger extraction.
- Robust – Even more extraction; ideal if you like very strong coffee.
- 1–4 Cups – Tailored for smaller volumes so your 2-cup batch doesn’t taste weak.
Try brewing the same coffee on Classic, then Bold, then Robust to find your preferred taste.
Using Pause ’N Serve Correctly
Pause ’N Serve is convenient, but it must be used properly. The manual specifies that you should not remove the carafe for more than 20 seconds during brewing to avoid overflow.
Tip: Have your mug ready and pour quickly—think of it as a 20-second “coffee pit stop.”
Troubleshooting Summary Table
| Symptom / Error | Probable Cause | Recommended Solution |
|---|---|---|
| Brew basket overflowing or very slow brew | Too much coffee; fine/decaf grind; Bold/Robust mode; Pause ’N Serve used too long; mineral buildup | Use medium grind; reduce coffee dose; return carafe within 20 seconds; descale machine. |
| Grounds in carafe or between filter and basket | Filter folded or misplaced; low-quality paper filter | Use good #4 cone filter; open and fold filter correctly; optionally pre-rinse. |
| Coffee tastes weak, bitter, or “off” | Dirty machine; wrong grind; bad ratio; poor water quality | Clean and descale; use medium grind; adjust dose; use filtered water and fresh coffee. |
| Coffee maker won’t turn on / brew | Empty reservoir; unplugged; outlet problem; power surge; clock reset | Fill reservoir; check outlet and plug; unplug/replug; set clock; try another outlet. |
| “Clean” light illuminated | Mineral buildup detected | Run vinegar descaling cycle and flush with 2–3 water cycles. |
| “Filter” light illuminated | Time to replace water filter | Soak new pod 15 min, assemble filter, place in reservoir well. |
| Auto Brew does not start | Clock not set; program time set incorrectly; auto icon off | Set current time; re-program auto brew; confirm icon appears; ensure water and coffee are loaded. |
| Coffee not hot enough / scorched | Keep-warm temp/time not suited | Adjust Keep Warm Temperature and Time settings per your taste. |
FAQ – Hamilton Beach 46221G Coffee Maker Troubleshooting
How often should I clean and descale my Hamilton Beach 46221G?
Hamilton Beach recommends cleaning at least once per month, or once per week in hard-water areas. You’ll also see the Clean icon light up when the coffee maker detects it needs descaling.
What kind of paper filter should I use?
Use a #4 cone-style paper filter that fits the removable brew basket. This size and shape are specifically designed for this model.
Can I wash the removable parts in the dishwasher?
Yes—removable parts like the brew basket and carafe can go on the top rack of your dishwasher. However, do not use the “Sanitize” cycle, as its high temperatures can damage the parts.
Why did my coffee maker suddenly stop keeping the coffee hot?
Check the Keep Warm Time setting—it may be set to 0 or a short duration. Also verify that the keep-warm plate is not visibly damaged and that the carafe sits flat on it. Remember the default keep warm time is 2 hours, but you can adjust from 0–4 hours.
Is it safe to keep the coffee maker inside a cabinet while brewing?
No. The manual specifically warns not to place the coffee maker in a cabinet during use, because steam and heat need space to dissipate and can damage cabinets or create a hazard.
My display is flashing 0:00—what does that mean?
This indicates the coffee maker has just been plugged in or experienced a power outage. You must set the time using the Time button before programming auto brew or relying on the clock.
Can I use an extension cord with this coffee maker?
Yes, but only if absolutely necessary. The manual notes that any extension cord must have an electrical rating equal to or greater than the coffee maker and must be arranged to avoid tripping or pulling hazards.
What’s the warranty on the Hamilton Beach 46221G?
For this series, Hamilton Beach provides a 1-year limited warranty in the U.S. and a 5-year warranty in Canada, covering defects in materials and workmanship for household use. It does not cover glass, filters, normal wear, misuse, or commercial use. Proof of purchase is required, and claims should be made through Hamilton Beach Consumer Affairs, not the retailer.
Why can’t I fix internal components myself?
The base of the coffee maker carries a warning against removing the bottom enclosure; there are no user-serviceable parts inside. Opening it can expose you to shock risk and void the warranty. Internal repairs must be performed by authorized service personnel only.
What should I do if my carafe breaks?
Stop using the coffee maker until you obtain a replacement carafe specifically designed for this model. The manual advises against using other carafes or heating this carafe on a stove or in a microwave. Replacement parts can be ordered through Hamilton Beach’s parts website.
When to Call Hamilton Beach or Replace the Coffee Maker
Despite best efforts, some issues can’t be solved at home:
- The unit does not power on even after verifying the outlet and resetting.
- There is smoke, burning smell, or visible scorching on the housing or cord.
- Water leaks from inside the base rather than from removable parts.
- The display is dead or scrambled but power is confirmed.
- The carafe or other critical parts are damaged and no replacement is available.
With a valid proof of purchase and within the warranty period, Hamilton Beach will repair or replace a defective unit at their discretion, though you’re responsible for shipping the product for service.
Troubleshooting User Manual – Free Download PDF File
Final Thoughts
The Hamilton Beach 46221G Premium Flavor 12-cup coffee maker is a feature-rich brewer with programmable auto brew, adjustable brew strength, keep-warm control, and built-in cleaning reminders. Most issues—overflows, poor taste, slow brewing, or error lights—come down to filter placement, coffee dose, water quality, or overdue cleaning.
By following this step-by-step troubleshooting guide, using the manufacturer’s instructions, and practicing regular maintenance, you can usually:
- Restore normal brewing
- Improve flavor and temperature
- Extend the life of your coffee maker
And most importantly—get back to enjoying great-tasting coffee, every single morning.


0 Comments