The Keurig K-1500 Commercial Coffee Maker is a popular choice for high-demand offices and businesses, providing reliable coffee brewing with each cycle. However, like all machines, it may sometimes encounter issues that prevent it from functioning properly.
In this comprehensive troubleshooting guide, we will go through step-by-step solutions to fix common problems with the Keurig K-1500, ensuring your coffee maker works like new.
Keurig K-1500 Coffee Brewer: A Step by Step Troubleshooting Guide
Common Problems with Keurig K-1500
Before diving into specific fixes, let’s explore the most common issues that you may encounter with the Keurig K-1500.
- Brewer not turning on
- No hot water during brewing
- Incomplete cups
- Water leaking or overflow
- Error lights flashing or staying on

1. Keurig K-1500 Brewer Will Not Brew
Possible Causes:
- No Water in the Reservoir
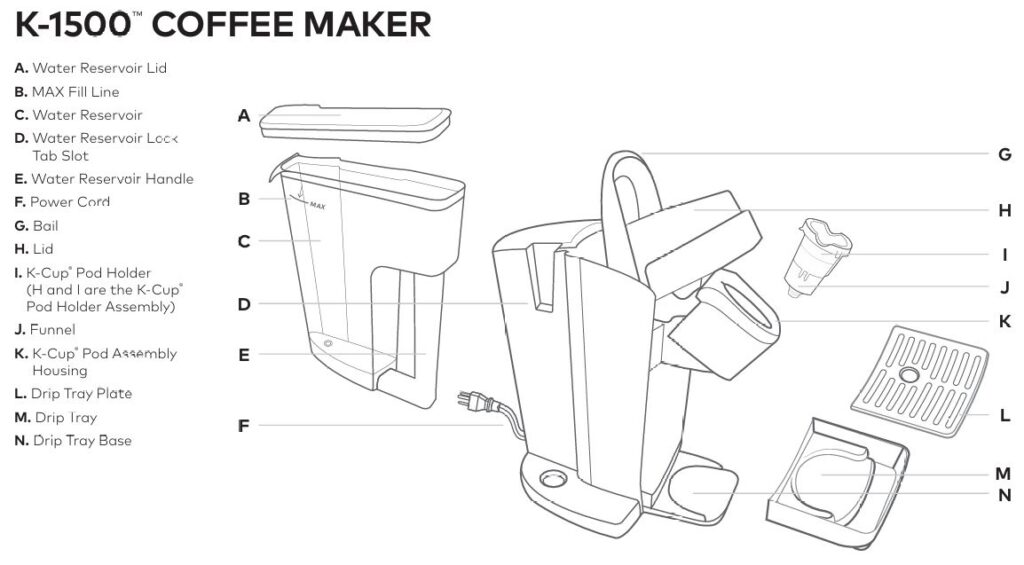
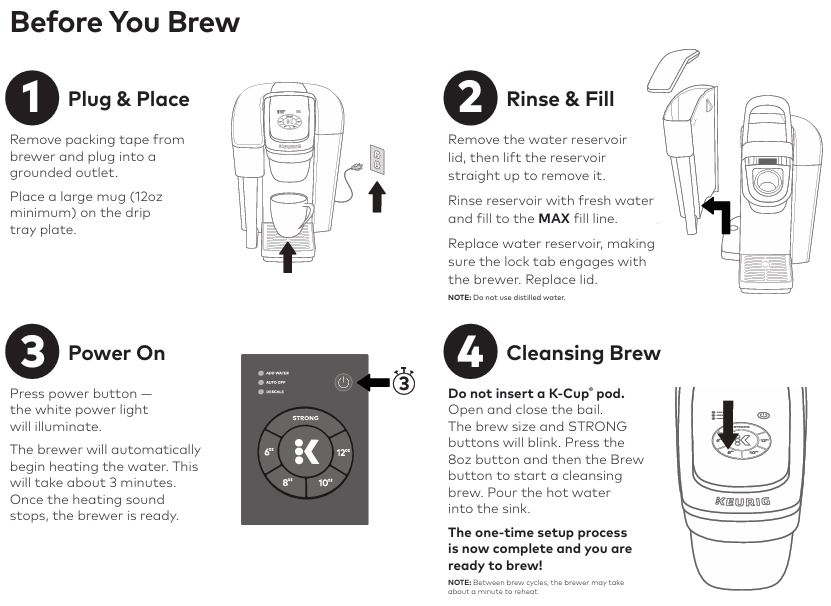
- Ensure that the water reservoir is filled to the MAX fill line. If the Add Water light is on, the reservoir may be empty or not seated properly.
- K-Cup® Pod is Not Inserted Properly
- Make sure that the K-Cup® pod is inserted correctly into the pod holder. If the pod is misaligned, the brewing process will not initiate.
Solutions:
- Check and refill the water reservoir, making sure it is securely locked in place.
- Open the brewer handle and ensure that the K-Cup® pod is correctly positioned.
- Close the handle completely and wait for the brewing cycle to start.
2. Brewer Shuts Off Unexpectedly
Possible Causes:
- Energy Saver Mode (Auto Off)
- The Keurig K-1500 is designed to turn off after 2 hours of inactivity to save energy.
- Power Issues
- There may be an issue with the power supply, such as an overloaded electrical circuit.
Solutions:
- To disable the Auto Off feature, press and hold the STRONG and 10oz buttons simultaneously until the indicator light turns off.
- Ensure the brewer is plugged into its own dedicated outlet, free from other high-energy appliances.
3. Brewing Partial Cup
Possible Causes:
- Clogged Exit Needle
- If the exit needle is blocked, the coffee may flow inconsistently or stop halfway through brewing.
- Descaling Needed
- Over time, calcium buildup from hard water can obstruct the brewer’s internal components.
Solutions:
- Clean the Exit Needle: Use a straightened paper clip to clear the needle of any coffee grounds or debris. Refer to the Keurig K-1500 Cleaning Instructions for detailed steps.
- Descale the Brewer: If you haven’t done so recently, follow the descaling procedure to remove mineral deposits. Regular descaling every 3-6 months is recommended.
4. Grounds in Coffee
Possible Causes:
- Blocked Entrance or Exit Needle
- Grounds may accumulate in the needles, causing them to puncture the K-Cup® pod improperly.
Solutions:
- Clean the Needles: Use a paper clip to gently clean both the entrance and exit needles. Ensure there are no obstructions before running a water-only brew cycle.
Descaling Procedure for Keurig K-1500
Why Descale Your Keurig?
Regular descaling is essential for maintaining the longevity and performance of your Keurig K-1500. Scale buildup from hard water can clog the brewer and decrease brewing efficiency.
Descaling Steps:
- Prepare the Brewer:
- Empty the water reservoir and remove any K-Cup® pods.
- Pour the entire bottle of Keurig® Descaling Solution into the water reservoir and fill the bottle with water. Pour this into the reservoir as well.
- Run the Descaling Solution:
- Press the power button to turn the brewer on.
- Place a large mug on the drip tray and select the largest brew size. Press the Brew button to run the solution through.
- Rinse:
- After running the descaling solution, empty the water reservoir, rinse thoroughly, and fill with fresh water.
- Run at least 12 rinse cycles with fresh water until no residual solution is present.
If your brewer doesn’t fill properly after descaling, it may be due to extensive scaling. In this case, let the brewer sit unplugged for 30 minutes before continuing the rinse cycle.
Water Reservoir Issues
Possible Causes:
- Water Reservoir Not Installed Properly
- Ensure that the water reservoir is seated securely on the brewer base. If it’s loose, the water may not flow into the brewer properly.
- Water Reservoir is Empty
- Double-check the water level to ensure that it’s filled to the MAX line.
Solutions:
- Confirm that the water reservoir is properly installed and filled.
- If the water reservoir is still causing issues, try removing it, rinsing it, and then reattaching it.
Power and Button Issues
Possible Causes:
- Unresponsive Buttons
- The brew buttons may not respond if the brewer is not receiving sufficient power or there’s a software glitch.
Solutions:
- Check Power Supply:
- Ensure the brewer is plugged into a dedicated, grounded outlet.
- If you’re using a power strip, try plugging the brewer directly into the wall.
- Reset the Brewer:
- Unplug the brewer for 30 seconds and then plug it back in. This resets the system and may resolve minor glitches.
Frequently Asked Questions
How do I reset my Keurig K-1500?
To reset your Keurig K-1500, unplug the brewer for at least 30 seconds and then plug it back in. This will clear any minor errors.
Why is my Keurig K-1500 not brewing a full cup?
This could be due to a clogged needle or a lack of water in the reservoir. Ensure the water tank is filled and clean the needles if necessary.
How often should I clean my Keurig K-1500?
It’s recommended to clean your Keurig K-1500 brewer regularly and descale it every 3-6 months to prevent mineral buildup.
Conclusion
By following this troubleshooting guide, you should be able to resolve most issues with your Keurig K-1500 Commercial Coffee Maker. Regular cleaning, maintenance, and descaling are key to ensuring your brewer continues to function optimally. If the problem persists after following these solutions, contact Keurig’s customer service for further assistance.
Don’t let a faulty coffee maker interrupt your productivity—use these simple steps to get back to brewing your favorite beverages!

Here’s a short table summarizing the common issues with the Keurig K-1500 Commercial Coffee Maker and their solutions:
| Problem | Cause | Solution |
|---|---|---|
| Brewer Will Not Brew | No water or improperly inserted K-Cup® pod | Refill water reservoir and ensure K-Cup® pod is inserted properly. |
| Brewer Shuts Off Unexpectedly | Auto Off feature or power issue | Disable Auto Off feature or check power supply. |
| Brewing Partial Cup | Clogged needles or need for descaling | Clean the needles and descale the brewer. |
| Grounds in Coffee | Blocked entrance/exit needle | Clean the entrance and exit needles. |
| Power Issues | Brewer not plugged in properly | Ensure the brewer is plugged directly into a grounded outlet. |
| Water Reservoir Issues | Reservoir not seated or empty | Ensure the reservoir is properly installed and filled to the MAX line. |


0 Comments