The Keurig K-2500 Commercial Coffee Maker is designed to provide quick, single-serve coffee solutions in high-demand environments. However, like any machine, it may sometimes experience issues that prevent it from working properly. If your Keurig K-2500 is not brewing or functioning as expected, don’t worry – we have a comprehensive troubleshooting guide to help you fix it, step by step. This guide covers common issues and their solutions.

Common Issues with the Keurig K-2500 and How to Fix Them
1. Brewer Does Not Power On
Problem: If your Keurig K-2500 coffee maker doesn’t power on, this could be due to a few simple reasons.
Solutions:
- Check the Power Connection: Make sure the brewer is plugged into a grounded outlet.
- Power Switch: Ensure the power switch on the back of the brewer is in the “ON” position.
- Circuit Breaker: Check if the circuit breaker has tripped and reset it if necessary.
- Try a Different Outlet: If the brewer still doesn’t turn on, try plugging it into a different outlet.
2. Brewer Won’t Brew After First Use
Problem: Your Keurig K-2500 may not brew when used for the first time due to improper setup or priming.
Solutions:
- Prime the Brewer: The brewer must fill the internal hot water tank before the first use. If it’s not primed, it won’t brew.
- Water Supply: Ensure that the water supply is properly connected and turned on. If the brewer is plumbed, check the water pressure.
- Environment Temperature: If the brewer has been stored in a cold environment (below freezing), allow it to warm to room temperature for at least two hours before use.
3. Brewer Produces Only Partial Cup of Coffee
Problem: If your coffee maker produces only a partial cup, this could be due to a clogged needle or a problem with the pod holder.
Solutions:
- Check Needles: The exit and entrance needles may be clogged. Use a straightened paperclip to clean the needles.
- Clean the K-Cup Pod Holder: Remove the K-Cup pod holder and rinse it under the faucet to remove any coffee grounds.
- Descale the Brewer: If prompted to descale, make sure you follow the descaling instructions carefully.
4. Grounds in Your Coffee Cup
Problem: Grounds in your coffee cup could mean that the exit or entrance needles are clogged, preventing the pod from properly brewing.
Solutions:
- Clean the Needles: Use a straightened paperclip to clean both the entrance and exit needles. Refer to the manual for needle care instructions.
- K-Cup Pod Holder Care: Detach and rinse the K-Cup pod holder. Clean the funnel to ensure proper functioning.
5. Brewer Display Shows “Add Water” or “No Water” Error
Problem: The brewer might show a “No Water” or “Add Water” message even when the water reservoir is full.
Solutions:
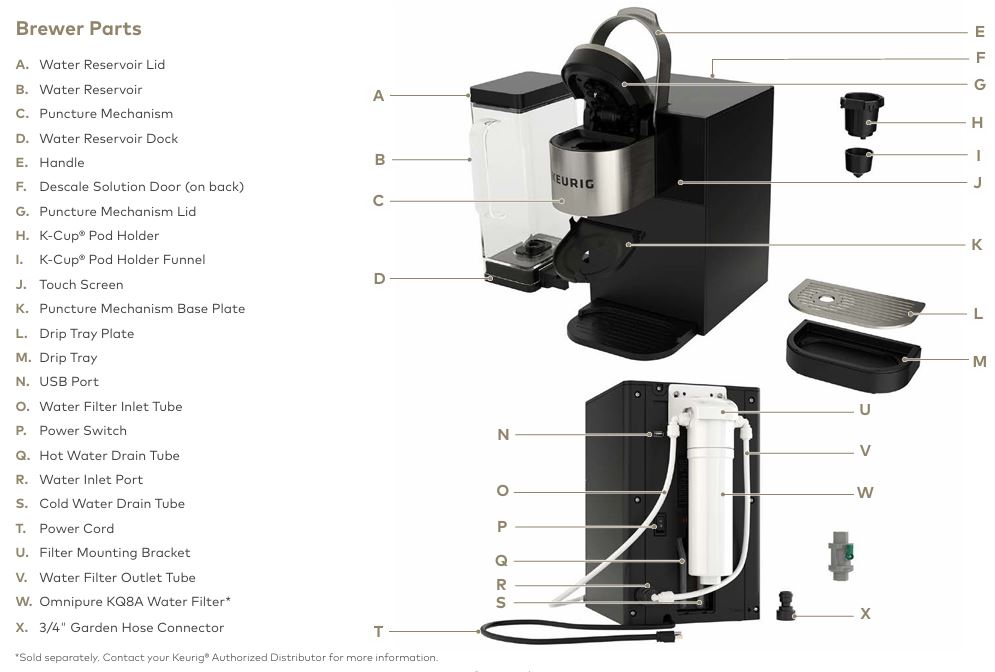
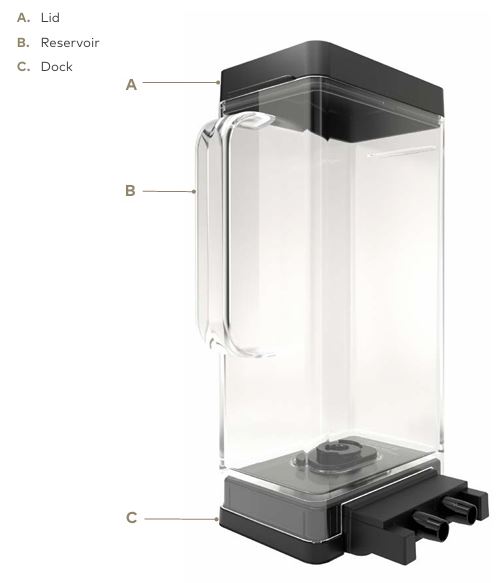
- Check Water Reservoir Connection: Ensure that the water reservoir is securely placed on the dock.
- Check for Airlocks: If using a plumbed brewer, airlocks in the water lines can prevent water from flowing. Ensure the water supply is turned on and the plumbing is correctly installed.
- Refill the Reservoir: If using the water reservoir, ensure it’s filled to the MAX line. The brewer will not operate properly if the water level is too low.
Advanced Troubleshooting for Keurig K-2500
6. Brewer Produces Weak Coffee
Problem: Your coffee may taste weak or diluted, even after selecting the “Strong” brew option.
Solutions:
- Check the Coffee Pod: Ensure you’re using a fresh, properly sealed K-Cup® pod. A damaged or old pod may produce weaker coffee.
- Select Strong Brew: Make sure the “Strong” button is selected before starting the brew cycle.
- Descale the Brewer: Build-up from mineral deposits can impact brewing strength. Follow the descaling procedure regularly.
7. Brewer Shows “Please Descale” Message
Problem: If the Keurig K-2500 prompts you to descale the brewer, it’s likely that mineral build-up is obstructing the brewing process.
Solutions:
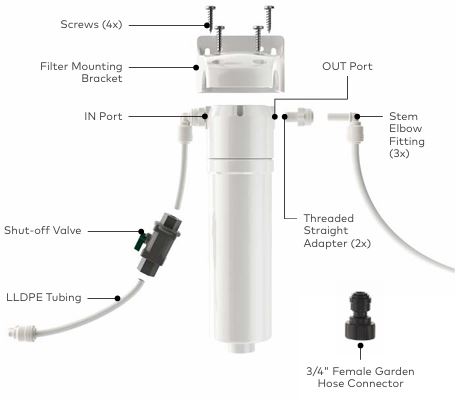
- Descaling Procedure: Follow the descaling instructions in your brewer’s manual. Use Keurig® Descaling Solution and follow the correct procedure for either a plumbed or reservoir brewer.
- Plumbed Brewers: Remove the water line and follow the descaling steps.
- Reservoir Brewers: Fill the reservoir with descaling solution and follow the on-screen prompts.
Tip: Descale every three months to maintain performance and prevent clogs.
8. Water Leaking from Brewer
Problem: Water leaking from the brewer can cause damage and may indicate a problem with the water reservoir or plumbing connections.
Solutions:
- Check Reservoir Dock: Ensure the water reservoir is securely docked and the locking screw is tightened.
- Inspect Plumbing Connections: If the brewer is plumbed, inspect the water lines and connections for leaks.
- Replace O-rings or Seals: Over time, seals and O-rings may wear out and cause leaks. Replacing these parts can prevent further leakage.
Brewer Maintenance Tips
Regular Cleaning
To avoid malfunctions and keep your Keurig K-2500 brewing at its best, perform the following regular maintenance:
- Clean the Water Reservoir: Regularly clean the water reservoir with soapy water. Rinse thoroughly and dry with a lint-free cloth.
- Clean the Drip Tray: Empty the drip tray and clean it with a damp, soapy cloth. It can hold up to 10 ounces of overflow.
- Needle Cleaning: Clean the entrance and exit needles using a straightened paperclip to remove any coffee grounds.
- Descale: Perform descaling every three months to prevent mineral build-up.
Sanitizing the Brewer
For a deeper clean, Keurig recommends sanitizing the brewer weekly using URNEX® Complete Café Equipment Sanitizer. This process helps remove any mold or bacteria build-up, ensuring your coffee remains safe and fresh.
FAQ: Keurig K-2500 Troubleshooting
My Keurig K-2500 is not making coffee, what should I do?
Ensure that the brewer is properly plugged in and the water supply is connected. Clean the K-Cup pod holder and needles to prevent clogging. If the brewer is still not working, try descaling it.
How often should I descale my Keurig K-2500?
Descale your Keurig K-2500 every three months to maintain its performance. If you’re using hard water, you may need to descale more frequently.
Why does my Keurig K-2500 display a “Please Add Water” message even though the reservoir is full?
Check if the water reservoir is properly seated. Also, inspect the water inlet for any blockages. If your machine is plumbed, make sure the water supply is on and properly connected.
Can I use any K-Cup® pods with the Keurig K-2500?
While other brands may fit, it is recommended to use Keurig® K-Cup® pods to avoid malfunction and ensure the best brewing experience.
Conclusion
With this comprehensive troubleshooting guide, you should be able to fix most common issues with your Keurig K-2500 Commercial Coffee Maker. Regular maintenance, proper setup, and timely descaling will ensure your brewer continues to deliver great-tasting coffee with minimal downtime. If you encounter persistent problems, don’t hesitate to contact Keurig® Authorized Distributors for further assistance.

Here’s a short table summarizing the common troubleshooting issues and solutions for the Keurig K-2500:
| Issue | Possible Causes | Solutions |
|---|---|---|
| Brewer not powering on | – Loose power connection, tripped circuit breaker | – Ensure the brewer is plugged in and the switch is on |
| Brewer won’t brew for the first time | – Brewer needs to be primed, water supply not connected | – Prime the brewer, ensure water is connected and turned on |
| Partial cup of coffee | – Clogged needles or K-Cup holder | – Clean the needles and pod holder |
| Grounds in coffee cup | – Clogged entrance or exit needles | – Clean both entrance and exit needles with a paperclip |
| Weak coffee | – Old or damaged K-Cup, improper brew settings | – Use fresh K-Cup and select “Strong” brew option |
| “Add Water” error | – Reservoir improperly seated, airlock in plumbed system | – Re-seat the water reservoir, check plumbing connections |
| Water leaking | – Improperly seated reservoir or worn-out seals | – Check and reseat the water reservoir, replace seals if needed |


0 Comments