If your Keurig K-Iced Plus Coffee Maker is not functioning as expected, don’t worry. This detailed guide will help you resolve the most common problems quickly and efficiently. From power issues to brewing problems, we’ve got the solutions.
1. Brewer Not Turning On
If your Keurig K-Iced Plus does not turn on, the following steps can help:
Solution 1: Power Reset
A simple reset often resolves many common issues. To reset the brewer:
- Unplug the coffee maker from the electrical outlet.
- Wait for 30 seconds before plugging it back in.
- Press any button or lift the handle to turn it on.
This simple reset often resolves minor electrical glitches.
Solution 2: Check Power Supply
Ensure that the brewer is plugged directly into a dedicated outlet, not a power strip. The brewer requires a stable power supply to function properly.
2. Brewing Problems
Partial Brew: Brewing only part of your cup is a common issue. Here are solutions to resolve it.
Solution 1: Add Water
Ensure there is enough water in the reservoir to meet the minimum brew requirement. The Keurig K-Iced Plus needs at least 6oz of water to brew. If the water is too low, add more water and try again.
Solution 2: Check Brew Size Settings
The Brew Over Ice setting adjusts the water to account for ice melt. This might make the final output volume appear smaller than expected. Rest assured, the coffee maker is brewing the correct amount, even if it looks less than expected.
Solution 3: Clean the Needles
A clogged exit needle can significantly affect the brew size and flow. Follow the Needle Cleaning Instructions below for a step-by-step guide.
Brewer Not Brewing: If your Keurig K-Iced Plus isn’t brewing at all, follow these steps.
Solution 1: Refill Water Reservoir
Ensure the water reservoir has a minimum of 6oz of water for brewing. If it’s too low, refill it to the MAX FILL line and try again.
Solution 2: Reset the Brewer
A soft reset may help:
- Unplug the brewer for 30 seconds.
- Press and hold the 12oz button for 5 seconds to reset the brewing cycle.
- Wait for the water to start dispensing, then proceed with brewing.
Solution 3: Descale the Brewer
Mineral buildup can affect brewing functionality. If your brewer still isn’t working after these steps, perform a descaling cycle (see below for detailed instructions).
3. Water Issues
No Water Dispensed
If your brewer dispenses no water at all, follow these troubleshooting tips:
Solution 1: Ensure Water Level is Sufficient
The brewer requires a certain amount of water to begin brewing. Ensure there is enough water in the reservoir to trigger the brew cycle.
Solution 2: Air in Water Line
If air gets trapped in the water line, it can prevent the brewer from dispensing water.
Solution:
- Unplug the brewer.
- Remove and reseat the water reservoir.
- Plug the machine back in and try brewing again.
Water Overflow
If your Keurig is overflowing, follow these solutions to resolve the issue.
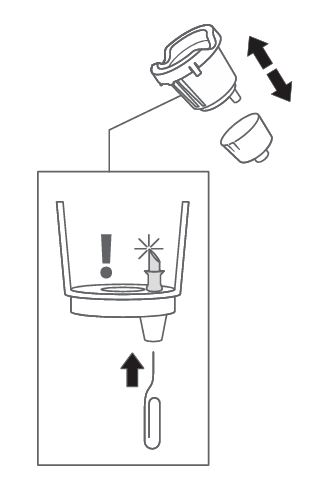
Solution 1: Clean the Drip Tray
The drip tray can hold up to 8oz of overflow. If the tray is full, empty it to prevent spills. Clean the tray regularly to ensure it remains functional.
Solution 2: Check the Needle
If water is overflowing, it could be due to a clogged needle. Check and clean the exit needle following the cleaning instructions below.
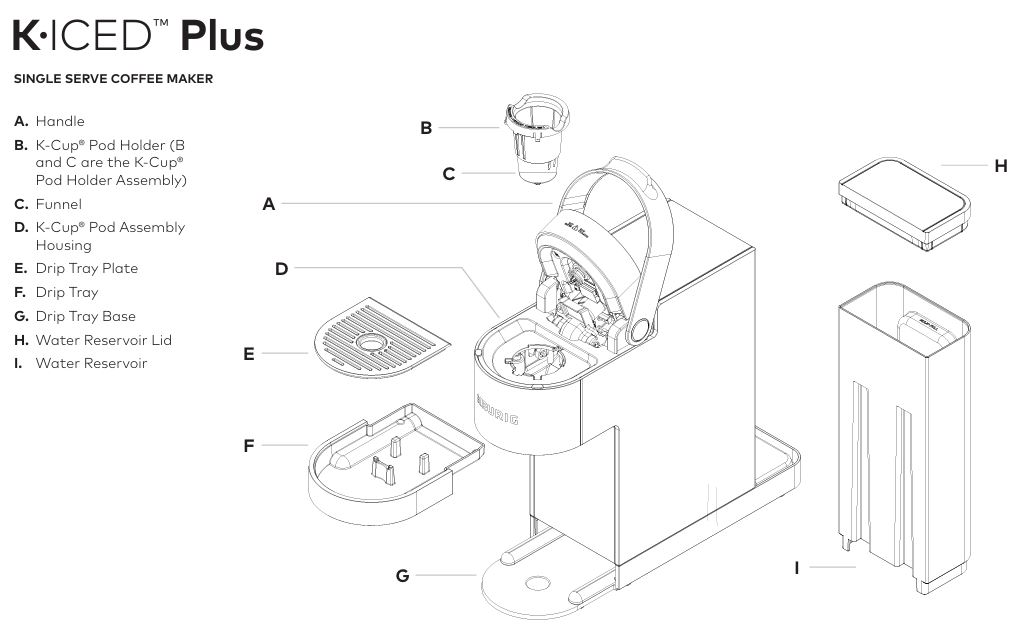
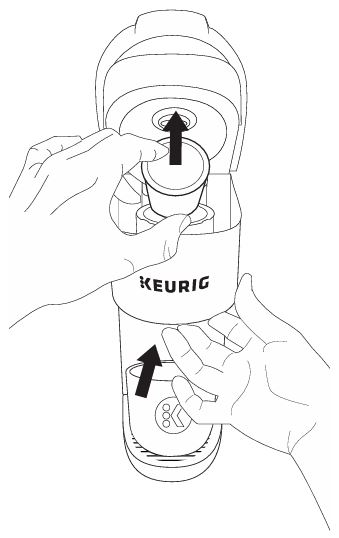
4. Needle Issues
Clogged Needles
The exit and entrance needles are essential for water flow during brewing. If these needles become clogged with coffee grounds, the brewer will not work properly.
Solution 1: Clean the Exit Needle
To clean the exit needle, insert a straightened paper clip into the needle and gently loosen any coffee grounds. Refer to the user manual for detailed instructions.
Solution 2: Clean the Entrance Needle
To clean the entrance needle, follow these steps:
- Lift the brewer handle.
- Use a straightened paper clip to clear any blockage in the entrance needle.
After cleaning, run a water-only brew cycle to flush out the needles.
5. Descaling & Maintenance
Descaling Procedure
Descaling removes mineral buildup inside the brewer, which can affect its performance. To descale your Keurig K-Iced Plus, follow these steps:
Step 1: Add Descaling Solution
- Pour the entire bottle of Keurig® Descaling Solution into the empty water reservoir.
- Fill the empty bottle with water and pour it into the water reservoir.
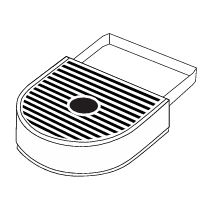
Step 2: Activate Descale Mode
- Turn off the brewer.
- Press and hold the BREW OVER ICE button.
- Press and hold both the 8oz and 12oz buttons for 3 seconds.
- When the DESCALE light turns solid, release the buttons.
Step 3: Run Cleansing Brew
- Press the BREW button when it begins flashing.
- Discard the hot liquid into the sink.
Repeat the descaling cycle until the ADD WATER light illuminates.
Step 4: Fresh Water Rinse
- Empty the water reservoir.
- Refill with fresh water to the MAX FILL line.
- Press the BREW button and let the water run through.
- Repeat this step until the Descale light turns off.
6. General Maintenance Tips
Proper maintenance ensures that your Keurig continues to perform well. Here are a few tips:
Regular Cleaning
- K-Cup® Pod Holder: Remove, clean, and reassemble the pod holder regularly.
- Water Reservoir: Wash the water reservoir with warm, soapy water once a week.
- Drip Tray: Empty and clean the drip tray to prevent overflow.
Water Filter Replacement
- Change the Keurig® water filter every two months to ensure better tasting coffee by removing impurities.
Use Only Keurig® Pods
- Always use Keurig® K-Cup® pods to avoid clogging the brewer and ensure the best coffee taste.

FAQs
What if my Keurig is not brewing despite the water level being full?
Ensure the needles are clear. Clogged needles can prevent water flow, causing brewing issues.
Why is my Keurig brewing only a small amount?
When brewing over ice, the machine accounts for ice melt, which reduces the overall volume. If the issue persists, try cleaning the needles.
What if the brewer powers off unexpectedly?
The brewer automatically turns off after 5 minutes of inactivity. Press any button or open the handle to reset the machine.
Warranty and Support
Keurig Limited Warranty
Keurig provides a one-year warranty on your brewer, which covers defects in materials and workmanship under normal home use. For warranty service, you must provide proof of purchase.
How to Obtain Warranty Service
To request a warranty service, call Keurig Customer Service at 1-866-901-BREW (2739). Do not return your brewer without obtaining a Return Materials Authorization (RMA) number.
For more information, visit Keurig Support.

Conclusion
Your Keurig K-Iced Plus Coffee Maker should now be working smoothly after following these troubleshooting steps. Regular maintenance and cleaning will ensure that your machine stays in optimal condition, providing you with high-quality coffee every time.
Here’s a short table summarizing common issues and their solutions for the Keurig K-Iced Plus:
| Issue | Solution |
|---|---|
| Brewer Not Turning On | Unplug, wait 30 seconds, and plug it back in. Ensure the brewer is plugged into a dedicated outlet. |
| Partial Brew | Add more water to the reservoir. Clean the needles. Check the brew size settings (for Brew Over Ice). |
| Brewer Not Brewing | Refill the water reservoir. Perform a reset by unplugging and pressing the 12oz button. Clean the needles. |
| No Water Dispensed | Ensure enough water in the reservoir. Remove and reseat the water reservoir. |
| Water Overflow | Empty and clean the drip tray. Check the exit needle for clogs. |
| Clogged Needles | Use a paper clip to clean the entrance and exit needles. |
| Descale Notification On | Perform the descaling procedure (see the detailed steps above). |
| Brewer Power Issues | Plug the brewer into its own outlet. Reset by unplugging and plugging back in. |


0 Comments