The Keurig K2550 single-serve coffee maker is a popular choice for commercial use, offering convenience and efficiency. However, like any appliance, it may face operational issues. In this comprehensive troubleshooting guide, we will help you identify and solve common problems with the Keurig K2550, ensuring your coffee machine operates smoothly.

1. Keurig K2550 Not Powering On
If your Keurig K2550 isn’t powering on, follow these steps to troubleshoot the issue:
Step 1: Check Power Supply
- Ensure the brewer is plugged into a grounded outlet. If the machine is connected to a power strip, try plugging it directly into the wall.
- Check for power interruptions by resetting the circuit breaker or using a different outlet.
Step 2: Power Switch and Display
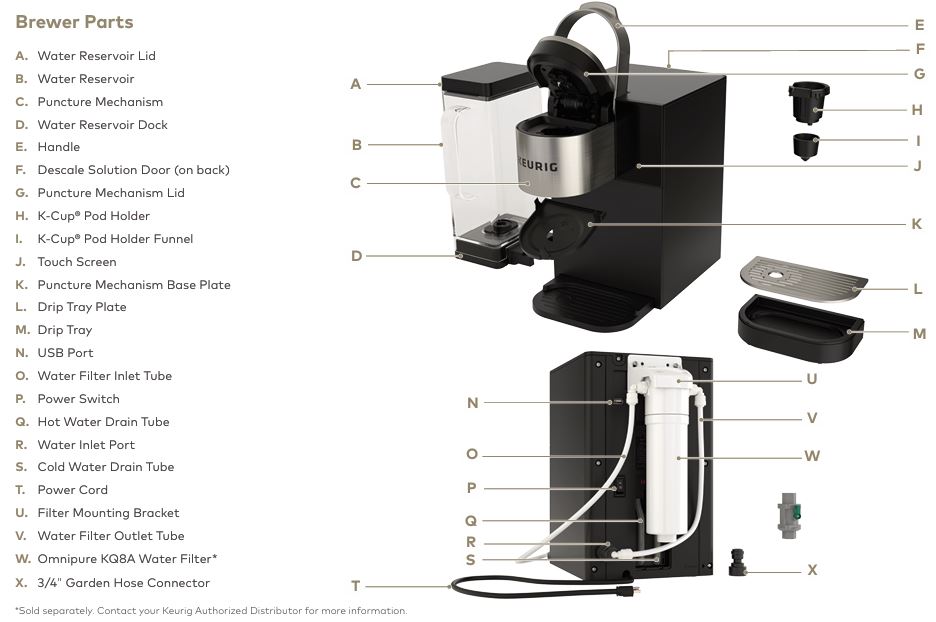
- Confirm that the power switch at the back of the brewer is in the ON position.
- If the touch screen is not illuminated, ensure the brewer is fully powered and not experiencing internal power failure.
Step 3: Electrical Issue
- If the machine still doesn’t power on, there may be a deeper electrical issue, such as a blown fuse or faulty wiring. In this case, contact a Keurig Authorized Distributor for repair or replacement.
2. Brewer Not Brewing
A common problem is when the Keurig K2550 fails to brew. Here’s how to resolve it:
Step 1: Priming the Brewer
If this is your first time using the brewer:
- The brewer needs to be primed by filling the internal hot water tank before the first use. Ensure the water supply is correctly connected.
Step 2: Check the K-Cup Pod Holder
- Make sure the K-Cup pod holder is properly aligned and the handle is fully lowered. If the handle is not completely down, the brewer will not start the brew cycle.
Step 3: Check for Blockages
- A clogged entrance or exit needle can prevent brewing. Remove and clean the K-Cup holder using a paperclip or other similar tool to clear any blockages.
3. Brewer Producing Partial Cups
Sometimes the Keurig K2550 will only brew a partial cup. Here’s how to fix that:
Step 1: Clean the Needles
- The entrance or exit needle may be clogged, causing improper water flow. Carefully clean both needles using a straightened paperclip to dislodge any coffee grounds or debris.
Step 2: Descale the Brewer
- If the issue persists, it may be due to scale buildup in the brewer. Perform a descaling cycle (detailed later in this guide) to remove any mineral deposits blocking the water flow.
4. Grounds in Your Coffee Cup
Finding coffee grounds in your cup can be a frustrating experience. Follow these steps to solve this issue:
Step 1: Clean the Needles
- Coffee grounds often get stuck in the exit needle. Clean the needle by removing the K-Cup holder and using a straightened paperclip to loosen any grounds.
Step 2: Ensure Proper Pod Placement
- Ensure that the K-Cup pod is seated properly in the holder and that the holes for the needles are not obstructed.
5. Brewer Displaying Error Messages
If your Keurig K2550 is showing error messages on the display, here’s what you can do:
Step 1: Check for Plumbing Issues
- If the display shows messages like “Please connect the brewer to a water source,” ensure that the water supply is turned on and properly connected.
Step 2: Descale the Brewer
- If the brewer alerts you to perform a descale, it means calcium buildup may be affecting performance. Perform the descaling procedure as outlined below.
Step 3: Reset the Brewer
- If you encounter persistent error messages, try turning the brewer off for a few minutes and then restarting it.
Descaling the Keurig K2550 Brewer
Descaling your Keurig K2550 regularly is essential for maintaining its performance. If you notice slow brewing or reduced coffee volume, it may be time to descale the machine.
Step 1: Prepare for Descaling
You will need:
- Keurig Descaling Solution (sold separately)
- Large ceramic mug or appropriate container
- Clean water
Step 2: Descaling Process
- Turn off the brewer and remove the K-Cup holder.
- Fill the internal tank with about 7 oz of Keurig Descaling Solution (for plumbed models) or fill the water reservoir with the entire bottle.
- Run the descaling cycle:
- For plumbed models: Let the solution soak for 30 minutes, then run two 12oz descaling brews.
- For water reservoir models: Run four rinsing brews to remove any remaining solution.
Step 3: Clean and Rinse
- After descaling, rinse all components thoroughly and run at least four cleansing brews with clean water to ensure no descaling solution remains.
Contacting Support
If you’ve followed the troubleshooting steps above and your Keurig K2550 still isn’t working, it’s time to contact customer support. Reach out to your Keurig Authorized Distributor or call Keurig’s technical support at 1-888-287-2739 Option #5 for further assistance.

FAQs
How do I fix a Keurig K2550 that is not brewing?
Ensure the water supply is properly connected, the K-Cup pod holder is correctly positioned, and the needles are free from blockages. Perform a descaling cycle if necessary.
Why does my Keurig K2550 brew a partial cup?
This may be caused by a clogged needle or scale buildup. Clean the needles and descale the machine to resolve the issue.
How often should I descale my Keurig K2550?
Descale your Keurig K2550 every three months or more frequently if you notice a drop in coffee volume or slower brewing times.
Here is a short table summarizing the troubleshooting steps for the Keurig K2550:
| Issue | Possible Solution |
|---|---|
| No Power | Check the power outlet, reset the circuit breaker, ensure the power switch is on. |
| Not Brewing | Prime the brewer, ensure K-Cup pod holder is properly seated, check for clogs. |
| Partial Cup | Clean entrance/exit needles, descale the brewer. |
| Grounds in Coffee | Clean the needles and ensure proper K-Cup pod placement. |
| Error Messages | Check water connection, perform descaling, reset the brewer. |
| Descaling Needed | Follow descaling instructions using Keurig Descaling Solution. |
By following these troubleshooting steps, you should be able to get your Keurig K2550 single-serve coffee maker working smoothly again. If the issue persists, don’t hesitate to reach out to Keurig’s customer support for further guidance.


0 Comments