If your Cuisinart DCC-1200BKSNAS 12-cup programmable coffee maker isn’t working as expected, don’t worry—many of the issues can be solved with a bit of troubleshooting. This comprehensive guide will help you fix common problems step-by-step, using detailed, practical information directly from the official user manual. Whether it’s a brewing issue, programming error, or cleaning problem, this guide provides solutions to ensure you can enjoy great coffee again quickly.
Cuisinart DCC-1200BKSNAS Brewing Machine: Common Issues and Troubleshooting Solutions
1. Coffee Maker Not Turning On
If your coffee maker fails to start brewing, the first thing to check is the power supply.
Possible Causes:
- Loose or improperly connected power cord.
- Unresponsive power switch or faulty outlet.
- Blown fuse or internal component failure.
Steps to Fix:
- Check the Power Source: Ensure the coffee maker is plugged into a functioning power outlet. You can verify this by plugging another appliance into the same outlet to see if it works.
- Inspect the Power Cord: Ensure the cord is securely connected to the machine and not frayed or damaged. If the cord is faulty, it may need replacing.
- Reset Circuit Breaker: If your coffee maker is connected to a circuit breaker, make sure it is not tripped. Reset the breaker and try again.
- Internal Issues: If there’s no power despite checking these, it may be an internal issue. Consult the warranty or customer service for assistance.
2. Coffee Not Brewing Properly
Brewing problems can arise if the water flow is restricted or if incorrect settings are used.
Possible Causes:
- Clogged filter basket or water lines.
- Incorrect grind size or excessive coffee grounds.
- Water reservoir improperly filled.
Steps to Fix:
- Check the Coffee Grind: Coffee ground too finely can cause clogging, preventing proper water flow. Use a medium grind for optimal brewing. If the grind is too fine, reduce the amount of coffee grounds.
- Clean the Filter Basket: Remove any old coffee grounds that may be blocking the filter basket. Wash the filter basket and carafe with warm, soapy water and dry thoroughly before reusing.
- Proper Water Fill Level: Make sure the water reservoir is filled to the desired level. Use the carafe markings to guide you, but always add a little extra water to account for the steam loss during brewing.
3. Coffee Overflowing or Leaking
Overflowing coffee is a common issue when the filter basket is overfilled or improperly aligned.
Possible Causes:
- Overfilling the filter with coffee grounds.
- Using too many filters (paper and gold-tone filter together).
- Clogged water lines or an improperly seated filter basket.
Steps to Fix:
- Proper Coffee Ground Measurement: Never exceed the maximum 15 tablespoons of coffee grounds for a 12-cup brew. Exceeding this amount can cause overflow.
- Single Filter Usage: Always use a single filter to avoid clogging. Using both a paper filter and a permanent filter together can restrict water flow.
- Clean Water Reservoir: Make sure there’s no mineral buildup in the water reservoir or clogging of water lines. Regular cleaning with vinegar can prevent this.
4. Coffee Maker Not Heating Properly
If your coffee is brewing cold or only lukewarm, the heating element may not be functioning properly.
Possible Causes:
- Malfunctioning heating plate.
- Mineral buildup on the internal components.
- Coffee maker improperly programmed or set to a low heat setting.
Steps to Fix:
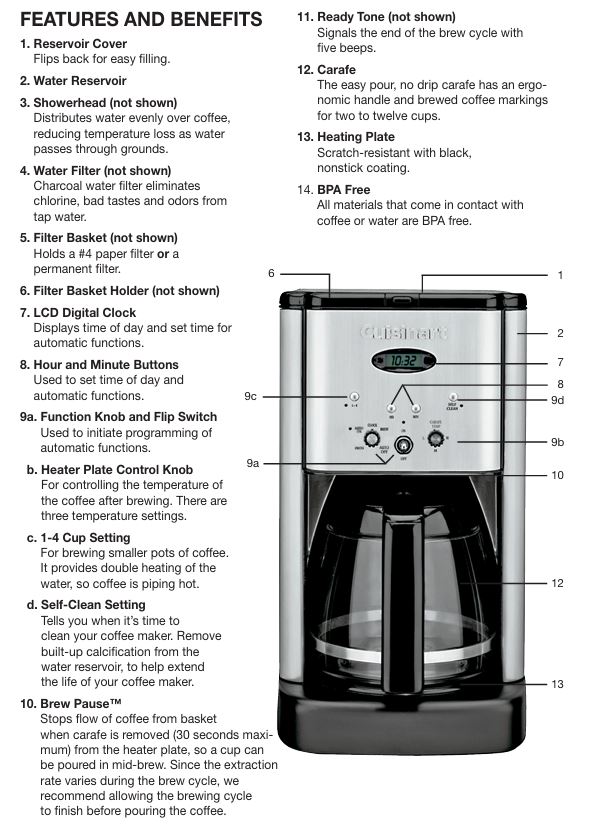
- Check Heating Plate Settings: Use the temperature control knob to ensure it is set to your desired level. There are three temperature settings (Low, Medium, and High) to maintain the warmth of your coffee after brewing.
- Descale the Coffee Maker: Hard water deposits can build up over time, affecting the heating element. Perform a decalcification cycle using a vinegar-water solution to clean the internal components.
- Test the Coffee Maker: After running the cleaning cycle, test the machine by brewing a fresh pot of coffee to see if the heating issue is resolved.
5. Auto-On Feature Not Working
If your coffee maker isn’t starting automatically at the set time, there might be an issue with the clock settings or auto-on programming.
Possible Causes:
- Incorrect clock or auto-on time settings.
- Internal malfunction in the programming mechanism.
- A miscommunication between the flip switch and the function knob.
Steps to Fix:
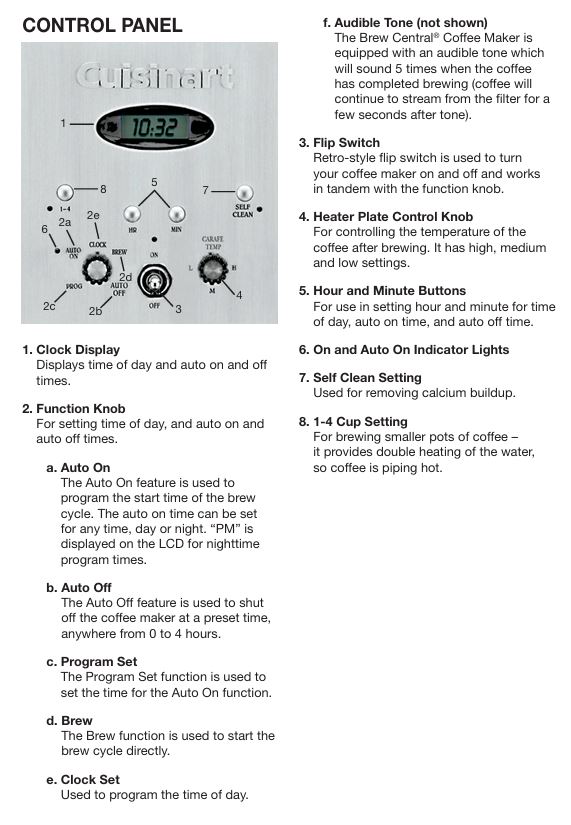
- Check Time Settings: Verify that the time on the coffee maker is correct. If not, turn the function knob to “Clock” and set the time using the hour and minute buttons.
- Reprogram Auto-On Feature: Turn the function knob to “Prog,” then set the auto-on time using the hour and minute buttons. Make sure the flip switch is set to “On” to activate the feature.
- Test Auto-Off Feature: If the auto-on time is correct, also check the auto-off settings. The auto-off function may be interfering with the auto-on feature. Set the auto-off to a time that allows the coffee maker to finish the brewing cycle.
6. Strange Tastes or Odors in Coffee
A strange taste or odor in your coffee can be the result of mineral buildup, dirty components, or poor water quality.
Possible Causes:
- Old coffee oils in the filter basket or carafe.
- Mineral deposits from hard water.
- Poor quality tap water.
Steps to Fix:
- Regular Cleaning: Clean the filter basket, carafe, and water reservoir with warm, soapy water after each use. Be sure to remove old coffee oils that can affect taste.
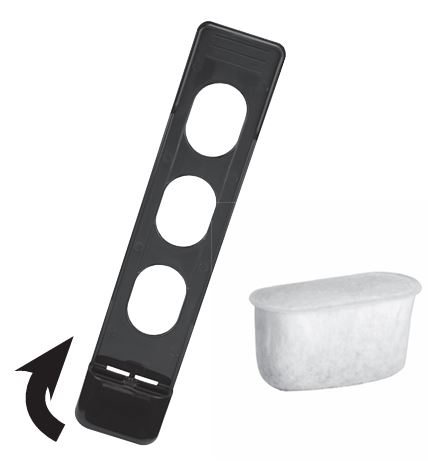
- Use Filtered Water: If your tap water has a strong taste or odor, consider using filtered or bottled water for brewing. The built-in charcoal water filter in your coffee maker will help reduce chlorine, but it’s not a substitute for good-quality water.
- Descaling Cycle: Perform a decalcifying cycle using a mixture of 1/3 vinegar and 2/3 water to remove mineral deposits that could be affecting the taste.
Advanced Troubleshooting Guide on Cuisinart DCC-1200 Series Brewer
a. Brew Pause™ Not Working
The Brew Pause™ feature allows you to pause brewing and pour a cup of coffee before the full cycle completes. If it’s not working, the issue may lie with the filter basket or Brew Pause™ mechanism.
Possible Causes:
- Misalignment of the filter basket.
- Obstruction in the Brew Pause™ mechanism.
Steps to Fix:
- Check Alignment: Ensure that the filter basket is properly seated in place. If it’s misaligned, it can prevent the Brew Pause™ feature from activating.
- Examine the Mechanism: Remove the filter basket and check if there’s any obstruction or buildup preventing the Brew Pause™ function from working. If necessary, clean the internal components.
b. Self-Cleaning Function Not Engaging
If the self-cleaning function isn’t starting, it could be because the water reservoir is not properly filled, or there may be a malfunction.
Possible Causes:
- Water reservoir not filled to the correct level.
- Vinegar-water solution not properly prepared.
Steps to Fix:
- Fill the Water Reservoir Properly: Ensure the water reservoir is filled to the proper level. The self-cleaning function requires a full tank to operate.
- Run the Cleaning Cycle: Mix 1/3 white vinegar and 2/3 water and pour it into the water reservoir. Press the Self-Clean button to begin the cycle. The cleaning light should turn on. If it doesn’t, check for internal issues or reset the coffee maker.
Regular Maintenance Tips for Your Cuisinart DCC-1200BKSNAS
- Perform Regular Cleaning: To maintain optimal performance, clean the coffee maker after every use. Clean the carafe, filter basket, and water reservoir regularly to prevent buildup of oils, coffee grounds, and mineral deposits.
- Replace the Water Filter: Change the charcoal water filter every 60 days to ensure clean, fresh-tasting coffee.
- Run a Decalcifying Cycle: Perform a decalcifying cycle every 1-3 months, depending on the hardness of your water. Use a mixture of vinegar and water to remove calcium buildup that can affect performance.
- Use Quality Water: Always use filtered or purified water to improve the taste of your coffee and reduce the risk of mineral deposits forming inside the machine.
Frequently Asked Questions (FAQs)
1. How do I clean the Cuisinart DCC-1200BKSNAS coffee maker?
To clean your coffee maker, unplug it and remove the filter basket and carafe. Wash these parts with warm, soapy water. Use a damp cloth to wipe the body of the coffee maker. Perform a decalcifying cycle every few months with a mixture of vinegar and water.
2. Why is my coffee maker making a strange noise?
Strange noises may occur if there is mineral buildup inside the machine. Run a decalcifying cycle to clear out any calcium deposits. If the noise persists, there may be an issue with the internal components, which might require service.
3. How do I reset the auto-on feature?
To reset the auto-on feature, ensure the time is correctly set, then turn the function knob to “Prog” to program the auto-on time. Press the hour and minute buttons to set the desired start time, then ensure the flip switch is turned on.
4. What is the Brew Pause™ feature and how does it work?
The Brew Pause™ feature temporarily stops the flow of coffee when the carafe is removed, allowing you to pour a cup before the brewing cycle is complete. Ensure that the filter basket is properly aligned for this feature to work correctly.
5. Why is my coffee brewing weak?
Weak coffee could be caused by using a coarse grind or too little coffee. Adjust the grind size to medium-fine and ensure you’re using the correct amount of coffee for the number of cups you’re brewing.


0 Comments