If your Ninja Luxe Café ES700 Pro Series won’t brew, won’t froth, or just isn’t tasting right, this deep-dive guide walks you through systematic troubleshooting from power-on to perfect extraction. You’ll find safety notes, quick checks, decision trees, part names, error meanings, and factory-validated procedures like Clean and Descale cycles. All steps and specs align with the ES700 Owner’s Guide for authentic, model-correct fixes.
Safety First (Read Before You Begin)
- Unplug before cleaning, disassembly, or when not in use. Avoid contact with hot surfaces; scalding steam and hot liquids can burn. Never immerse the machine body or cord in water.
- Keep children away; don’t let the cord hang over edges or touch hot cooktops. Use the handles and knobs only.
- Never remove the portafilter while brewing—the group head is under pressure. Always place a suitably sized cup under the portafilter before starting a brew.
- Do not run the machine without water; use only room-temperature or cold water in the 2 L reservoir and do not exceed the max fill line.
- Steam wand caution: don’t touch when operating; wipe immediately after use and allow the auto-purge to complete.
Tip: Most “machine not working” calls are resolved by water seating, descaling, basket cleanliness, or grind/tamp corrections. Start with the quick checks below before deeper repairs.
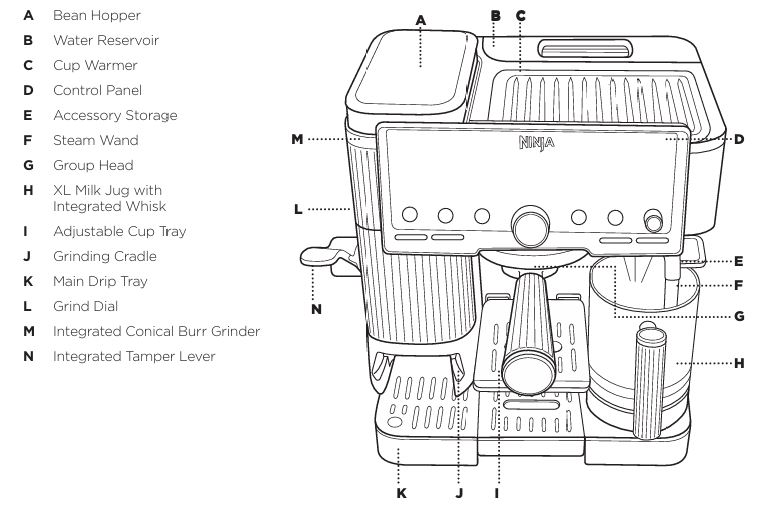
Orientation: Know the Parts You’ll Use While Troubleshooting
- Water Reservoir (2 L) – seats at the rear; must be fully and firmly seated.
- Bean Hopper & Integrated Burr Grinder – lid must stay on; grind size set by the Grind Dial (1 = finest, 25 = coarsest).
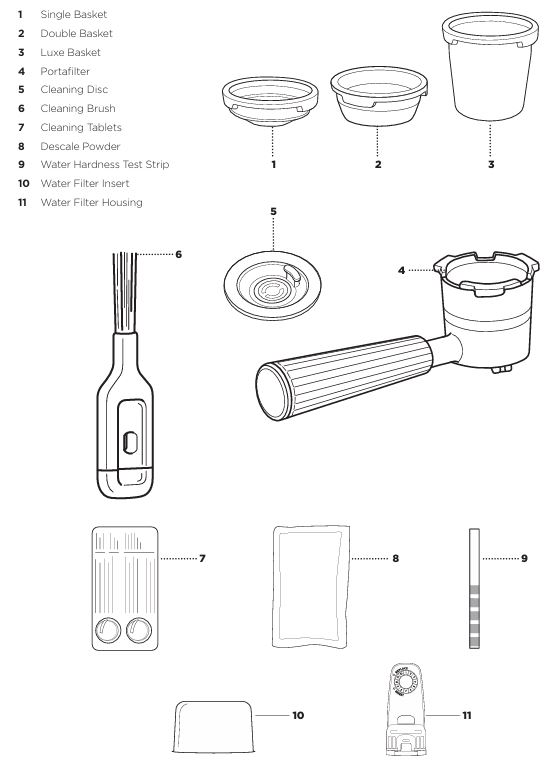
- Portafilter & Baskets – Single*, Double (pre-installed), and Luxe baskets; align orange dot to orange dot when inserting in the group head. (*Single basket not on all models.)
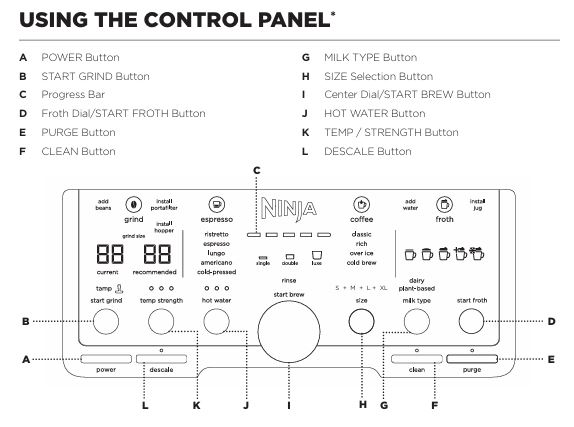
- Control Panel – POWER, START GRIND, TEMP/STRENGTH, SIZE, CLEAN, DESCALE, PURGE, FROTH dial, HOT WATER.
- Steam Wand & XL Milk Jug w/ Whisk – froth styles: Steamed, Thin, Thick, Extra-Thick*, Cold Foam. (*not on all models). Auto purge after frothing.
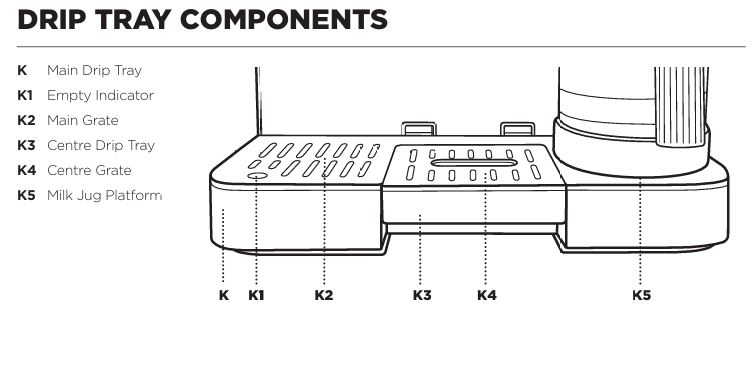
- Drip Tray & Empty Indicator – remove and empty when the orange indicator rises.
Quick-Start Diagnostic Checklist (5 Minutes)
Use this when the machine “does nothing,” “brews too little,” or “frothing won’t start.”
- Power & Sleep
- Confirm plug and wall socket are good; press POWER. The ES700 powers down after ~20 minutes to save energy—turn it back on.
- Water
- Fill reservoir with cold/room-temp water to Max; reseat firmly. Hot water can trigger ADD WATER false alerts.
- Portafilter & Basket
- Remove, check basket holes for blockages, re-insert the correct basket for your drink. Tighten until the portafilter’s orange dot aligns with the lock arrow.
- Grinder & Beans
- Confirm whole beans in hopper; no pre-ground in hopper. If ADD BEANS persists, unplug and gently push beans toward the burrs; verify hopper is locked.
- Notifications
- Address any ADD WATER / ADD BEANS / INSTALL HOPPER / INSTALL PORTAFILTER / INSTALL JUG / RINSE / CLEAN / DESCALE prompts exactly as shown later in this guide.
- Try a Water Flush
- Run HOT WATER or a CLASSIC M+ water flush to preheat and confirm water flow (with basket installed for brew flush).
If any step fails (no water, no grind, no heat), jump to the corresponding section below.

Symptom-Based Troubleshooting (Step-by-Step)
A) No Water or Very Little Water from the Portafilter
Likely causes
- Low or unseated reservoir; machine still warming; grind too fine; scale buildup.
Fix in order:
- Fill & Reseat the Reservoir
- Fill to Max with cold/room-temp water, press firmly into place.
- Preheat the System
- Allow warm-up; preheat group head/portafilter by running HOT WATER or a water-only double shot into your cup; discard.
- Match the Recommended Grind
- When you insert the portafilter into the grinding cradle, ES700 shows a Recommended grind. Use the Grind Dial to match it, then START GRIND. If the shot still chokes or times out, go coarser 1–2 steps.
- Clean Basket Holes
- Remove the basket, wash with warm soapy water; ensure holes aren’t clogged. Dry thoroughly before use.
- Descale if Flow Is Restricted
- If water flow remains weak, run the DESCALE cycle (≈90 minutes). Details in section “Deep Maintenance.”
With the Luxe basket you need sufficient reservoir water: plan for ~533 ml requirement; the machine will warn ADD WATER if not enough.
B) Espresso Trickles Slowly (Choking) or Streams Too Fast
Diagnosis:
- Too slow / choking → grind too fine, basket clogged, or scale.
- Too fast / watery → grind too coarse, or tamp is too light.
Fix:
- Use Barista Assist’s Recommended Grind
- Match Current to Recommended. If slow: go 1–2 steps coarser. If fast: go 1–2 steps finer.
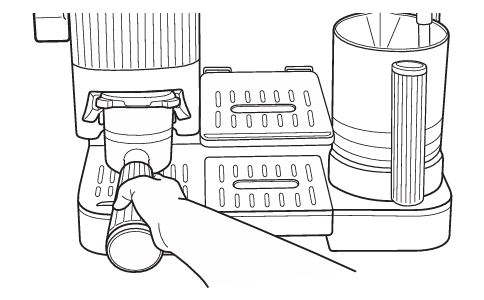
- Tamp Correctly
- With portafilter in the cradle, press the integrated tamper lever firmly to the stop—twice for an even puck.
- Clean the Basket
- Wash and dry basket; confirm holes are clear.
- Descale if Needed
- If you’ve corrected grind/tamp and flow is still abnormal, run DESCALE.
Crema check: A caramel stream with a persistent crema layer indicates proper extraction. If crema is thin, verify tamp, freshness (beans ideally used within ~20 days of roast), and grind.
C) Espresso Runs Around the Edge of the Portafilter (Leaking at Group Head)
Probable causes & fixes:
- Portafilter Not Fully Seated
- Insert with orange dot to orange dot; twist until dot lines up with lock arrow.
- Grounds on Basket Rim
- Wipe rim and group head surface; re-insert and lock.
- Worn Group Head Gasket
- If leaking persists at full lock, replace the rubber gasket behind the shower screen (Phillips screw removes screen; pry gasket out, install new). Parts available via Ninja; contact support if needed.
D) Frothing Won’t Start or Milk Isn’t Hot Enough
Frothing won’t start – check these:
- Machine not at temp → wait for warm-up.
- Low/loose reservoir → fill/seat to at least min line.
- Wand position → ensure wand is inserted into jug with jug properly on platform.
- Install Jug message → ensure both jug bottom and platform are dry and clean.
- Milk volume → fill to min line.
Milk not hot enough / too thin or too thick:
- Choose Correct Froth Style (Steamed, Thin, Thick, Extra-Thick*, Cold Foam). Only Cold Foam remains cold..
- Adjust Froth Temperature in Additional Settings: _h06 → LO / M (default) / HI. Press & hold SIZE 3 seconds to enter.
- Clear Clogs
- Remove the tip with the brush’s built-in wrench; use the needle to clear the orifices; PURGE afterwards.
- Milk Type Matters
- Whole dairy yields better texture; for plant-based, use barista/full-fat versions and set MILK TYPE accordingly.
Always wipe the wand immediately after frothing and push it down to trigger auto-purge—the system will purge water through the wand into the drip tray after each froth.
E) Machine Is Leaking, Drip Tray Fills Fast, or Water Appears Under the Unit
- The ES700 bypasses some water into the main drip tray during espresso to maintain pressure—normal. It also auto-purges after frothing, sending water to the tray. The tray holds approx. purge volumes for up to six cappuccinos. Empty when the orange indicator is visible.
- If water overflows or pools, empty the tray immediately, reseat the reservoir, and check for tray misalignment.
- Persistent external leaks at the group head → inspect/replace group head gasket per section C.
F) Grinder Isn’t Dispensing Grounds / Loud Grinding Noise
No grounds coming out:
- Beans Present & Hopper Locked
- Fill with whole beans (never pre-ground in hopper). Lock hopper clockwise. If ADD BEANS persists, unplug and gently press beans toward burrs.
- Portafilter Detection
- Ensure the portafilter sits flat and fully inserted in the grinding cradle; the machine tares its weight and detects the basket before grinding. Reinsert if necessary.
- Clear the Chute
- Use the cleaning brush around the cradle; the chute cover removes for cleaning.
Loud noises:
- Often caused by foreign debris or frozen beans. Use only whole, room-temperature beans. If you suspect residue buildup, remove the bean hopper, twist out the upper burr (align orange arrows), brush both burrs—never get them wet—and reassemble.
G) Taste Issues: Too Bitter, Too Acidic, Too Weak, Too Strong, Not Hot Enough
Adjust strength & temperature (before brew):
- Hold TEMP/STRENGTH 3 seconds to toggle mode.
- Espresso Strength: • taller (4:1), •• default (2.5:1), ••• shorter (2:1).
- Coffee Strength: Mild / •• Default / ••• Bold (changes bean dose).
- Temperature: Low / •• Medium (default) / ••• High.
Bitter or acidic:
- Match Recommended Grind and adjust strength ratio. Use low/medium temp for dark roasts, medium/high for light roasts. Descale if taste remains off.
Not hot enough:
- Preheat cup and portafilter with hot water; use HIGH temp; warm cup on cup warmer; ensure froth style isn’t Cold Foam; descale if needed.
Weak/strong size mismatches:
- For coffee (non-espresso), set SIZE first (S to XL). For espresso, adjust strength ratio; remember it changes output volume—use appropriately sized cups. Clean baskets if output is off.
H) “RINSE” Notification When Switching Hot ↔ Cold
- If you brew a cold drink immediately after a hot drink, ES700 requires a RINSE: place a ≥355 ml cup under the group head, press START BREW, and allow ~250 ml flush. Brew your cold drink afterward. To avoid RINSE, group your cold drinks first, then hot.
I) No Power
- Confirm plug, socket, and press POWER. Remember auto shut-off after ~20 minutes; simply power back on. If an Er code appears (e.g., Er 03), contact Ninja Customer Service.
Error & Notification Reference (What It Means + What To Do)
| Message / Symptom | What It Means | Action |
|---|---|---|
| ADD WATER | Insufficient water or reservoir not seated | Fill to Max with cold/room-temp water, reseat firmly, press START BREW to resume. |
| ADD BEANS | Not enough beans; beans bridged above burrs | Refill beans; if persists, unplug and gently push beans down toward burrs; verify hopper lock. |
| INSTALL PORTAFILTER | Portafilter not detected in cradle | Ensure portafilter is flat, fully inserted; clear grounds from cradle; reseat and retry. |
| INSTALL HOPPER | Hopper not locked or blocked by beans | Unlock, lift off, clear beans from grinder top, reseat firmly, lock clockwise. |
| INSTALL JUG | Jug not placed or surfaces are wet | Place jug on platform, ensure both surfaces are dry/clean. |
| RINSE | Switching hot→cold requires flush | Place cup, START BREW for automatic ~250 ml rinse. |
| CLEAN | Backflush group head with cleaning disc/tablet | Run CLEAN cycle (~6 min). Steps below. |
| DESCALE | Limescale level requires descaling | Run DESCALE (~90 min). Steps below. |
| Er XX | Internal error code | Call Ninja support with the code. |
Deep Maintenance That Restores Performance
1) Clean Cycle (≈ 6 minutes)
When to run: When CLEAN illuminates, or taste/flow degrades from coffee oils.
You’ll need: Cleaning disc (handle up) + cleaning tablet.
Procedure:
- Empty the main drip tray (prevents overflow). Fill reservoir to Max with water.
- Insert the Double basket into portafilter. Place cleaning disc on top, handle up; add 1 cleaning tablet to the center.
- Lock portafilter into group head. Press CLEAN, then press the center dial to start. The machine backflushes and deposits water/sediment into the tray. Wait for completion beep.
- Remove and hand-wash portafilter, disc, and tray; dry.
Run this any time you notice flavor muddiness or restricted flow despite proper grind/tamp.
2) Descale Cycle (≈ 90 minutes)
When to run: When DESCALE illuminates (based on your water hardness setting) or when persistent flow/temperature issues arise. Descaling prevents clogs and restores temp/flow.
You’ll need: Ninja descale powder mixed with 1.1 L water or 500 ml white vinegar plus water to the Descale line. Empty drip tray first.
Procedure:
- Dissolve descale powder in 1.1 L water and pour into reservoir or add 500 ml vinegar then top to Descale line with water.
- Insert Double basket and lock portafilter. Place an empty ≥550 ml cup under spouts; ensure milk jug is installed with wand in jug.
- Press DESCALE, then the center dial to begin. Machine alternates flushing through steam wand and group head for ~90 min. Wait for completion beep/counter.
- Remove portafilter/tray/jug carefully (hot water), wash with soapy water to remove any solution.
- Refill reservoir with fresh water to Max. Reinstall tray and portafilter (no jug) and flush group head with an M+ CLASSIC brew. Then PURGE the steam wand.
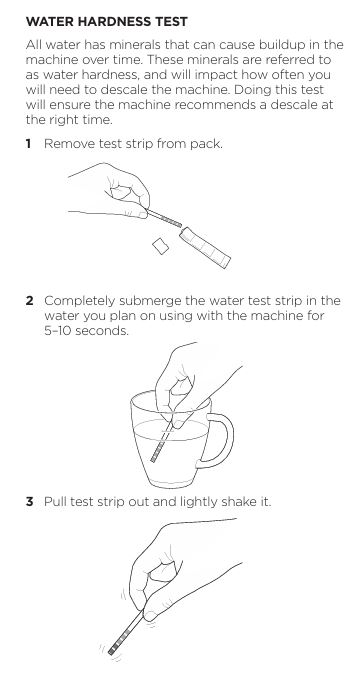
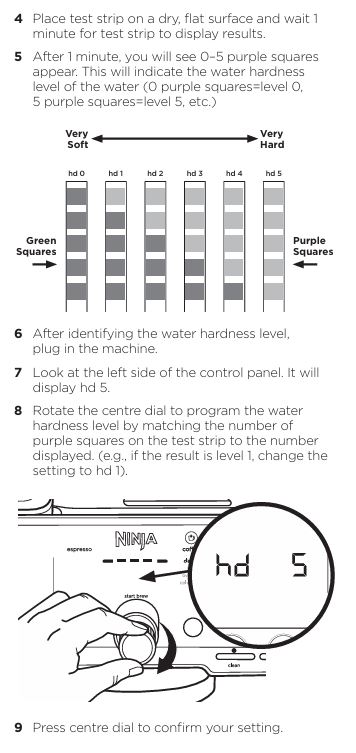
Water Hardness Setup: Use the included test strip to set hd0–hd5 so the machine prompts for descale at the right time (hold SIZE for Additional Settings).
3) Grinder Cleaning (Upper Burr Removal)
When to do: After oily beans, loud/gritty sounds, or intermittent dosing.
- Unplug. Remove beans (Switching Out Beans), unlock and lift off hopper.
- Rotate upper burr counterclockwise to align orange arrows; lift out. Brush only—do not wash burrs. Clean the fixed burr in the machine with the brush. Clean the chute/cradle and remove the chute cover as needed. Reinstall burr (align arrows) and hopper, lock.
4) Steam Wand Deep-Clean
- Pop off the brush cap to reveal the needle. Use it to clear the wand tip. For deeper clean, use the wrench in the brush to remove the tip; clean inside the tip and wand with the needle. PURGE afterward.
5) Shower Screen & Group Head Gasket Service
- If shots spray sideways, leak, or flavor consistency degrades, remove the Phillips screw in the shower screen, clean the screen, and inspect/replace the rubber gasket (flathead helps removal). Reinstall screen and screw. Replacement gaskets are available from Ninja.
Brew & Froth Calibration: Getting Café-Quality Results
Dialing-In: Grind, Dose, Ratio, Temperature
- Grind: 1 (finest) to 25 (coarsest). Follow Recommended on the display—ES700’s Barista Assist adapts to your beans and recent extractions, and may change over 2–3 brews while it learns.
- Tamp: Use the integrated lever, two firm presses.
- Ratio (Espresso Strength):
- • Taller/less concentrated (≈4:1)
- •• Default (≈2.5:1)
- ••• Shorter/more concentrated (≈2:1)
Note: Changing strength changes output volume—choose cup size accordingly.
- Temperature: Low/Medium/High—use lower temps for dark roasts, higher for light roasts.
Coffee Sizes (Non-Espresso)
S, S+, M, M+, L, L+, XL—from ≈175 ml up to ≈530 ml depending on style (Classic/Rich/Over Ice/Cold Brew). Set SIZE before grinding.
Americano Reference (to sanity-check volumes)
- Single Americano: default ≈68 ml espresso component
- Double Americano: default ≈135 ml
- Quad Americano: default ≈258 ml
(Strength dots adjust volumes; • is larger, ••• is shorter.)
Hot Water On Demand
Press HOT WATER, set temp (Low/Med/High), START BREW. Program dispenses ~200 ml if not manually stopped. Place cup on the highest shelf to reduce splashing.
“Best Practices” That Prevent Most Problems
- Use freshly roasted beans; prefer bags with a “Roasted On” date and use within ~20 days of that date.
- Dial in the grinder again after changing beans; always match Current to Recommended.
- Pre-heat cup and portafilter to increase drink temperature; run a water flush.
- Clean the basket after each use; keep machine, drip tray, and cradle free of debris.
- Use filtered water; set water hardness correctly to time descaling.
- Wipe the steam wand immediately and auto-purge before shutdown.
Mini Decision Trees
“It doesn’t brew.”
- POWER light on? If no → power on. If yes →
- ADD WATER? Fill & reseat; press START BREW.
- Portafilter detected? If INSTALL PORTAFILTER → insert flat, fully back.
- Grind happening? If no grounds → beans + hopper lock + cradle clean.
- Water drips only → RINSE if switching hot/cold; else CLEAN then DESCALE.
“It doesn’t froth.”
- Jug installed and dry? INSTALL JUG cleared?
- Enough water and warm-up complete?
- Froth style not Cold Foam (unless desired)?
- _h06 Froth Temp set higher?
- Clear wand tip with needle; PURGE.
Maintenance Schedule (Recommended)
- After every brew: Empty puck, wash basket & portafilter, wipe base, empty tray as needed. Wipe and purge wand after froth.
- Weekly or after oily beans: Brush burrs, clean chute/cradle; wash drip tray parts (dishwasher-safe).
- Monthly: Backflush CLEAN cycle (~6 min).
- As prompted by hardness: DESCALE (~90 min).
- As needed: Remove/clean shower screen; inspect/replace group head gasket.
Frequently Asked Questions (ES700-Specific)
Why am I getting zero crema?
Tamp is likely too light—use the lever twice; grind may be too coarse; or beans aren’t fresh. Also ensure basket holes aren’t clogged.
Why is my drink smaller/larger than expected?
For espresso, strength setting changes the grounds-to-water ratio and output volume. For coffee, choose size with the SIZE button before grinding. Basket clogs or scale can also affect yield—clean and descale if needed.
Can I skip the RINSE when going from hot to iced?
No; ES700 enforces RINSE to equalize temperatures (~250 ml flush). Brew your cold drinks first to avoid the rinse.
The machine thumps/pulses when brewing—normal?
Some pump noise is normal. But confirm water above min and reservoir seated firmly.
My steam wand won’t froth—what am I missing?
Warm-up might not be complete; jug may not be detected (dry bottom/platform); milk below min; or wand tip clogged—use the needle and PURGE.
Can I use pre-ground coffee?
Don’t put pre-ground coffee in the hopper (burrs can jam). If your recipe calls for pre-ground in the basket, add it directly to the basket (not the hopper). Always keep burrs free of moisture.
What if I see “Er 0X”?
That’s an internal error code. Note the number and contact Ninja Customer Service.
Bonus: Pro-Level Setup for Reliable Café Shots
- Warm Everything: While the ES700 heats, run HOT WATER to warm group head, portafilter, and cup. Discard water and dry basket before grinding.
- Match & Micro-Adjust: Always match Recommended grind. Make single-step changes and evaluate crema flow (steady, caramel ribbon) and taste.
- Strength for Style:
- Latte base: go ••• (shorter, richer) and add milk.
- Americano: keep •• default or • for higher volume; confirm Americano output references.
- Milk Discipline: Start with cold milk and a room-temperature jug; choose DAIRY vs PLANT-BASED correctly; set _h06 if you want hotter microfoam. Wipe and purge wand immediately after.
Troubleshooting Table: Problems & Solutions at a Glance
| Problem | Root Cause | Solution |
|---|---|---|
| No water from portafilter | Reservoir empty/unseated; grind too fine; warm-up not complete; scale | Fill/reseat; preheat/flush; coarser grind; DESCALE. |
| Espresso chokes | Grind too fine; clogged basket; scale | Coarser 1–2 steps; clean basket; DESCALE. |
| Espresso gushes | Grind too coarse; light tamp | Finer 1–2 steps; double-tamp firmly. |
| Spray/leak at group head | Portafilter not locked; grounds on rim; worn gasket | Align dots; clean rim; replace rubber gasket. |
| Frothing won’t start | Jug not detected; low water; wand not inserted; not at temp | Dry jug/platform; fill/seat reservoir; insert wand in jug; wait for ready. |
| Milk not hot / thin foam | Wrong froth style; low froth temp; milk type; clogged tip | Choose heated style; set _h06 HI; use whole/barista milks; clean needle + PURGE. |
| Drip tray fills quickly | Brew bypass & auto-purge behavior | Normal—empty when orange indicator visible. |
| Grinder silent/no dose | No beans; hopper unlocked; beans bridged; cradle not detecting | Add beans; lock hopper; gently push beans; ensure portafilter sits flat & fully in cradle; clean chute. |
| Grinder loud | Debris or frozen beans | Remove hopper; brush burrs (no water); use room-temp whole beans only. |
| Coffee not hot | No preheat; low temp; cold cup; scale | Preheat group head/portafilter/cup; set HIGH temp; DESCALE. |
Post-Repair Validation Checklist
After any fix, pull a double espresso and verify:
- Flow: begins within a few seconds, pours as a steady caramel ribbon (not spurting).
- Crema: stable layer that persists for several seconds when tilting the cup.
- Taste: balanced (adjust strength/temperature according to beans).
- Purge: If you frothed, the wand auto-purges; drip tray rises accordingly—empty as needed.
When to Call Support
Repeated Er codes, electrical issues, persistent leaks after gasket replacement, or if DESCALE/CLEAN doesn’t restore flow/temperature. Ninja Customer Service can supply replacement parts and further diagnostics.

Final Word from the Bench
The ES700 platform is engineered with intelligent notifications and Barista Assist to help you self-correct. If you follow the water-grind-tamp-clean-descale sequence above, you’ll solve the vast majority of “not working” scenarios without tools—often in minutes. Keep your baskets clean, set water hardness correctly, descale when prompted, and the machine will deliver consistent, café-level results day in and day out.
“Match the Recommended grind, double-tamp, and clean the basket—those three alone resolve most extraction complaints.”


0 Comments