
The Keurig K-200 drip coffee maker is known for its ease of use and high-quality brews, offering a convenient way to enjoy a fresh cup of coffee at home. However, like any appliance, it can sometimes encounter issues that prevent it from working properly.
Whether it’s power problems, partial brews, or error messages, this comprehensive troubleshooting guide will help you identify and resolve the most common issues with your Keurig K-200.

Power Issues: Keurig K-200 Not Turning On or Shutting Off
Power issues are one of the most common problems with coffee makers, including the Keurig K-200. If your coffee maker is not turning on or shuts off unexpectedly, follow these steps to resolve the issue.
Step 1: Check Power Supply
- Verify the power source: First, make sure the coffee maker is plugged into a grounded outlet. Sometimes, the issue can be as simple as a loose connection.
- Avoid overload: If there are multiple devices plugged into the same outlet, it might be overloading the circuit. Consider unplugging some appliances and using a dedicated outlet for the Keurig.
- Try a different outlet: If possible, plug the brewer into a different outlet to check if the issue is with the outlet itself.
Step 2: Reset the Brewer
- Perform a reset: Unplug the coffee maker for at least 30 seconds and then plug it back in. Sometimes, the Keurig needs to be reset to clear out any temporary glitches or power surges.
- Check for power button feedback: After plugging it in, press the power button and check if the display lights up. If the screen remains dark, proceed with further troubleshooting.
Step 3: Inspect the Power Cord and Plug
- Examine the power cord: Look for any visible damage on the power cord. If there are any frayed wires or cuts, this could be the source of the issue.
- Test the plug: Ensure that the plug is securely connected to the outlet. A loose connection can sometimes prevent the brewer from turning on.
Step 4: Check for Circuit Overload
- Avoid circuit overload: Ensure that no other high-power devices are connected to the same circuit as the Keurig. If the electrical circuit is overloaded, the brewer may not receive enough power to operate.
Brewing a Partial Cup of Coffee
If your Keurig K-200 is brewing only a partial cup, it’s often related to water flow issues or mineral buildup in the system. Follow these steps to get your brewer back to normal.
Step 1: Check Water Reservoir
- Ensure the water reservoir is properly seated: If the water reservoir is not securely in place, it can disrupt the brewing process. Ensure that the reservoir is fully engaged with the brewer, and that there’s enough water in it. Refill it to the MAX line if necessary.
- Ensure water is clean: Avoid using distilled water as it may not be suitable for your machine. Use filtered or tap water instead, as distilled water can lead to operational issues.
Step 2: Clean the Exit Needle
- Clogged exit needle: If the exit needle becomes clogged, water cannot flow freely through the K-Cup® pod. Clean the needle using a paperclip or similar tool to remove any coffee grounds or debris that may have become lodged inside.
Step 3: Descale the Brewer
- Descaling process: Over time, minerals from the water can build up inside the brewer, leading to clogging and reduced water flow. It’s essential to regularly descale your Keurig to ensure optimal performance. If the brewer is still producing partial cups, it’s likely due to a buildup of calcium or other minerals. Follow the descaling procedure with Keurig® Descaling Solution to clear any obstructions.
Touch Screen Alerts and Errors
Your Keurig K-200 has a touch screen that will display helpful error messages when something goes wrong. Here are common touch screen alerts and how to resolve them:
“More Water Please”
- Solution: If the screen displays “More Water Please,” but the water level is not low, try removing the water reservoir and emptying it. Clean the reservoir and return it to the brewer. Make sure the reservoir is seated properly in the base.
“Sorry, Brew Interrupted”
- Solution: If the brewing cycle is interrupted, lift the handle, remove the K-Cup®, lower the handle, and perform a rinsing brew without the pod. This can help clear any brewing obstructions.
“Sorry, There is a Problem”
- Solution: This error typically occurs when coffee grounds are stuck in the entrance needle. To resolve this, clean the needle using a straightened paperclip to loosen any coffee grounds. Follow the instructions in the manual for cleaning the entrance needles.
“Time to Replace the Water Filter”
- Solution: After every 1,000 ounces or two months of use, your Keurig will notify you to replace the water filter. Once you replace the filter, press ‘YES’ on the screen to reset the water filter reminder.
Descaling Your Keurig K-200
Descaling is crucial for the long-term performance of your Keurig K-200. If your machine has been showing signs of low water pressure, producing partial cups, or the “Time to descale” warning, it’s time to descale the brewer.
Step-by-Step Descaling Procedure
- Prepare the Brewer:
- Empty the water reservoir and remove any existing water filter.
- Pour the entire bottle of Keurig® Descaling Solution into the reservoir, then fill the bottle with water and add that to the reservoir as well.
- Run the Descaling Cycle:
- Place a large ceramic mug on the drip tray.
- Lift and lower the handle, and press the brew button to start the descaling process. Repeat the process until the touch screen indicates “More Water Please.”
- Let the brewer sit for at least 30 minutes while still on.
- Rinse with Fresh Water:
- After descaling, empty the reservoir and rinse it thoroughly. Fill it with fresh water to the MAX line.
- Run at least 12 rinsing brews using the largest brew size. Ensure that the water reservoir is refilled as necessary.
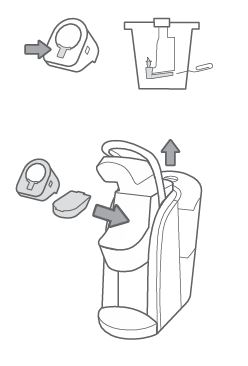
Grounds in Your Coffee
If you notice coffee grounds in your cup, it’s likely due to a clog in the brewing system. Here’s how to fix that:
Step 1: Clean the Entrance Needle
- Entrance needle clog: To clean the entrance needle, lift the brewer handle and use a straightened paperclip to remove any coffee grounds that may have become stuck in the needle. Gently insert the paperclip into the holes and move it around to dislodge any debris.
Step 2: Clean the Exit Needle
- Exit needle clog: Similarly, clean the exit needle by removing the K-Cup® pod holder and using a paperclip to remove any coffee grounds stuck inside. Rinse the needle thoroughly with hot water.
Frequently Asked Questions (FAQs)
Why is my Keurig K-200 not brewing?
If your brewer is not brewing, check that the water reservoir is filled and properly seated. Also, make sure that the K-Cup® pod holder is clean and free from obstructions. If the issue persists, it may be time to descale the machine.
How often should I descale my Keurig K-200?
Descaling should be done every 3-6 months, depending on the mineral content of your water. If you use hard water, you may need to descale more often.
How do I reset the water filter reminder?
After replacing the water filter, press ‘YES’ on the touch screen to reset the reminder.
What should I do if the brewer keeps shutting off?
If your brewer keeps shutting off, ensure that it is plugged into a dedicated outlet and that the power cord is intact. Try performing a hard reset by unplugging the machine for 30 seconds and plugging it back in.
Conclusion
With these step-by-step troubleshooting steps, you can fix most issues with your Keurig K-200 coffee maker and get back to brewing your favorite drinks. Regular maintenance, such as cleaning, descaling, and ensuring that the water reservoir is properly seated, can help extend the lifespan of your brewer and keep it running smoothly for years to come. If the issue persists after troubleshooting, don’t hesitate to reach out to Keurig customer support for assistance.
Here’s a concise table summarizing the troubleshooting steps for the Keurig K-200:
| Problem | Solution |
|---|---|
| Power Issues | – Check the power cord and plug. |
| – Reset the brewer by unplugging for 30 seconds. | |
| – Try a different outlet. | |
| Brewing a Partial Cup | – Ensure the water reservoir is full and properly seated. |
| – Clean the exit needle and descale if needed. | |
| Touch Screen Alerts | – “More Water Please” – Clean reservoir and reseat. |
| – “Sorry, Brew Interrupted” – Perform a rinsing brew. | |
| – “Sorry, There is a Problem” – Clean entrance needle. | |
| Descaling | – Use Keurig® Descaling Solution and follow the descaling cycle steps. |
| Grounds in Your Coffee | – Clean the entrance and exit needles with a paperclip. |
| Brewer Not Brewing | – Ensure the K-Cup® pod is properly placed and the water reservoir is filled. |


0 Comments